Printer Troubleshooting
If you have already tried or established the settings below you can select them now.
Power On/off:
Power Troubleshooting:
Power Cycle Attempted:
Epson Self Test:
Printer Driver Present in Windows:
Driver Install Attempted:
Cable Connection Established:
Cable Replacement Attempted:
SPOT Troubleshooting:
Cable Connection Type: USBLPT
Test Page from Windows: YesNo
Spare LPT/USB Cable tried: YesNo
Printer Make/Model: Epson TM-T88IVEpson TM-T88VEpson TM-T88VIEpson TM-T90
Select your printer type...
Report Printer
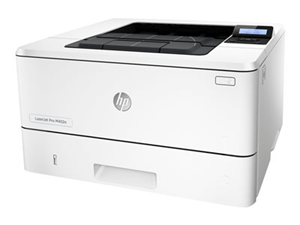
Invoice Printer
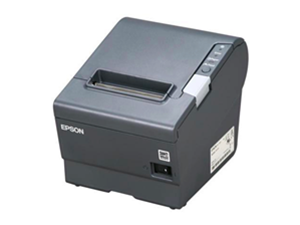
Tag Printer
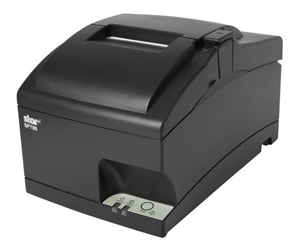
Zebra Printer
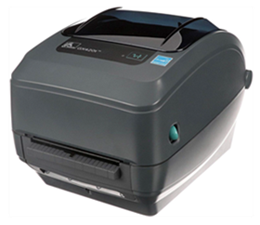
Give us your voice!
Unfortunately this section is not ready. Click the vote button below to add your voice to the priority.
Great!
Thanks for taking the time to give us some feedback.
Does the printer driver show in windows? (Make sure it is the Windows default printer.)
Need help?
To begin, you will need to navigate to devices and printers.

Type Control Panel.
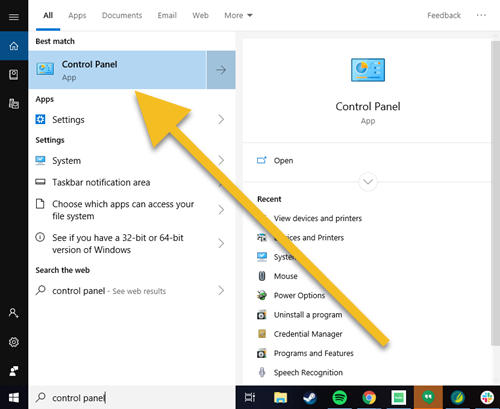
Select Control Panel.

Select View devices and printers.
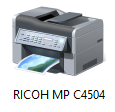
Look for your printer driver.
By default, this is usually named after the printer make/model.
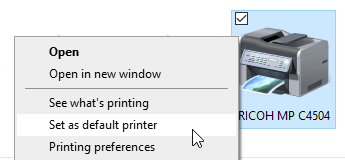
Right click the driver and select Set as default printer
Does the driver work in windows?
Need help?
To begin, you will need to navigate to devices and printers.
Type Control Panel.
Select Control Panel.
Select View devices and printers.
Look for your printer driver.
By default, this is usually named after the printer make/model.
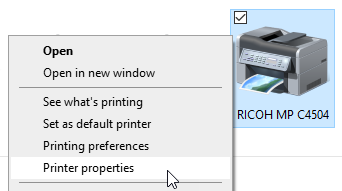
Right click the driver and select Printer properties.
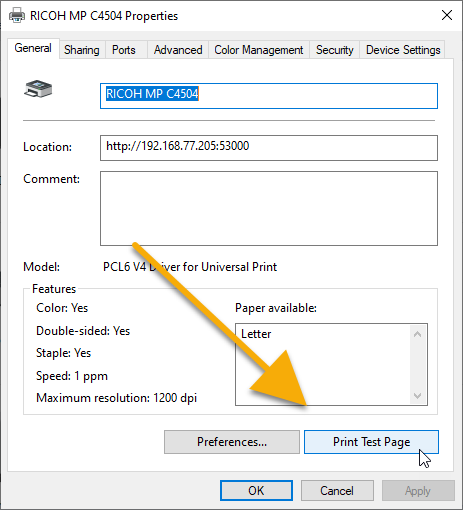
Select Print Test Page.
Is there power to the printer?
Lets try to power cycle the printer then the PC.
Need help?
This means that we need to turn the printer off, then the computer. Once both have fully powered down, turn on the computer then the printer.
Don't worry! Your progress will be here when you get back.
Let's see if we can fix the power. After troubleshooting, does the power work?
Need help?
If the power is not working, it usually comes down to three things:
1. The power cable to the printer is not connected.
Check the back of printer. Unplug the power cable and plug it back in.
Check the power cable is securely plugged into an outlet.
2. The power outlet is not functioning correctly.
You can test the outlet by plugging in other electronics that have confirmed power. If the power is working for the tested device, try step three. If it is not, try another outlet.
3. The power cable is not functioning.
Try using a different power cable.
Unfortunately you will need to contact your printer manufacturer. Unless you are under the SPOT 30 day warranty.
Need help?
Contact information:
HP: 1 (650) 857-1501
Brother: (877) 276-8437
If you are under the SPOT warranty with your HP m402n laserjet, please contact SPOT Support Support@Spotpos.com.
Looks like we hit a snag. Please contact SPOT Support. One of our support specialist will be happy to help!
Need help?
For immediate assistance you can call us at 801-208-2210. Monday - Friday: 5am - 6pm MT, Saturday 8:00 AM to 5:00 PM MT
Otherwise email us at Support@Spotpos.com.
Is there a print job in queue?
Need help?
Sometimes windows has trouble processing a print job. This can cause print jobs to get backed up in the queue.
To see if a print job is in queue navigate to devices and printers:
Type Control Panel.
Select Control Panel.
Select View devices and printers.
Look for your printer driver.
By default, this is usually named after the printer make/model.
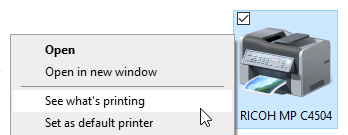
Right click on your printer driver and select See what's printing.
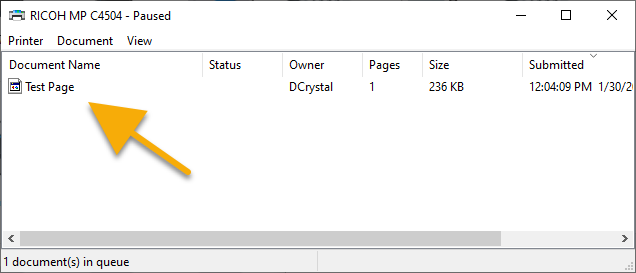
If there is a print job in queue you will see it listed here.
We need to clear print spooler!
Need help?
To make sure that there are no printer jobs stuck in queue we need to clear the print spooler A printer spooler is a small application that manages the paper printing jobs sent from a computer to a printer or print server. It enables storing multiple print jobs within a print queue or a buffer where it’s retrieved by the printer or print server..
To begin we need to open Windows Command Prompt:
Navigate to the windows search bar and type cmd.
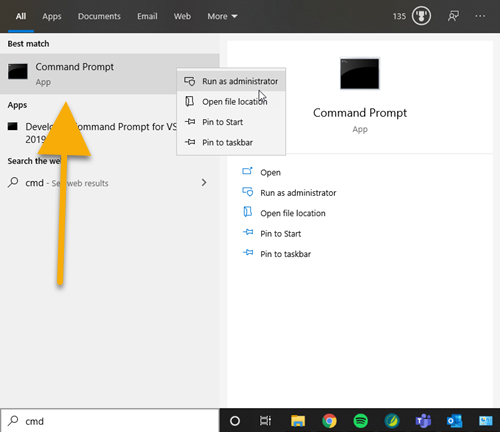
Right-click Command Prompt then select Run as administrator.

You should now have a black box pop-up.
Press this button:
Then use your keys CTR + V to paste into the command prompt window.
-OR-
Use the following commands in the command prompt window:
net stop spooler
icacls %systemroot%\system32\spool\printers\ /grant:r *S-1-1-0:F /T /C /Q
del /F /Q %systemroot%\system32\spool\printers\*
net start spooler

The end result should look like this.
Warning!: It is important that the spooler restarts or nothing will print. If you do NOTsee this:

You will need to run the command 'net start spooler' again. If the spooler does not start successfully you may need to reboot the PC.
Once you have completed the commands, you can close the window.
What kind of printer cable do you have?
Need help?
You will need to check the printer for the cable that connects it to the PC.
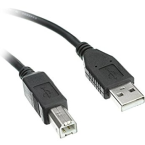
The most common cable will look like this. This is a USB cable.
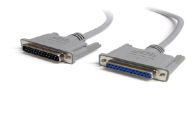
This is a LPT (Parallel) cable.
Lets check the connection of your LPT cable.
Need help?
Your cable should look like this.
1. Unscrew the cable from the printer using the hand twist then disconnect the wire.
2. Then unscrew the cable from the PC and disconnect it.
3. Once the cable is disconnected, we will need to reconnect it to both the PC and the printer. Secure it with the hand twists.
Lets check the connection of your USB cable.
Need help?
This should be what your cable looks like.
1. Disconnect the end attached to the printer, then the end attached to the PC.
2. Reconnect the cable to the back of the printer, then the PC.
Does it work in SPOT?
Need help?
Lets try printing a report from SPOT.
Any report located under Reports > Reports Gallery should be able to print. Pick a report and use the print function.
Lets try printing an invoice from SPOT.
Open invoice view for any invoice. Select reprint.
Lets try some things in SPOT.
Need help?
There are a few general settings that we need to check.
To begin we need to make sure the correct windows printer driver is assigned.
Navigate to:
Setup > Program Configuration > Workstation > Hardware Settings > Report Printers > Reports

Right click in the cell for Value > Windows Printer Path.
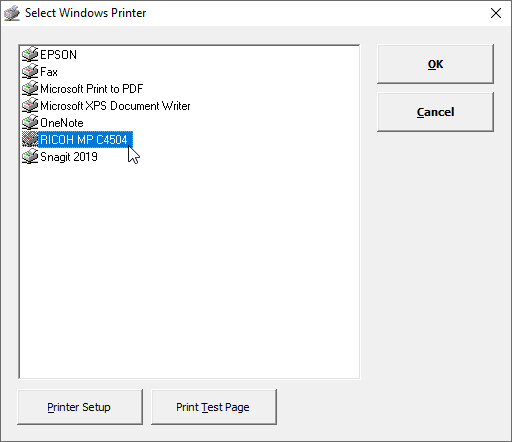
This should give you a Select Windows Printer pop-up.
Select your printer driver. Then select OK.
Next we need to make sure printing is enabled for SPOT.
Navigate to:
Setup > Program Configuration > Workstation > Report Settings > Print to:
This setting should be set to Defined Printer.
Finally the last setting we need to check is the SPOT printer assignment.
Navigate to:
Setup > Program Configuration > Workstation > Report Settings > Printer Assignments: Edit
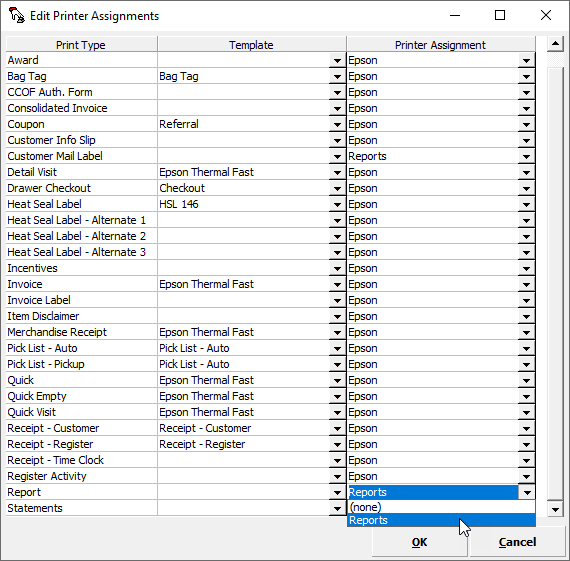
This should give you the Edit Print Assignments pop-up.
Scroll down to the Printer Type: Report.
Select the Printer Assignment and make sure Reports is selected.
Then select OK.
Navigate to:
Setup > Program Configuration > Workstation > Hardware Settings > Printers > Epson

Right click in the cell for Value > Windows Printer Path.
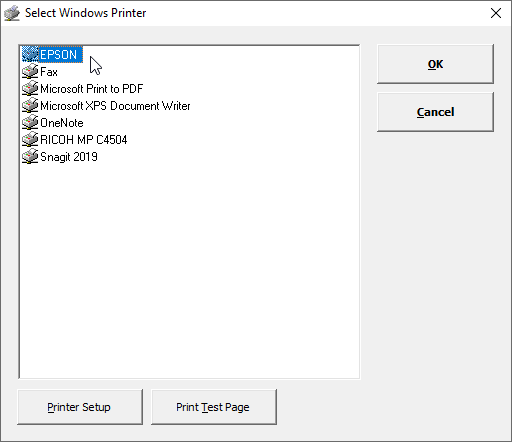
This should give you a Select Windows Printer pop-up.
Select your printer driver. Then select OK.
Next we need to make sure printing is enabled for SPOT.
Navigate to:
Setup > Program Configuration > Workstation > Report Settings > Print to:
This setting should be set to Defined Printer.
Finally the last setting we need to check is the SPOT printer assignment.
Navigate to:
Setup > Program Configuration > Workstation > Report Settings > Printer Assignments: Edit
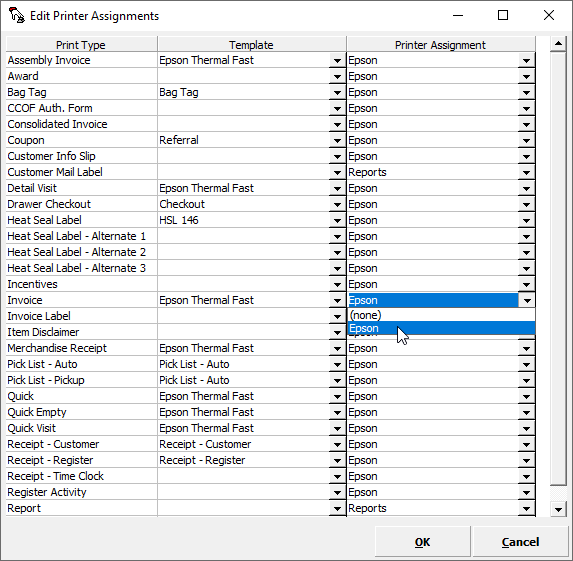
This should give you the Edit Print Assignments pop-up.
Scroll down to the Printer Type: Invoice.
Select the Printer Assignment and make sure Epson is selected.
Then select OK.
Congratulations!
Lets try to install the printer driver.
Need help?
Normally any printer used for SPOT reports should come with an install CD. Use that if you have it.
- OR -
If you purchased the HP Laser Jet Pro M402n from us, you can find the driver here.
For assistance with all other HP printer drivers, click here.
For assistance with Brother printer drivers, click here.
Epson install
To begin, navigate to http://install.spotpos.com/Drivers/Printers/Epson/.
Select the download link APD_456E.Zip. Make sure to download the file to a location you can easily access.
Once downloaded extract the single file and run it.
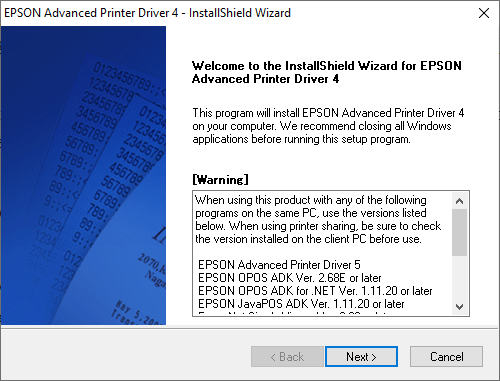
Select Next.
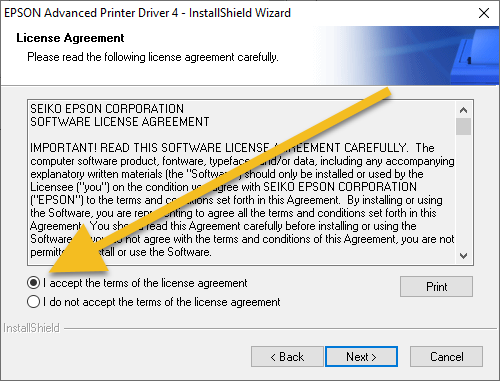
Accept the terms of agreement and then select Next.
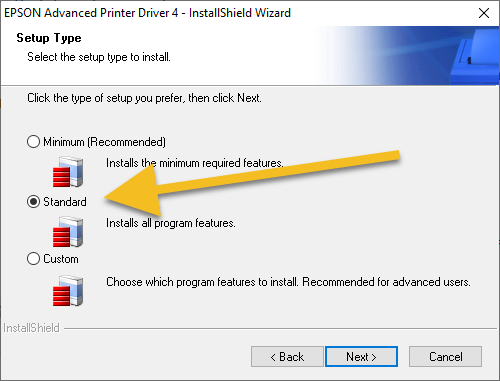
Select Standard, then select Next.
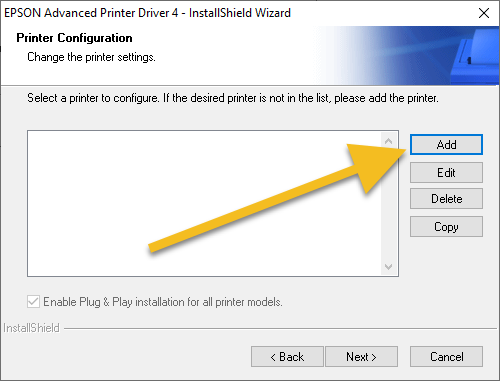
Select Add.
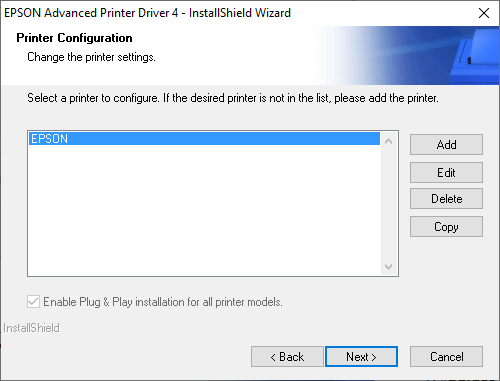
Select Next.
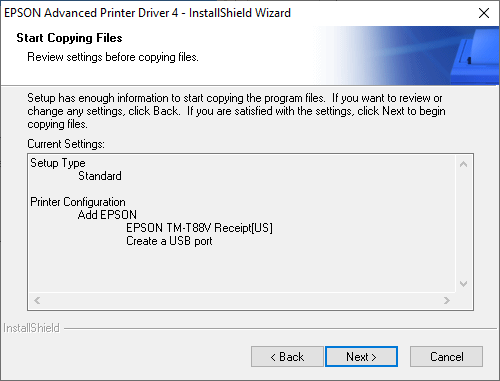
Select Next.
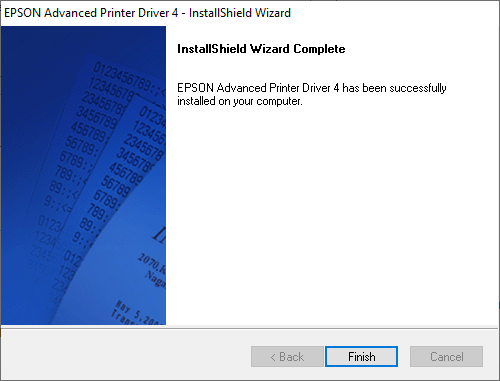
You have now successfully installed the printer driver.
Epson VI Install
To begin you will need to get the installer from the SPOT install site. Click here!
Select the APD_510.zip. Make sure to download the file to a location you can easily access.
Once downloaded extract the files and run it.
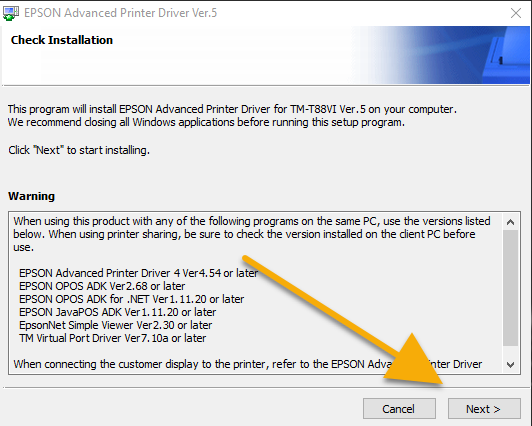
Select Next.
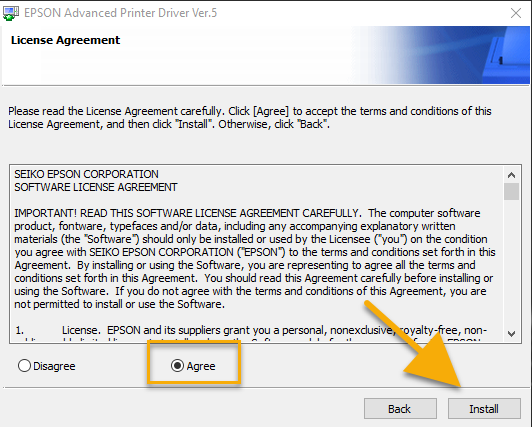
Select Agree then Install.
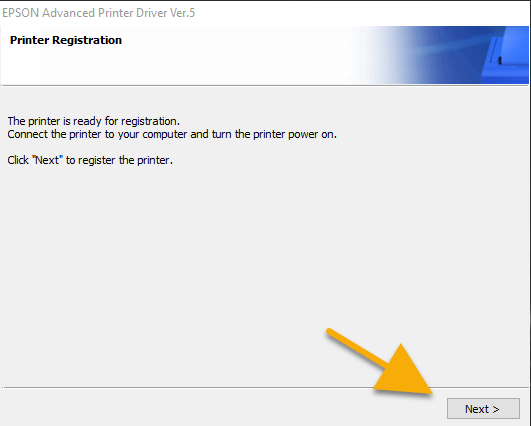
Select Next.
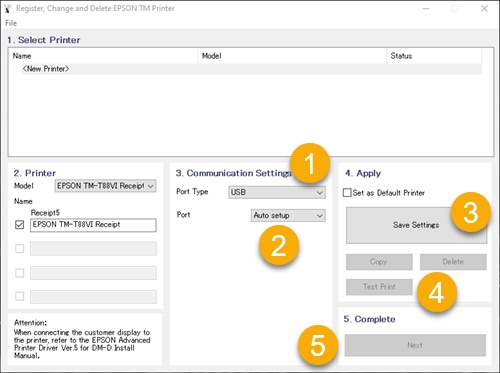
1. Select USB under Port Type.
2. Leave this on Auto Setup.
3. Select Save Settings.
4. Test the printer to make sure everything worked correctly.
5. Select Next.
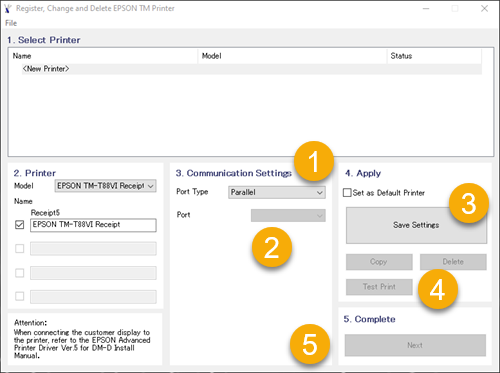
1. Select Parallel under Port Type.
2. Select the Port for your printer. Tip: If you are not sure, you can repeat steps 2-4, selecting a new port until you get a test page.
3. Select Save Settings.
4. Select Test Print.
5. Select Next.
You are finished! Scroll back to the top and select Done.
To verify your installation you will need to navigate to Windows Devices and Printers. You can accomplish this by going to the search bar on the Windows task bar.
To begin, you will need to navigate to Windows Devices and Printers on the computer with the working printer. You can accomplish this by going to the search bar on the Windows task bar.
Type 'control panel'.
Select 'Control Panel'.
Select 'View devices and printers'.
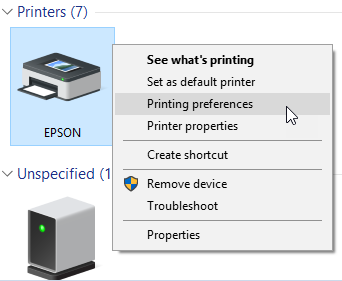
Select your EPSON printer.
If the printer is ready to print, the status will show '0 document(s) in queue'.
To complete the setup you will need to change the page layout in the newly created printer driver in order to match the printing capabilities of SPOT.
Right click your printer driver and select Printing preferences.
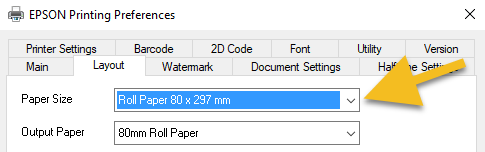
Select the Layout tab then choose User Defined Paper Size.
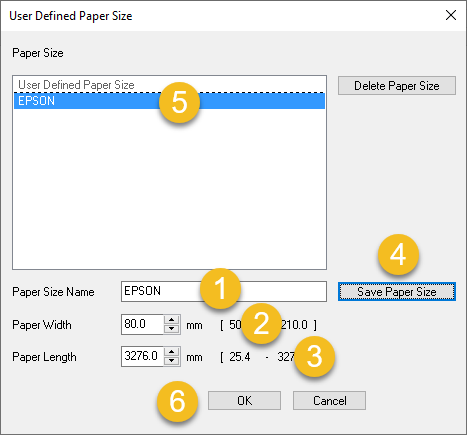
1. Set the name of the layout. EPSON works in most cases.
2. Set the width to 80.
3. Set the Length to 3276.
4. Save the paper size.
5. Make sure your newly created layout is selected.
6. Select OK.
Lets try swapping the USB cable with a spare or one we know already works.
Lets try swapping the LPT cable with a spare or one we know already works.
Select your invoice printer.
Need help?
To find the model of your Epson printer, look at the sticker on the right side of the printer.
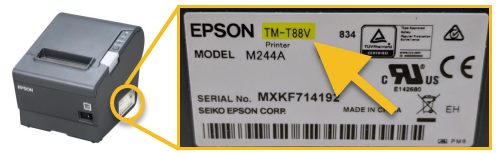
Select your cable.
Need help?
You will need to check the printer for the cable that connects it to the PC.
The most common cable will look like this. This is a USB cable.
This is a LPT (Parallel) cable.
Lets try a self test with your printer. Were you able to get the self test to print?
Need help?
Turn off the printer.
Hold down the feed button.
Turn on the printer.
Release the feed button once something prints automatically.
Press the feed button once so something else prints out and the error light stops blinking, taking it out of self-test mode.
Turn the printer off then back on to exit self test mode.
Did you find this helpful?


Great!
Thanks for taking the time to give us some feedback.
Thanks for your feedback.
Want to tell us more?
Send an email to our authors to leave your feedback.