Production Commitments shows you how many pieces you have promised for each production day, live, as orders are quicked and detailed. SPOT counts committed pieces per promised date, warns the counter at Quick when a day passes the capacity you set, and shows the running totals in the Production Commitment grid on the Home Page Alerts tab.
You can run it for a single store, or as a central plant with several drop stores feeding one set of production numbers.
This article walks the setup in order: choose a mode, set your capacity numbers, wire the price table, then read the grid. Two related tools, the per-day Production Commitment Setup grid and Production Promised Dates, come at the end.
Choose a mode
Production Commitments has two modes. Pick one before you touch any settings, because the price table setup is different for each.
Standard | Advanced | |
|---|---|---|
Counts pieces by | Department, using the load amounts on each department | Sponsor, assigned per department and inherited by its categories and items |
Capacity numbers live in | Price table > Departments | Sponsor Groups and Sponsors, with optional per-store overrides |
Per-store views (Stores in Sponsor, This Store) | No | Yes |
Item-level detail in the grid | No | Yes, with Show Itemized Detail |
Best for | A single plant that wants a daily piece count per department | Plants that want item-level detail (“how many DC pants are committed Thursday”) or per-store views |
Standard is the default. Advanced is more work to configure but is the only way to see commitments by item or by store.
Prerequisites
Capacity numbers: for each department (Standard) or each sponsor and sponsor group (Advanced), decide the piece count you can comfortably produce in a day and the absolute maximum. Leaving these at 0 turns the warnings off; the grid still counts pieces.
Price tables: every price table in use needs the settings in this article applied.
Program Configuration access: the settings live under Setup > Program Configuration.
Standard mode
Standard mode needs only two numbers per department in each price table.
Path: Setup > Program Configuration > Company > Mark-in Settings > Price Tables > price table > Departments > department
Caution Load Amount: the number of pieces you can comfortably produce for this department in one day. When a quick pushes a day past this number, SPOT raises the caution flag.
Maximum Load Amount: the most your plant could produce for this department in one day. Past this number SPOT raises the maximum flag.
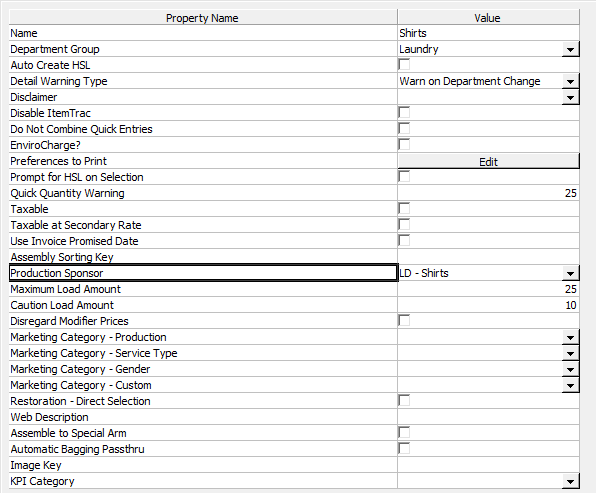
Repeat for every department in every price table you use, and leave Production Commitment Mode at Standard under Company > Production Settings.
That is the whole Standard setup. Skip to Reading the Production Commitment grid.
Advanced mode
Advanced mode counts pieces into Sponsors instead of departments. A sponsor is a bucket. You assign one to each department in the price table, and group sponsors into Sponsor Groups so that quicked orders, where SPOT only knows the department, still land somewhere sensible.
How sponsors and sponsor groups work together
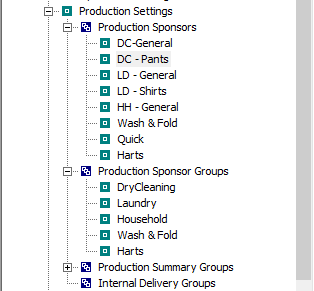
At Quick, SPOT knows the department but not the items, so the pieces are counted into the department’s Sponsor Group. When the order is detailed, the pieces move from the group into the Sponsor assigned to the department, category or item.
Example layout:
Department Group | Department | Sponsor | Sponsor Group |
|---|---|---|---|
Dry Cleaning | Mens Dry Cleaning | DC - General | DryCleaning |
Dry Cleaning | Pants | DC - Pants | DryCleaning |
Laundry | Shirts | LD - Shirts | Laundry |
Laundry | Misc. Laundry | LD - General | Laundry |
Household | HouseHold | HH - General | Household |
With this layout:
You quick 100 laundered shirts. The grid shows 100 pieces under Laundry for the promised date.
You detail 50 of them. The grid now shows 50 under Laundry and 50 under LD - Shirts.
Detail the rest and Laundry drops to 0 while LD - Shirts reads 100.
You can see both how many laundry pieces are in production and how many of them are shirts, for any promised day.
Step 1: Company Production Settings
Path: Setup > Program Configuration > Company > Production Settings
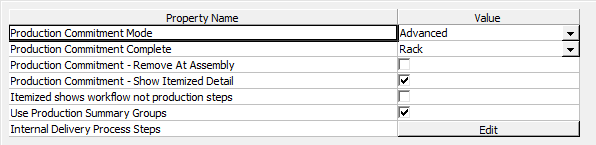
Production Commitment Mode: set to Advanced. Selecting Advanced is only the start; the remaining steps are required before anything shows up.
Production Commitment Complete: by default an order leaves the commitment grid when it is scanned to Ready. To remove pieces earlier, select an in-process step between Detail and Ready. If you scan orders at a Rack or Bagging step, pick that step and the pieces drop off the grid when the order is scanned there. Leave it at None to keep the default.
Production Commitment - Remove At Assembly: removes pieces from the commitment as soon as they are scanned onto assisted assembly or an automated assembly conveyor. This overrides the setting above.
Production Commitment - Show Itemized Detail: turn this on. When you select a cell in the commitment grid, SPOT shows item detail instead of an invoice search.
Itemized shows workflow not production step: with Show Itemized Detail on, the detail view shows each item’s current workflow step instead of its production step status. Leave this off if you use ProductionTrac.
Advanced only
Production Commitment Complete, Remove At Assembly and Show Itemized Detail have no effect in Standard mode. SPOT labels each of them “Advanced Mode Only”.
The same node also holds Use Production Summary Groups and Internal Delivery Process Steps. They belong to the Production Summary screen and the Internal Delivery feature, not to the commitment grid.
Step 2: Create Sponsor Groups
Path: Setup > Program Configuration > Company > Production Settings > Production Sponsor Groups
A sponsor group is the parent bucket that quicked pieces land in. Select the node, choose Add, and create one per department group you want to track, for example DryCleaning, Laundry and Household.

Name: shown on the Home Page grid and in reports.
Default Caution Piece Count: the number of pieces at which the caution flag is raised during quick receive. If you can comfortably produce 500 pieces of dry cleaning a day, enter 500.
Default Maximum Piece Count: the number of pieces at which the maximum flag is raised during quick receive. Once a day reaches this count, SPOT offsets the promised date for further orders.
Step 3: Create Sponsors
Path: Setup > Program Configuration > Company > Production Settings > Production Sponsors
Sponsors are the detail-level buckets. Create one for each thing you want a separate count for, such as DC - Pants, DC - General, LD - Shirts and LD - General.

Name: shown on the Home Page grid and in reports.
Abbreviation: short name for the sponsor. Optional.
Default Caution Pieces: the caution piece count for this sponsor. Used unless a store overrides it (Step 5).
Default Maximum Pieces: the maximum piece count for this sponsor. Used unless a store overrides it.
Sponsor Group: the group this sponsor belongs to. SPOT uses the group to consolidate sponsor totals during quick receive.
Step 4: Wire the price table
Path: Setup > Program Configuration > Company > Mark-in Settings > Price Tables > price table > Departments > department
Do this for every price table in use.
On each Department, set Production Sponsor to the sponsor that represents the department, for example LD - Shirts on the Shirts department.
Leave Caution Load Amount and Maximum Load Amount at 0 on each department. In Advanced mode the sponsor numbers replace them.
For a finer split, set Production Sponsor on a category or item below the department. A blank sponsor inherits from the level above it.
Step 5: Store settings
Path: Setup > Program Configuration > Store > Production Settings
Stores use the company sponsor numbers unless you override them here. SPOT notes these settings “are used only if” the company mode is Advanced.

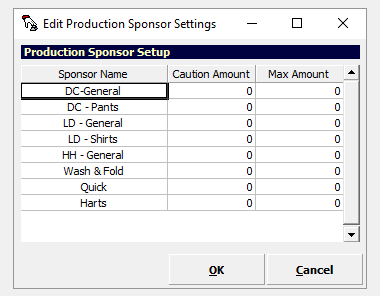
Production Sponsor Settings: choose Edit to open the Production Sponsor Setup grid, one row per sponsor with a Caution Amount and Max Amount. Enter a store-specific number to override the company default for this store. Leave a row at 0 to inherit.
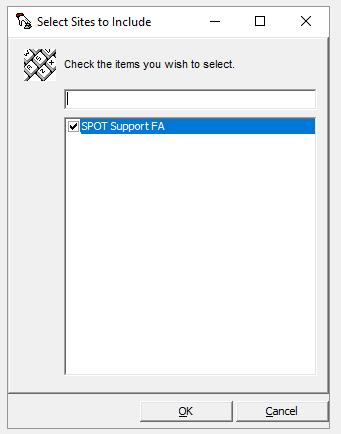
Sites to Include: choose Edit and tick each site (plant or store) whose totals should be included when this store views Production Commitment totals. A drop store that only wants its own orders plus the plant’s ticks just those two.
Production Promised Date Tracks Promised Date: controls what happens to an order’s production promised date when you change its promised date by hand. Checked: the production promised date follows every manual change. Unchecked, the default: it follows only when the new promised date is earlier; a later date leaves the production promised date alone, and you move it yourself if you want it moved. Changing the production promised date never changes the promised date.
Which number wins
In Advanced mode SPOT looks for a load amount in this order: the store’s Production Sponsor Settings, then the company Production Sponsor, then the company Production Sponsor Group, and finally the price table. The first value it finds is the one it uses.
Reading the Production Commitment grid
Path: Home Page > Alerts tab, or Menu > Production Tracking > Production Commitment
The lower half of the Alerts tab is the Production Commitment grid. Rows are your sponsor groups and sponsors (departments in Standard mode) with a Totals row, columns are the coming production days, and each cell is the committed piece count for that day. Select a cell to drill into the orders behind it. With Show Itemized Detail on, you see the items instead.
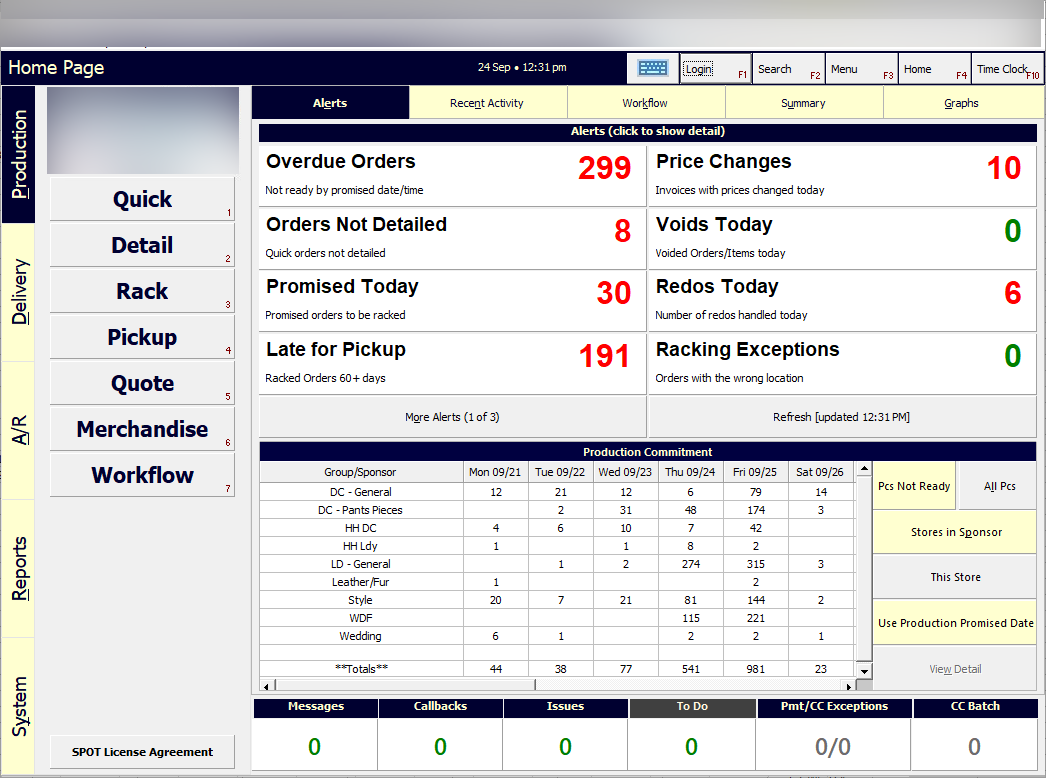
The buttons beside the grid change what is counted:
Pcs Not Ready / All Pcs: count only pieces still in production, or every piece committed to that day.
Stores in Sponsor: totals for every store in the sponsor group. Advanced mode.
This Store: only the current store’s orders. Advanced mode.
Use Production Promised Date: date the columns by production promised date instead of the promised date you gave the customer (see Production Promised Dates below).
View Detail: open the detail view for the selected cell.
Orders leave the grid when they reach Ready, or earlier if you set Production Commitment Complete or Remove At Assembly. Closing a restoration order also removes it.
The flags at Quick
The Caution and Maximum numbers do their work at quick receive. When a quick pushes a day past the Caution count for that department’s sponsor group, SPOT raises the caution flag so the counter can offer a later promised date before the order is saved. Past the Maximum count, SPOT raises the maximum flag and offsets the promised date for further orders on that day. If you leave both numbers at 0, no flags are raised and the grid simply counts.
Production Commitment Setup: per-day caps
Path: Menu > Configuration > Production Commitment
This grid is the simplest way to cap a day by weekday.
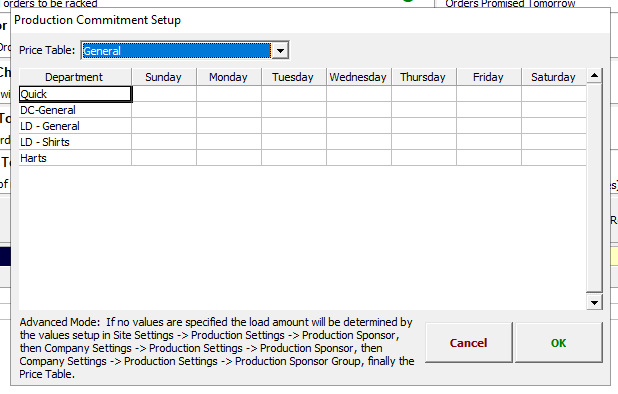
Select the Price Table.
Each row is a department in Standard mode, or a sponsor in Advanced mode. Enter the number of pieces you will accept for Sunday through Saturday.
Choose OK.
Once a day reaches its cap, further orders promised for that day are moved ahead to the next production day. If Monday allows 500 shirt laundry pieces, piece 501 promised for Monday moves to Tuesday. Wednesday can be set to 700 if you have more capacity mid-week.
Blank cells
In Advanced mode a blank cell means SPOT falls back to the store sponsor settings, then the company sponsor, then the sponsor group, then the price table, in that order. The dialog says so in its footer.
Production Promised Dates
Path: Setup > Program Configuration > Company > Mark-in Settings > Price Tables > price table > Production Promised Dates
A production promised date is a second date on the order, separate from the promised date you give the customer. It lets production run on its own schedule, for example promising the customer Friday while committing the plant to Thursday. Each price table can hold one or more named schedules.
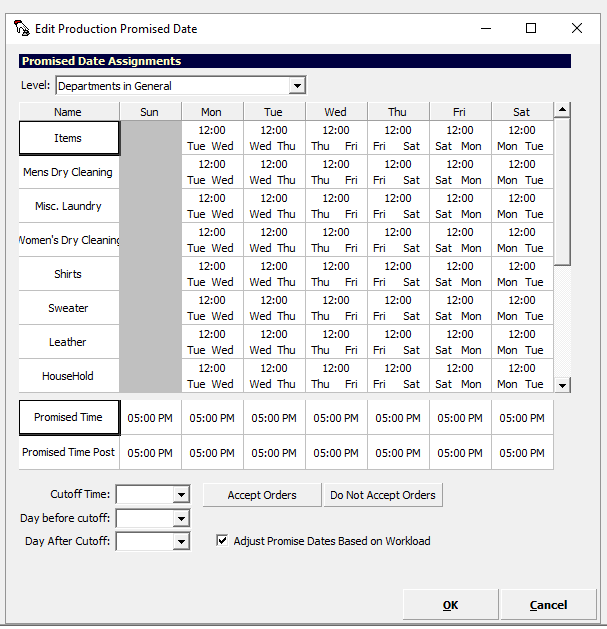
Select Production Promised Dates, choose Add, and give the schedule a Name.
On Production Promised Date, choose Edit to open the Promised Date Assignments grid.
Choose the Level, for example the departments in the price table. Each row is a department, each column a weekday, and each cell holds a cutoff time and the production day that orders quicked before and after that cutoff are promised for.
Set Promised Time and Promised Time Post, and the Cutoff Time, Day before cutoff and Day After Cutoff defaults.
Use Accept Orders / Do Not Accept Orders to block a day.
Leave Adjust Promise Dates Based on Workload checked if you want SPOT to push production promised dates out when a day is over its commitment.
Choose OK.
The Use Production Promised Date button on the Alerts tab grid and on the Production Summary screen switches those views to this date.
Related screens
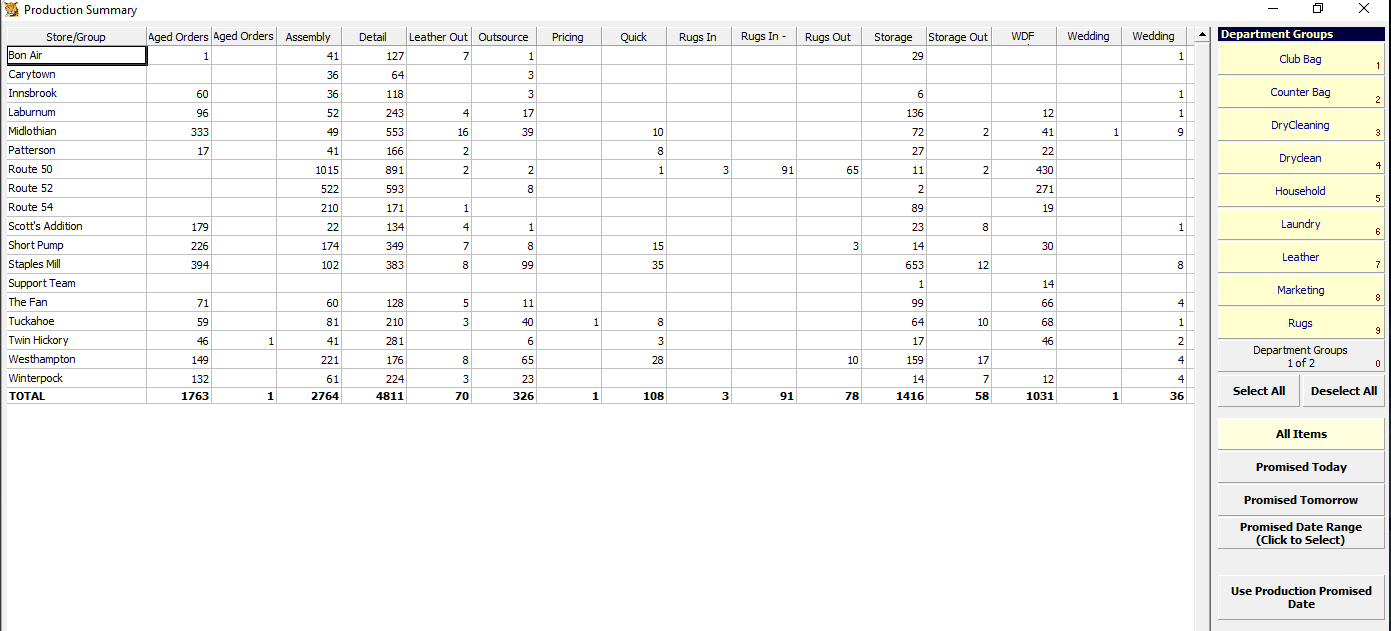
Menu > Production Tracking > Production Summary: one row per store, or per Production Summary Group when Use Production Summary Groups is on under Company > Production Settings, with piece counts per process step, filtered by department group and promised date.
Reports > Reports Gallery > Production: there is no single commitment report. Pieces Due - By Date, Orders Promised by Date and Production Completion cover the same ground on paper.