Sometimes windows has trouble processing a print job. This can cause print jobs to get backed up in the queue.
To see if a print job is in queue navigate to devices and printers:

Type Control Panel.
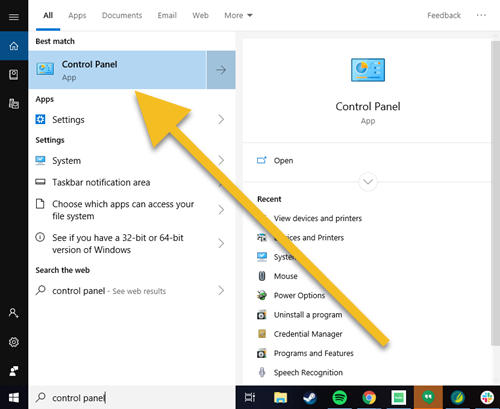
Select Control Panel.
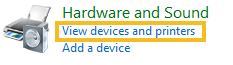
Select View devices and printers.
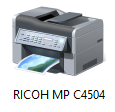
Look for your printer driver.
By default, this is usually named after the printer make/model.
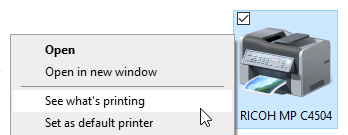
Right click on your printer driver and select See what's printing.
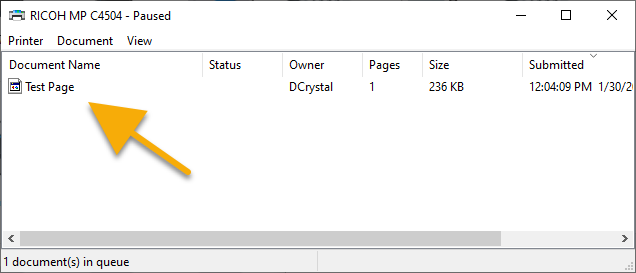
If there is a print job in queue you will see it listed here.
We need to clear print spooler!
To make sure that there are no printer jobs stuck in queue we need to clear the print spooler A printer spooler is a small application that manages the paper printing jobs sent from a computer to a printer or print server. It enables storing multiple print jobs within a print queue or a buffer where it’s retrieved by the printer or print server..
To begin we need to open Windows Command Prompt:
Navigate to the windows search bar and type cmd.
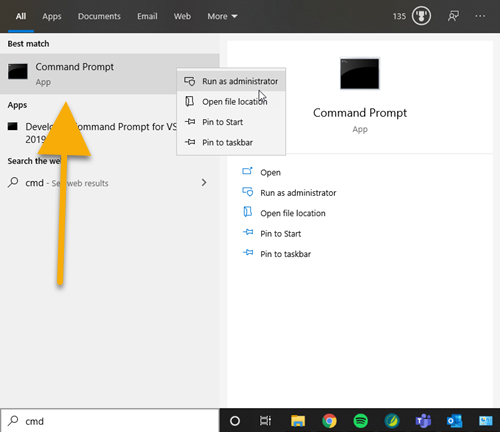
Right-click Command Prompt then select Run as administrator.
![]()
You should now have a black box pop-up.
Then use your keys CTR + V to paste into the command prompt window.
-OR-
Use the following commands in the command prompt window:
net stop spooler
icacls %systemroot%\system32\spool\printers\ /grant:r *S-1-1-0:F /T /C /Q
del /F /Q %systemroot%\system32\spool\printers\*
net start spooler
![]()
The end result should look like this.
Warning!: It is important that the spooler restarts or nothing will print. If you do NOTsee this:

You will need to run the command 'net start spooler' again. If the spooler does not start successfully you may need to reboot the PC.
Once you have completed the commands, you can close the window.
What kind of printer cable do you have?
Need Help?
You will need to check the printer for the cable that connects it to the PC.
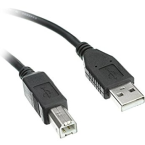
The most common cable will look like this. This is a USB cable.
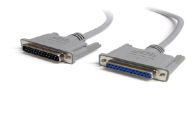
This is a LPT (Parallel) cable.
Lets check the connection of your LPT cable.
Need help?
Your cable should look like this.
1. Unscrew the cable from the printer using the hand twist then disconnect the wire.
2. Then unscrew the cable from the PC and disconnect it.
3. Once the cable is disconnected, we will need to reconnect it to both the PC and the printer. Secure it with the hand twists.
Lets check the connection of your USB cable.
Need help?
This should be what your cable looks like.
1. Disconnect the end attached to the printer, then the end attached to the PC.
2. Reconnect the cable to the back of the printer, then the PC.
Does it work in SPOT?
Need help?
Lets try printing a report from SPOT.
Any report located under Reports > Reports Gallery should be able to print. Pick a report and use the print function.
Lets try printing an invoice from SPOT.
Open invoice view for any invoice. Select reprint.
Lets try some things in SPOT.
Need help?
There are a few general settings that we need to check.
To begin we need to make sure the correct windows printer driver is assigned.
Navigate to:
Setup > Program Configuration > Workstation > Hardware Settings > Report Printers > Reports

Right click in the cell for Value > Windows Printer Path.
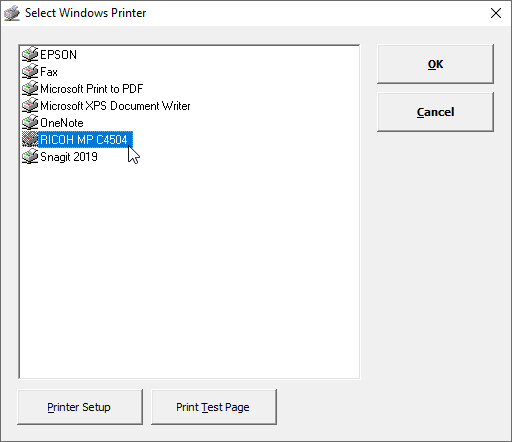
This should give you a Select Windows Printer pop-up.
Select your printer driver. Then select OK.
Next we need to make sure printing is enabled for SPOT.
Navigate to:
Setup > Program Configuration > Workstation > Report Settings > Print to:
This setting should be set to Defined Printer.
Finally the last setting we need to check is the SPOT printer assignment.
Navigate to:
Setup > Program Configuration > Workstation > Report Settings > Printer Assignments: Edit
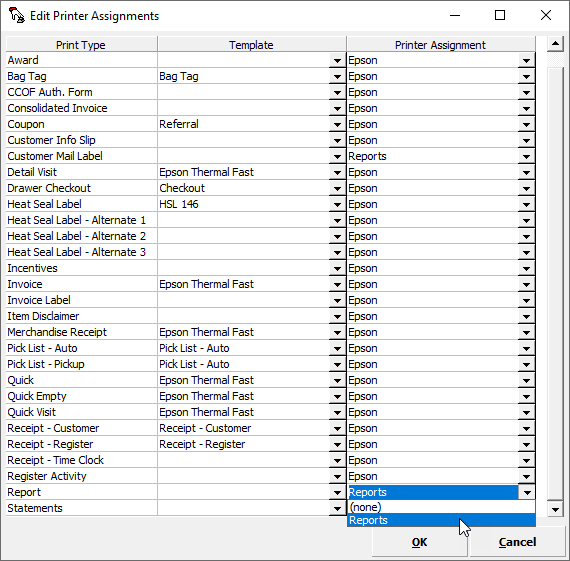
This should give you the Edit Print Assignments pop-up.
Scroll down to the Printer Type: Report.
Select the Printer Assignment and make sure Reports is selected.
Then select OK.
Navigate to:
Setup > Program Configuration > Workstation > Hardware Settings > Printers > Epson

Right click in the cell for Value > Windows Printer Path.
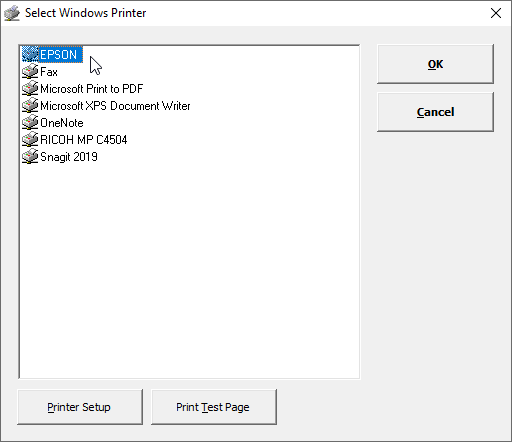
This should give you a Select Windows Printer pop-up.
Select your printer driver. Then select OK.
Next we need to make sure printing is enabled for SPOT.
Navigate to:
Setup > Program Configuration > Workstation > Report Settings > Print to:
This setting should be set to Defined Printer.
Finally the last setting we need to check is the SPOT printer assignment.
Navigate to:
Setup > Program Configuration > Workstation > Report Settings > Printer Assignments: Edit
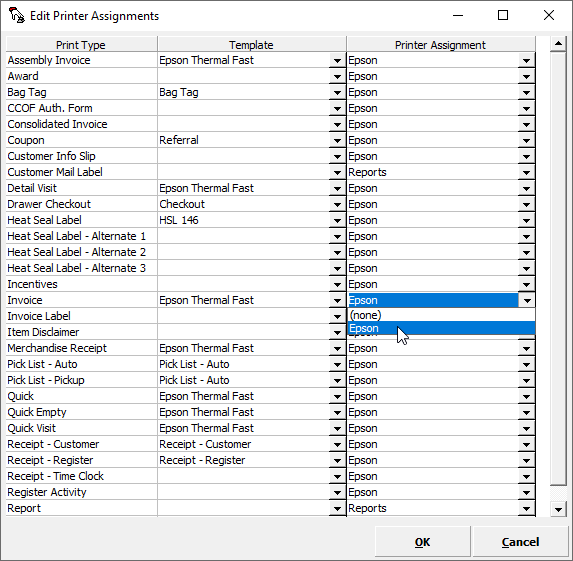
This should give you the Edit Print Assignments pop-up.
Scroll down to the Printer Type: Invoice.
Select the Printer Assignment and make sure Epson is selected.
Then select OK.
Congratulations!
Lets try to install the printer driver.
Need help?
Normally any printer used for SPOT reports should come with an install CD. Use that if you have it.
- OR -
If you purchased the HP Laser Jet Pro M402n from us, you can find the driver here.
For assistance with all other HP printer drivers, click here.
For assistance with Brother printer drivers, click here.