To complement SPOT, there are a few pieces of hardware that round out any operation.
Setup
Invoice Printers
Invoice printers are the backbone of printing in SPOT. These are used to print everything from a customer claim check during quicks, to a credit card receipt at pickup. The most common type of printer for this job is a thermal printer. A thermal printer uses a special kind of paper that reacts to heat so there is no ink required. The most common brand of thermal printer that SPOT works with is EPSON.
Invoice Printer Type and Cables
Before you begin working with your printer it is important to identify the printer type and connection method(cable). Epson printers will have a sticker located on the right side. The top line will give you the type.
.png "image(115).png")
In this case, and most commonly, you will be dealing with an EPSON TM-T88V.
Now that you have the type of printer, you will need to identify the connection method. At minimum you will have two cables attached to the back of your printer, one should be the power cable that plugs into an outlet, the other will be the cable that attaches your printer to your computer.
.png "image(116).png")
In the case that you have another cable, it most likely belongs to your cash drawer. See Cash Drawer for more information.
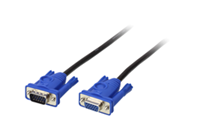
To help identify what kind of cable you are using, you can check the images below.
.png)
.png)
.png)
Once you have connected the appropriate cables, you will need to install the printer driver in Windows.
Invoice Driver Setup for Windows
Before getting set up in SPOT it is important to install the printer driver in Windows. The printer driver allows the printer to properly communicate with the computer and SPOT.
For EPSON driver type TM-T 88IV, 88V, and 90, you will need to use the APD installer.
To begin, navigate to http://install.spotpos.com/Drivers/Printers/Epson/.
Select the download link APD_456E.Zip. Make sure to download the file to a location you can easily access.
Once downloaded extract the single file and run it.
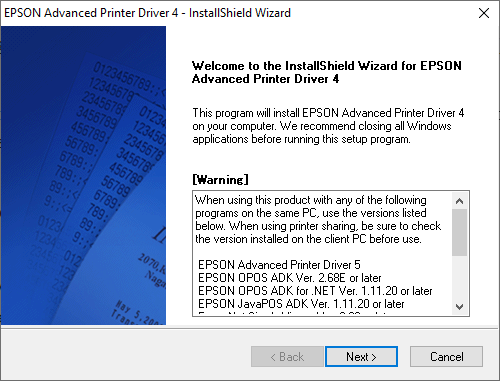
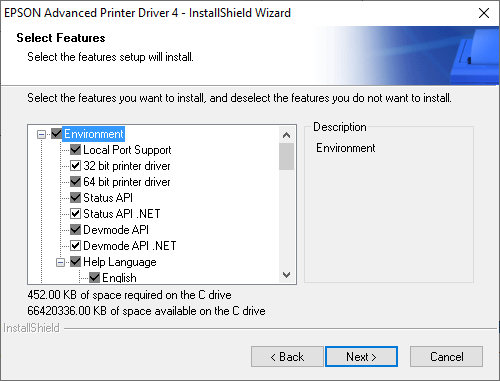
Select 'Next'.
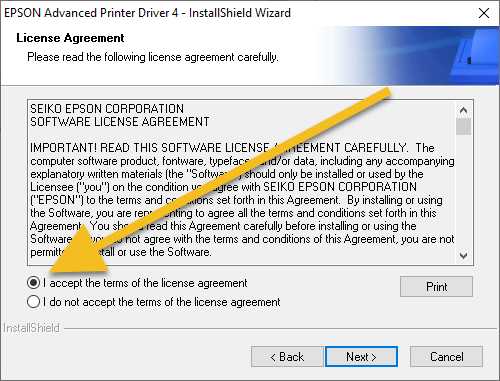
Accept the terms of agreement and then select 'Next'.
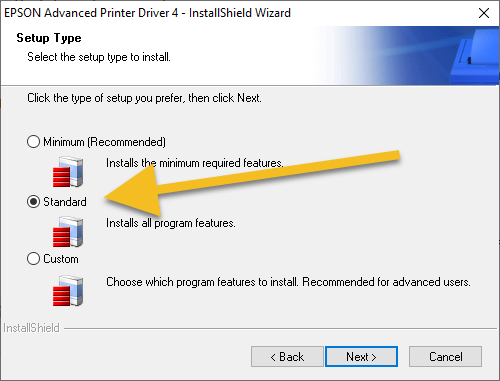
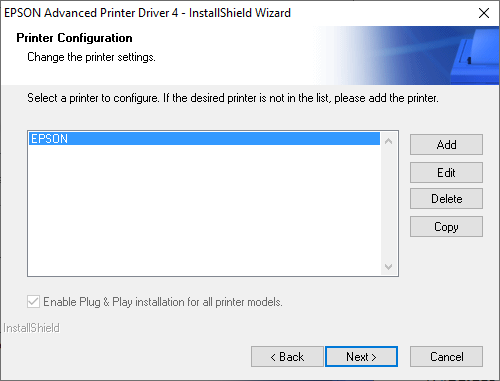
Select Standard, then select next.
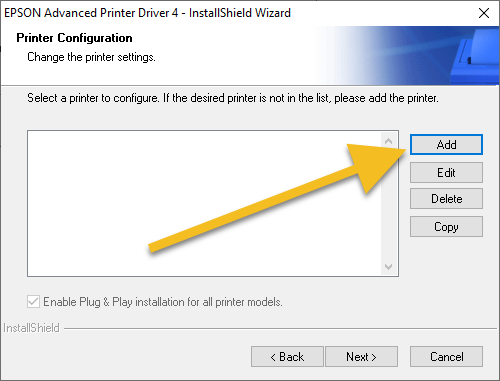
Select 'Add'.
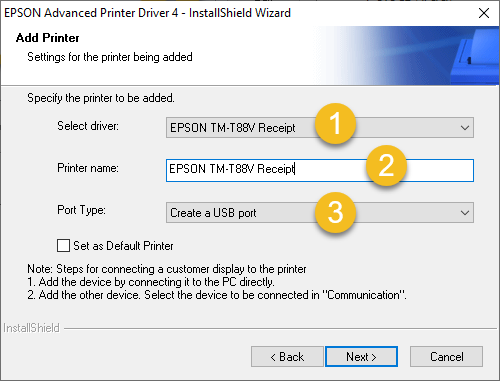
Select driver: This will be the printer type found on the right side of the printer.
Printer name: Change if needed. Tip: SPOT support technicians will by default shorten the name to 'EPSON'. This will assist with internal testing if required.
Port Type: Select the connection cable type. Tip: If you are unsure, refer to Invoice Printer Type and Cables.
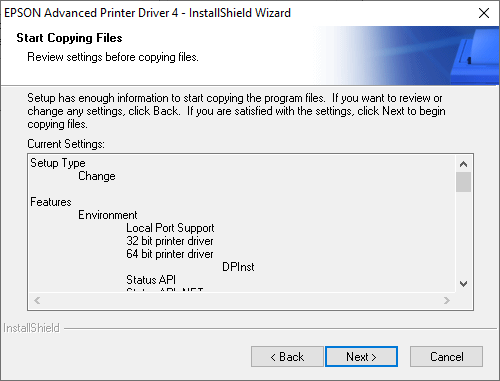
Select 'Next'.
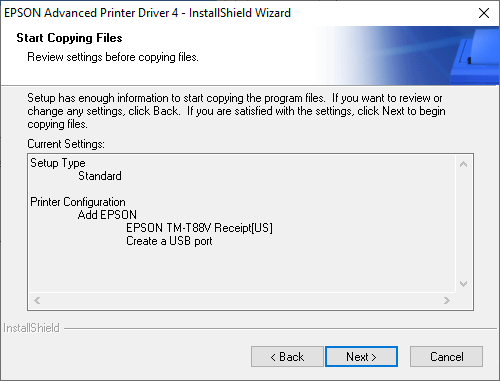
Select 'Next'.
You have now successfully installed the printer driver.
To verify your installation you will need to navigate to Windows Devices and Printers. You can accomplish this by going to the search bar on the Windows task bar.
To begin, you will need to navigate to Windows Devices and Printers on the computer with the working printer. You can accomplish this by going to the search bar on the Windows task bar.

Type 'control panel'.
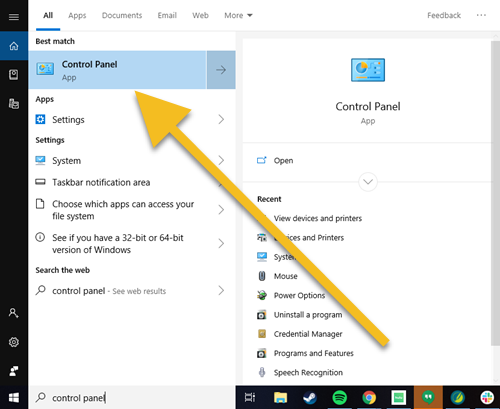
Select 'Control Panel'.
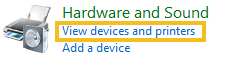
Select 'View devices and printers'.
Select your EPSON printer.
If the printer is ready to print, the status will show '0 document(s) in queue'.
To complete the setup you will need to change the page layout in the newly created printer driver in order to match the printing capabilities of SPOT.
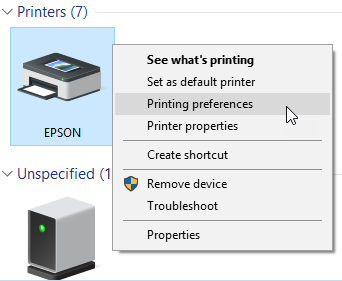
Right click your printer driver and select 'Printing preferences'.

Select the ‘Layout' tab then choose 'User Defined Paper Size'.
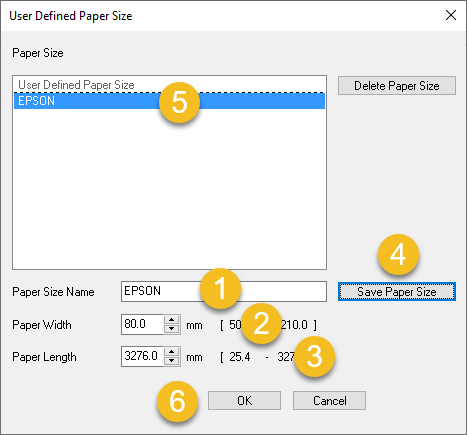
Set the name of the layout. 'EPSON' works in most cases.
Set the width to '80'.
Set the Length to '3276'.
Save the paper size.
Make sure your newly created layout is selected.
Select 'OK'.
Congratulations! You are now ready to set up the printer in SPOT.
Invoice Printer Setup in SPOT
Once you have your printer driver setup in Windows, you are able to set it up in SPOT.
With SPOT open, navigate to:
Setup > Program Configuration > Workstation > Printers
Select your printer.

Right click inside the 'Value' box next to 'Windows Printer Path'.
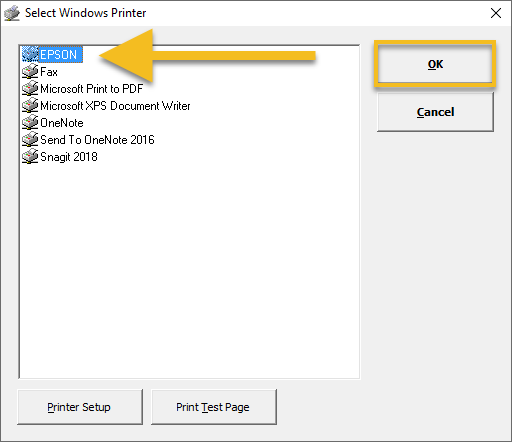
Select your Windows printer driver. Then select 'OK'.
This completes your invoice printer setup! You can now exit program configuration and test your new printer.
Tag Printers
Tag printers are used to generate slips of paper that are then fastened to garments for later identification. These printers use toner ribbon, this ink must be indelible. The most commonly used tag printer for SPOT is the Star SP700.
.png "image(120).png")
Tag Printer Setup In Windows
To set up your tag printer driver in Windows you will want to navigate to Devices and Printers.
To begin, you will need to navigate to Windows Devices and Printers on the computer with the working printer. You can accomplish this by going to the search bar on the Windows task bar.
.png "image(121).png")
Type 'control panel'.
.png "image(122).png")
Select 'Control Panel'.
.png "image(123).png")
Select 'View devices and printers'.
.png "image(124).png")
Select add printer.
.png "image(125).png")
Select 'The printer that I want isn't listed'.
.png "image(126).png")
Choose ‘Add local printer of network printer with manual settings’. Then select next.
.png "image(127).png")
Under 'Use existing port:' select the port that is applicable.
LPT1 or LPT2 should be selected if you have a parallel cable.
USB00(x) should be selected if you have a USB cable.
After you have chosen your port, select next.
Tip: It is possible to change the port after the driver is created. This will allow you to use test print function to identify your correct port.
To help identify what kind of cable you are using, you can check the images below.
.png)
.png)
.png "image(130).png")
Under 'Manufacturer', select 'Generic'.
Under 'Printer', select 'Generic / Text Only'.
.png "image(131).png")
In most cases you will want to name the printer 'Tag'.
Once you have named the printer, select 'Next'.
.png "image(132).png")
Select 'Finish'.
.png "image(133).png")
To verify it is working, right click on your new tag printer driver and select 'Printer properties'.
.png "image(134).png")
Print a test page to confirm your printer driver has the correct port selected.
If you are not able to get a test print, try navigation to the 'Ports' tab and changing your printer port to a similar one. (LPT1 to LPT2, USB001 to USB002, etc.)
.png "image(135).png")
If you have a USB connected tag printer you will need to navigate to the 'Sharing' tab.
Select 'Share this printer'.
Leave the 'Share Name' as the original tag printer name. Then click 'OK'.
Congratulations! You have successfully installed your tag printer driver!
Net Use
With a USB tag printer there is an additional step. Since SPOT is unable to designate a USB port for a tag printer a Net Use command has to be created. This command is used to pass a command from one port to another.
Note: You only need to take this step with a USB connected tag printer.
To begin, open up Notepad in Windows. You can accomplish this by going to Search on the Windows task bar.
.png "image(136).png")
Type 'Notepad'.
.png "image(137).png")
Select the 'Notepad' app.
.png "image(138).png")
In Notepad type the following:
Net Use /d
Net use lpt1 \\%computername%\Tag /P:Y
If your tag printer has another shared name besides 'Tag' you will need to replace that section of the second line. For instance if your share name is 'TG1' instead of 'Tag' the second line would look like this:
Net use lpt1 \\%computername%\TG1 /P:Y
Once you have the text in place, you will need to save the file as a '.bat'.
.png "image(139).png")
Select 'File', then 'Save As...'.
.png "image(140).png")
Select 'Desktop' on the left. Then change the name to 'Tag Fix.bat'.
Click 'Save'.
You should now have an icon on your desktop:
.png "image(141).png")
Double click the icon. A black command window will flash on screen.
You are now ready to setup your USB tag printer in SPOT!
Tag printer setup in SPOT
To setup your tag printer in SPOT you will need to navigate to:
Setup > Program Configuration > Workstation > Tag printers
Select 'Tag'.
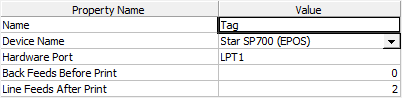
Name: Leave this as 'Tag'.
Device Name: Set this to 'Star SP700 (EPOS)'
Hardware port: This is the port assigned to you Windows printer driver. LPT1 or LPT2. (Or the port assigned in the Net Use command created for USB printers.)
Note: SPOT will only print to LPT1 or LPT2, you will have to adjust the port numbers in Windows if your printer is using a higher-numbered port.
With those settings completed, the tag printer will now be able to communicate with SPOT.
Before you can start printing, you will need to make sure that the tag printer is assigned to the tag profile in the workstation settings, navigate to:
Setup > Program Configuration > Workstation > Tagging Settings > Tag Printer Assignments > Edit
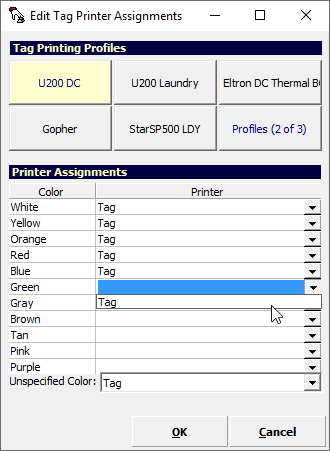
Select each tag profile and assign the tag printer to each color, including the 'Unspecified Color:'.
WARNING! If multiple tag printers and/or profiles are in use at this station you may want to contact SPOT support at Support@Spotpos.com for further assistance.
Cash Drawers
Automatic cash drawers are a must-have for any company that plans on handling cash transactions. These cash drawers can operate in conjunction with SPOT if set up properly.
.png "image(142).png")
The simplest and most common setup for an automatic cash drawer is to be connected to a thermal printer already connected to the computer.
.png "image(143).png")
Windows Printer Driver
To facilitate the cash drawer being connected through the EPSON printer, an additional EPSON printer driver has to be setup for exclusive use of opening the cash drawer.
Because this install requires a prior printer driver, please make sure you have already installed your EPSON printer. See Invoice Driver Setup Windows for instructions on how to install your initial EPSON printer driver.
To begin setting up the printer driver for your cash drawer, open the EPSON APD installer.
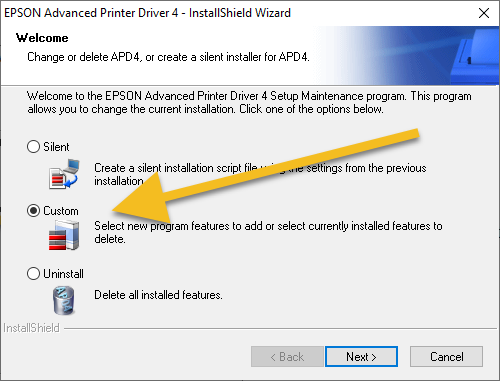
Select 'Custom'. Then 'Next'.
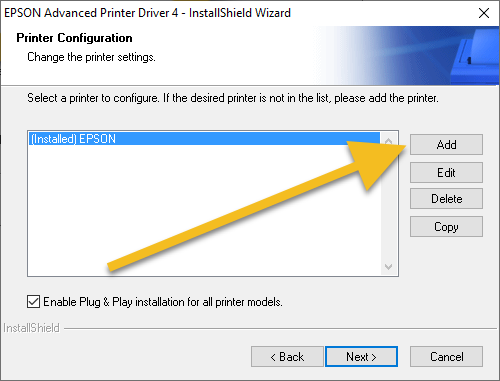
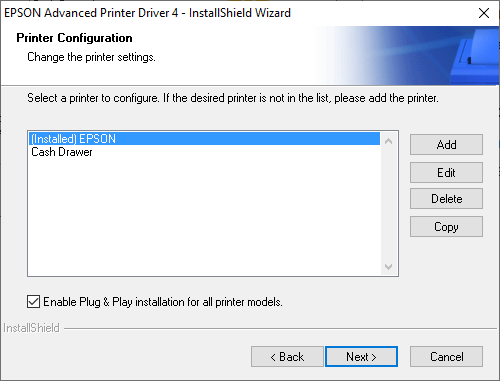
Select 'Add'.

1. Select driver: Select the same printer type as your EPSON printer.
2. Printer name: Set the 'Printer name' to 'Cash Drawer'
3. Port Type: Set this to 'Share with EPSON'. Keep in mind that 'EPSON' is the name you created when installing the initial printer driver.
Select 'Next'.
Select 'Next'.
Select 'Next'.
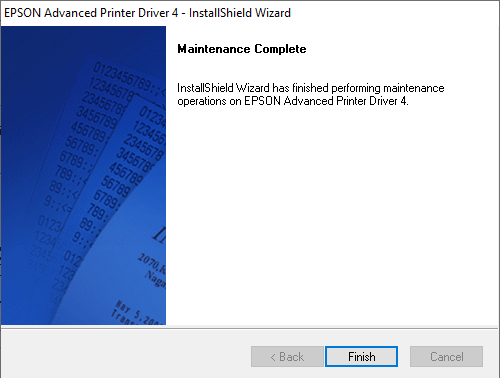
Once the install has completed, select 'Finish'.
Now that the driver has completed the installation, you will need to change a few of the printer driver settings in order for it to work in SPOT. You can accomplish this by going to the search bar on the Windows task bar.
To begin, you will need to navigate to Windows Devices and Printers on the computer with the working printer. You can accomplish this by going to the search bar on the Windows task bar.
Type 'control panel'.
Select 'Control Panel'.
Select 'View devices and printers'.
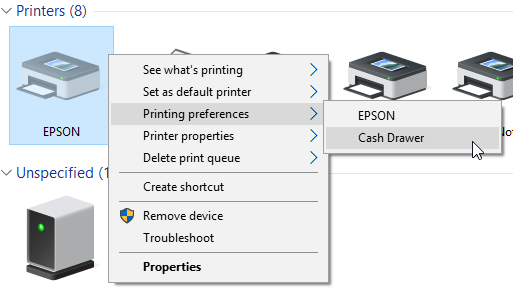
Right click on your EPSON printer driver, hover over preferences, and select Cash Drawer.

Navigate to the 'Document Settings' tab.
Select Paper 'Source'.
From the list below, select:
'Document[NoFeed,NoCut]'
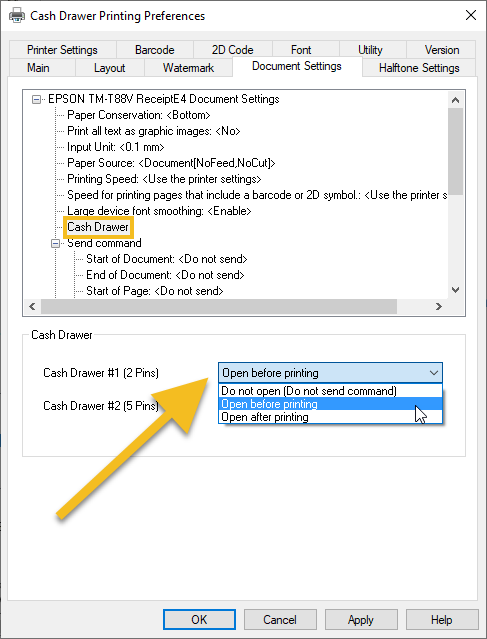
Next select 'Cash Drawer'.
In the drop down for 'Cash Drawer #1 (2 Pins])' select 'Open before printing'.
Then click 'OK' to save the driver preferences.
Congratulations! You have completed the cash drawer driver setup in Windows.
SPOT Cash Drawer Setup
After the cash drawer printer driver has been set up in Windows, the next step is setting the cash drawer up in SPOT.
To begin, navigate to:
Setup > Program Configuration > Workstation > Cash Drawers
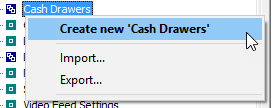
Right click 'Cash Drawers' and select 'Create new 'Cash Drawers'.
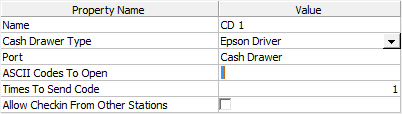
Name: In most cases, multiple cash drawers will be set up in SPOT. It is recommended to give them a number scheme such as 'CD 1', 'CD 2', etc.
Cash Drawer Type: Set this to 'Epson Driver'.
Port: This must match the cash drawer printer driver name exactly.
ASCII Codes To Open: This should be a single space.
Times to Send Code: This can remain at 1.
You can now Save the Program Configuration.
Congratulations! Your cash drawer is now ready to be checked in.
Cash Drawer Checkin/Checkout
Checkin
After the setup in SPOT but before it can be used, a cash drawer must be checked in.
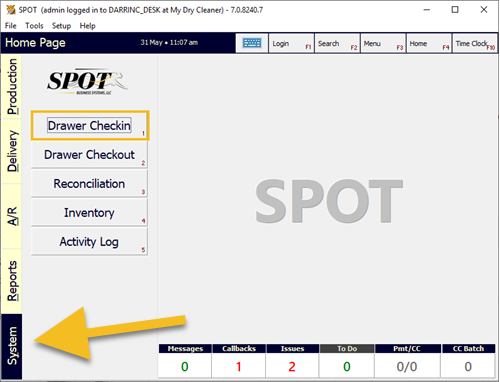
Navigate to the 'System' tab from the home page, then select 'Drawer Checkin'.
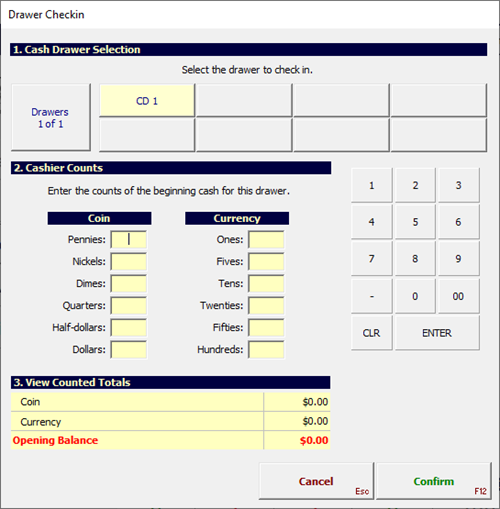
Select the drawer you would like to check in.
(Optional) Input the drawer counts for cash and coin.
Verify counted totals.
Confirm your cash drawer check in. You are now ready to complete financial transactions in SPOT.
Socket Mobile 7xi
The Socket CHS 7Xi is a cordless handheld scanner designed for mobility. It’s certified by Apple for iOS devices, but is also compatible with Blackberry, Android, and Windows. Capable of decoding both 1D and 2D symbologies, the Socket CHS 7Xi works with practically any smartphone or tablet and provides a convenient solution for mobile business applications requiring industrial-class scanning performance in a compact, highly portable scanning device.
This scanner needs to be paired with Bluetooth.
There should not be any further configuration needed.
You can find the Socket Mobile PDF here
.png "image(144).png")
Touch Screen
Touch screens are a commonly used tool in the drycleaning industry. The most commonly used with SPOT are ELO Touch screens.
.png "image(145).png")
Touch Screen Install
To begin, you will need to identify what cables you are using. There should be three cables that come out of the touch screen monitor. One cable will always be the power cord.
The second cable will be the VGA cord.
In some rare cases, this can be an HDMI or DVI cable.
The third cable is the important one to identify. To help identify what kind of cable you are using, you can check the images below.
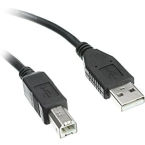
USB cable.
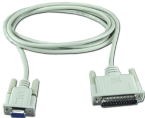
Serial cable.
Once you have all your cables connected and identified you will need to install the touch screen driver.
The ELO touch screen driver can be found here: http://install.spotpos.com/Drivers/Video/TouchScreen/ELO/Standard%20Drivers/
Select the link with the '.zip' at the end. Make sure to select a download location you can easily find. Once you extract the files, you can run the 'Setup.exe'.
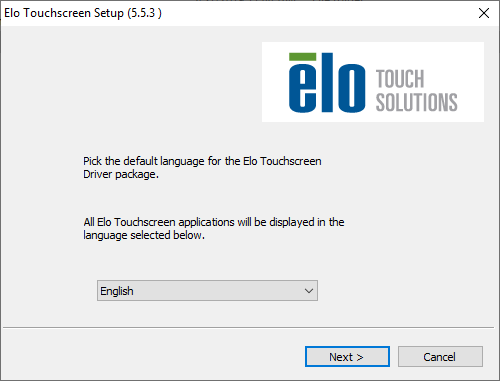
Select 'Next'.
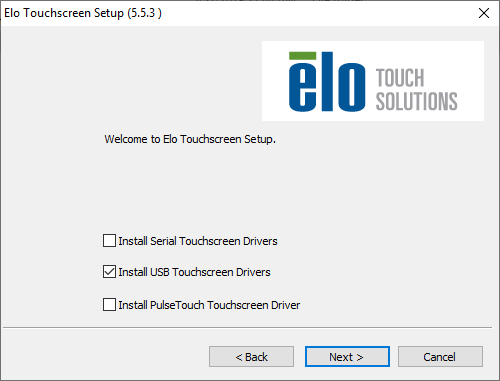
Select the driver option based on the third cable you identified earlier.
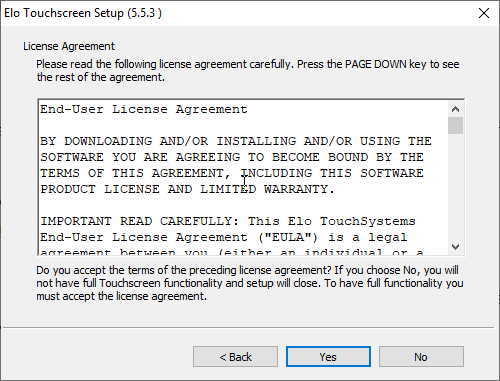
Accept the license agreement.
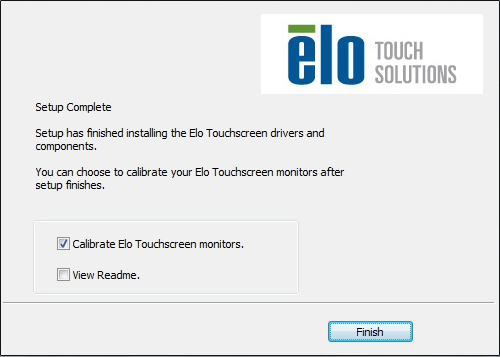
If installed correctly, it should give you an option to run the calibration at the end of the install. Make sure it is checked and select 'Finish'. Follow the calibration prompts.
Tip: If you are installing a serial connected monitor, and the install does not prompt for calibration, you will need to uninstall and reinstall the driver, selecting a different COM port.
Congratulations! Your touch screen is now set up and ready for use.