Order Process & Settings
This section covers the basic life cycle of an invoice from start to finish. This process involves many settings; however, only the most commonly used settings are described in this section.
Overview
Quick
This step is used to produce a quick receipt based on clothing type, allowing the customers to leave the store quickly and have a date/time by which they can expect to return and retrieve their garments. Keep in mind this step is optional; it is possible to start an order at Detail.
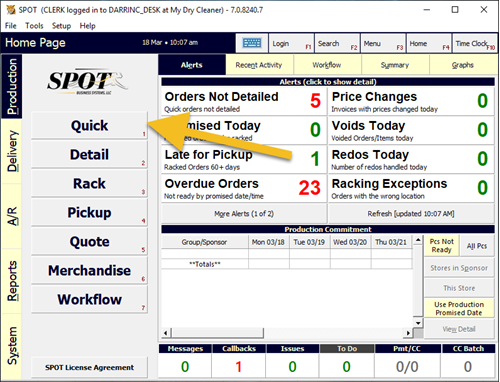
To begin, click 'Quick' or press 1 on your keyboard while on the SPOT home page.
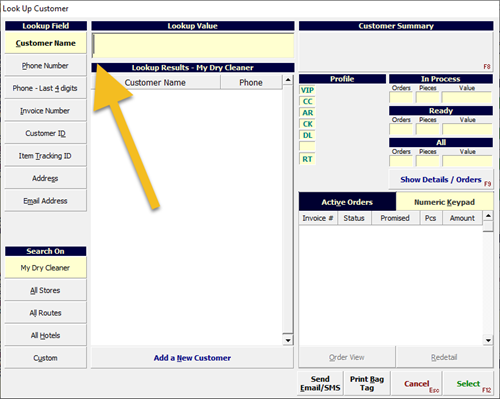
Begin searching for the customer by typing in the 'Lookup Value' box. The most common search criteria are customer name or phone number.
When searching by name, be sure to begin with the customer's last name.
To search by phone number, begin typing the 10-digit number.
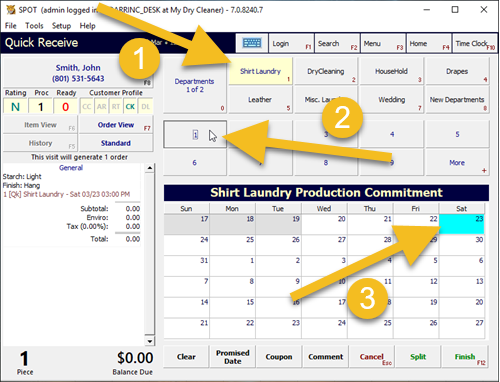
Select the 'Department'.
Select the correct amount of items for the customer.
Select the due date if needed.
Once completed, two items will print by default:
The bag ticket/quick ticket. This should be placed in the bag with the customer's clothes as it will be used to quickly identify the customer during the Detail session.
The customer claim check. This should be given to the customer who will use this claim check at pickup.
Common Settings
Company Settings
Setup > Program Configuration > Company > Mark-in Settings
Split Settings > Edit
Quantity - Quick: When creating Quicks, orders will be split when the piece count exceeds the MaxPieceCount defined for the department group.
Enable Quick Receive: If set to No, users will be unable to use the 'Quick' function in the SPOT Home Page. This is set to Yes by default.
Prompt For Pickup After Quick/Detail: If set toYes, the user will be given the opportunity to go directly into Order Pickup upon completion of the Quick and Detail functions if the customer has ready orders available for pickup.
Store Settings
Setup > Program Configuration > Store > Mark-in Settings
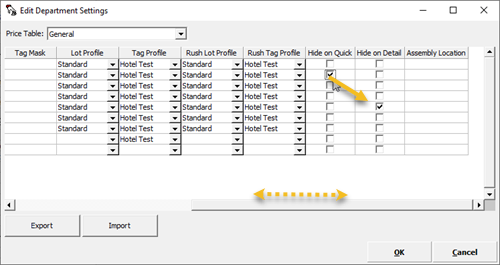
Department settings > Edit

Select your price table.
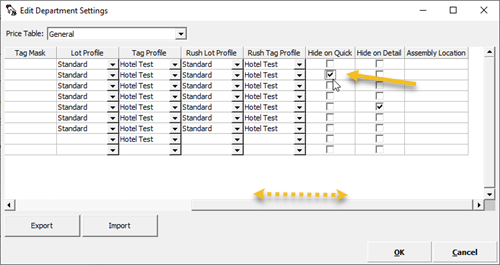
Scroll to the right.
Hide on Quick: This will remove the selected department from the Quick screen.
Use Single Promised Date on Quick Override: If this setting is enabled, any promised date override on the Quick screen will be remembered and applied for other Quick entries added during the Quick mark-in session.
Require Quick Receive: If this setting is activated, Detail cannot take place without a Quick.
Workstation Settings
Setup > Program Configuration > Workstation > Mark-in Settings
Print Visit on Quick: This setting allows a Quick to be printed.
Print or Email Visit info: This will either let you choose to always print, email, or text when a Quick/Detail is finished or have a prompt that lets you choose each time.
Prompt for Counter/Route Order: This will alert the user at the time of Quick/Detail if the customer is a Route customer, allowing a counter order to be created as necessary.
Setup > Program Configuration > Workstation > Report Settings > Printer Assignments > Edit
Quick: Here you can choose what printer and template this workstation uses at 'Quick'.
Detail
Similarly to Quick, the clerk will need to select a customer (or existing Quick ticket), then select a department. Note that under Detail, there are numerous options to describe each individual garment.
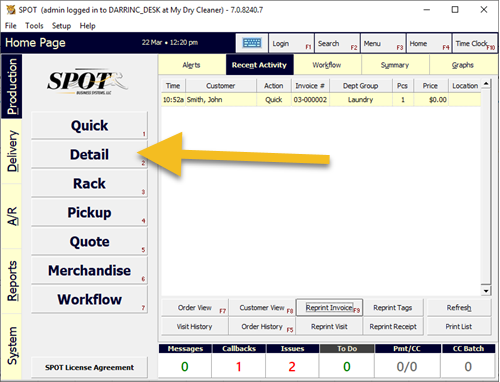
From the home screen, click 'Detail' or press 2 on your keyboard.
After clicking 'Detail', you are brought to the Lookup page.
Here you can type in your customer's information or scan your customer's Quick ticket.
Once you scan the Quick ticket, the system will access the customer's order and you can begin the Detail process.
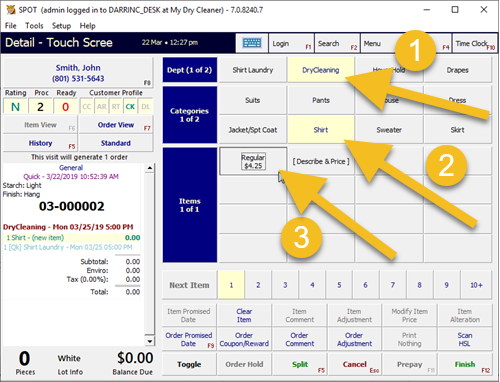
Begin by selecting the department. Then select the category. Finally, select your item. Once the item is selected, you will be able to select its specific descriptors.
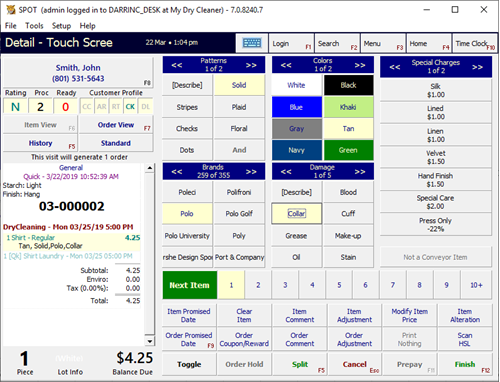
From the modifier page, you can easily define garments based on patterns, colors, and brands.
In addition, you will be able to identify any pre-existing damage and/or assign any special charges (also known as upcharges) based on things like fabric or stains that may require special care for the garment.
Once you are satisfied with the garment description, Select 'Next Item'. Repeat the process for all items in the order.
Once the order is complete and you have verified the information, select 'Finish' or press F12 on your keyboard.
Common Settings
Company Settings
Setup > Program Configuration > Company > Mark-in Settings
Split Settings > Edit
Quantity - Detail: When creating Detail, orders will be split when the piece count exceeds the MaxPieceCount defined for the department group.
Combine like items: If activated, all items marked in with the EXACT same combination of item name, modifiers, upcharges, etc. will be combined into the same line. Any new matching items will simply increment the item quantity of the existing line.
Prompt For pickup After Quick/Detail: If set to Yes, the user will be given the opportunity to go straight into Order Pickup upon completion of the Quick and Detail functions if the customer has ready orders available for pickup.
Allow Item Price Modify: If set to Yes, users can modify the item price in Item View (which is also accessible from the "Item Price" button in the "Touch Screen - Extended" mark-in screen).
Store Setting
Setup > Program Configuration > Store > Mark-in Settings
Auto-Select Quick Department: If set to Yes, the first department present in a Quick ticket will be pre-selected in the mark-in screen when that Quick is detailed.
Department settings > Edit
Select your price table.
Scroll to the right.
Hide on Detail: This will remove the selected department from the Detail screen.
Default Mark-in Method: (Two most common methods)
Touch Screen Extended (Default):This is used with a mouse or touch screen.
Keyboard: Allows quick use of the keyboard to mark-in an order.
Workstation Settings
Setup > Program Configuration > Workstation > Mark-in Settings
Print Invoice on Detail: This allows an invoice to be printed once finished.
Print Visit on Detail: This setting allows a Detail visit to be printed.
Print or Email Visit info: This will either let you choose to always print, email, or text when a Quick/Detail is finished or have a prompt that lets you choose each time.
Prompt for Counter/Route Order: This will alert the user at the time of Quick/Detail if the customer is a Route customer, Allowing a counter order to be created as necessary.
Setup > Program Configuration > Workstation > Report Settings
Printer Assignments > Edit > Detail: Here you can choose the template for this workstation to use at Detail.
Assembly
At the end of production, customers' garments must be assembled. There are two methods to do this in SPOT.
Automatic Conveyor - This method uses a third-party assembly conveyor (e.g., Metalprogetti). Assembly staff scan barcodes on items and place them on the conveyor. Once all items for a particular order are scanned and placed on the conveyor, they will be offloaded automatically. The conveyor communicates with SPOT in real time for accurate order and garment information. For more detail, please see the Automated Conveyors section.
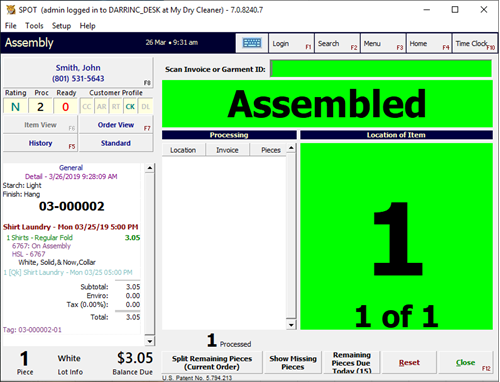
Assisted Assembly - This method allows the assembly staff to scan individual garments and place them on predesignated locations (e.g., hooks or slots). Once all the garments that belong to an invoice are collected, the system is ready to move on to the next step in assembly.
Rack
Now that all of the garments in the order are assembled, the invoice(s) will need to be stored until the customer returns for pickup.
There are two methods in SPOT:
Storage Conveyor - This method allows the clerk to scan an invoice onto a slot on the conveyor. These slots are labeled and will automatically update the location of the invoice in SPOT. It is important to mention that some Storage Conveyors also have unattended Kiosks which allow customers to interact with an automated terminal to retrieve their orders.
Manual Rack - This utilizes the Rack button on the home screen of SPOT. Here the user will enter the invoice number and the ‘Location’.
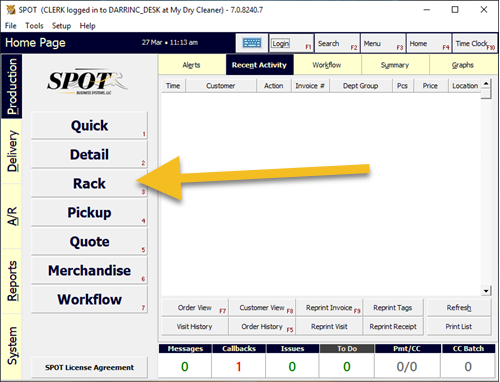
From the home screen, click Rack or press 3 on your keyboard.
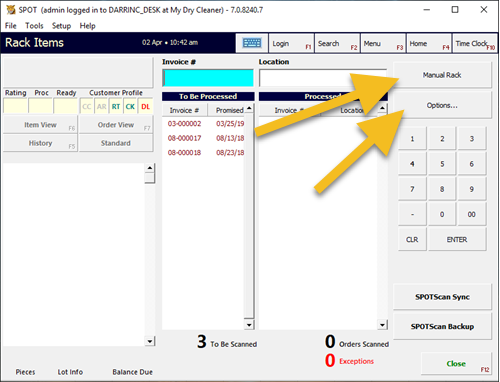
Use the button in the top right to toggle your preset rack locations. See more in the Store Settings below.
To manually define a location, select 'Option' and choose 'Preset Location', then type in your location.
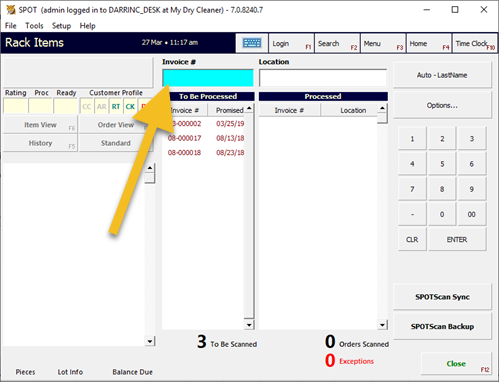
Begin scanning the invoices.
After an order is scanned and assigned to a location, it will be moved from the 'To Be Processed' column to the 'Processed' column.
Common Settings
Company Settings
Setup > Program Configuration > Company > Racking Settings

Disable Multiple Rack Alert: If set to Yes, the user is allowed to rack multiple orders to the same manual rack location. If set to No, the user will be required to resolve the rack location if another active order is already there.
Display Other Rack Locations: If set to Yes, at the time of racking the user will be presented with a list of other rack locations where the same customer has orders racked. The user will have the option to print the list.
Processed Orders New Entries: Select whether new orders in the processed orders list show at the bottom of the list, or the top.
Store Settings
Setup > Program Configuration > Store > Racking Settings
Disable Racking Exception Alerts: Intended to be used with the "Print Exceptions to Invoice Printer". Selecting this option disables the display of all exception alerts that may interrupt the racking process.
Fast Racking: Determines whether the racking screen is streamlined for speed or shows complete information. (Fast racking is forced when using a SPOTScan.)
Print Exceptions to Invoice Printer: If enabled the list of racking exceptions will be printed to the invoice printer.
Warn If Already Racked: If enabled, SPOT will warn the user if an order being racked had been previously racked at least once. The current rack location is displayed, along with the user who had performed the racking operation.
Setup > Program Configuration > Store > Racking locations
These are the locations that you are able to toggle through in the Rack screen.
By default, you will only have Manual, Auto Last Name, and Auto Phone.
Auto - Initials = The location will be set to the customer's initials.
Auto - Phone x 4 = The location will be set to the last 4 digits of the customer's phone number.
Auto - Phone x 2 = The location will be set to the last 2 digits of the customer's phone number.
Auto - Last Name = The location will be set to the customer's last name.
Auto - Last Init = The location will be set to the customer's last name initial.
Auto - None = The location will be set to the name of the rack location itself.
Manual = The user will be required to enter the rack location.
Workstation Settings
Setup > Program Configuration > Workstation > Racking Settings
Double-Scan Timeout: This sets the interval for the racking screen (and other processing steps) to detect a double-scan of an invoice or item belonging to a particular invoice. If set, the system will trap and ignore any double-scan of an invoice or item if subsequent scans fall within the time period specified. If set to zero (0) or less, the system will make no effort to trap and ignore a double-scan of any barcode.
Reprint Changed Invoice: If Yes, an invoice will automatically reprint if racking it caused a price change because of price-later items, upcharges, or alterations.
Pickup
Pickup is the final step in the invoice life cycle. The customer will have the garments returned and be charged for the service. This can be done in several ways, but the most common method is to use the Pickup screen located on the SPOT home page.
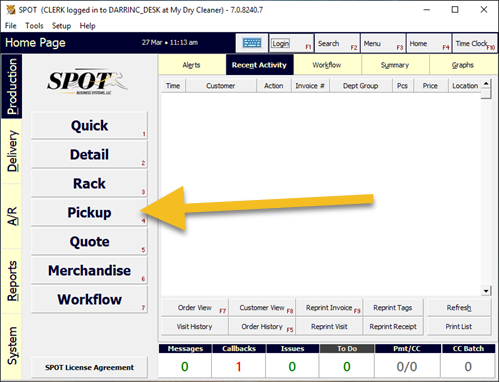
From the home screen, click Pickup or press 4 on your keyboard.
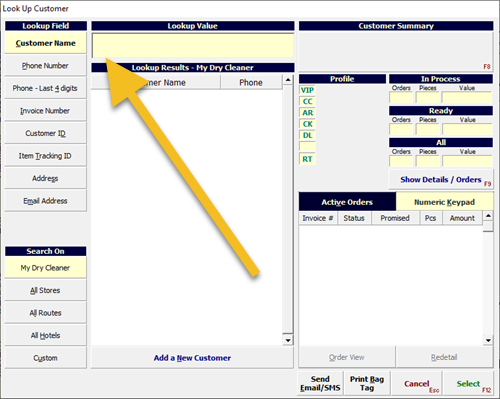
Once you have selected Pickup, a new window will come up.
Here you can scan your customer's Quick Receipt, invoice, or type in the customer's name or phone number.
Once complete, press Select in the bottom right corner or press F12 on your keyboard.
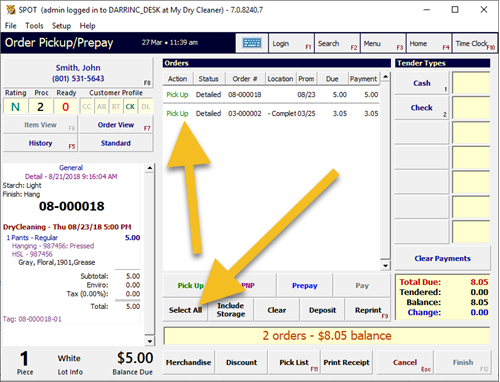
You will now be presented with a list of open orders for that customer. Ensure all appropriate orders have the correct action (e.g., Pick Up) listed. You can select multiple orders by holding down the Shift key while selecting an order or pressing the 'Select All' button.
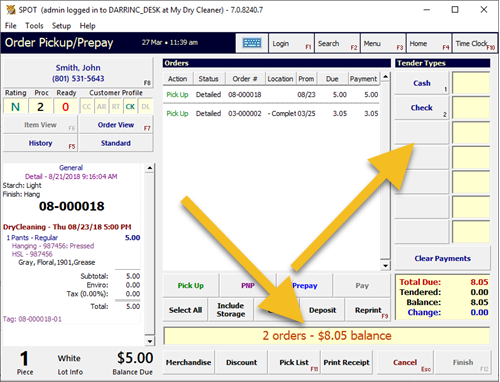
Once all of the relevant orders have been set to the correct action, you can look at the bottom of the screen to view the totals.
Now select the payment type that you would like to use from the pane on the right.
Finish processing the payment as prompted.
When the transaction is complete, make sure the customer retrieves all of the physical orders.
Common Settings
Company Settings
Setup > Program Configuration > Company > Cashier Settings
Allow Pickup of In-Process Orders: If this is enabled, orders that are not yet in a ready (racked) status may be picked up.
Checkout Auto-Select Tenders: Specifies whether to automatically select Check, CC, and Other transactions.
Select Pickup of On-Assembly Orders: Select "No", "Yes" or "Prompt" to automatically select for Pickup orders that have one or more items still On-Assembly.
Store Settings
Setup > Program Configuration > Store > Cashier Settings
Invoice Selection At Pickup: Determines which invoices are pre-selected at Order Pickup.
Ready: Only ready orders will be pre-selected.
Force Scan: invoices have to be scanned at the counter before they can be picked up.
Print Invoices at Pickup: Specifies whether to print a copy of each invoice picked up (default setting is No).
Workstation Settings
Setup > Program Configuration > Workstation
Print Customer Receipt: Determines whether a customer receipt will be printed when picking up or prepaying orders.
Print Register Receipt: Determines whether a store copy of the customer's receipt will print. This receipt may be useful when reconciling the cash drawer.
Send Email Receipt If Available:
Email - If a receipt is going to be printed and the customer has a valid email address, the receipt will be emailed instead.
SMS - As above, but receipt will be sent via SMS.
No - Receipts will always be printed. (Default)
Prompt - The clerk will be given three choices: ‘Printed Receipt’, ‘Email Receipt’, or ‘SMS’.
Order Process Structure
Workflow
Quick, Detail, Assembly, Rack, and Pickup make up the basic workflow process. This process can be changed or modified to fit your needs. That is done through a production template.
A production template is made up of processing steps.

A process step is a holding area for an invoice. Quick, Detail, Assembly, Rack, and Pickup are the defaults. However, you may create your own. For example, some SPOT users choose to have a step like “Alterations” if they send the garments for tailoring off-site.
Creating a workflow step
You can create a custom workflow step by going to:
Setup > Program Configuration > Company > Workflow
Right-click “Process Steps”
Add new.
Name: Define as appropriate.
Handler: This should almost always be “Scan”, allowing normal invoices to be scanned to this step.
Internal Status: This should be “In Process” for most cases. This indicates that the order is still in production and not ready for the customer.
Location Type: This should either be “Originating Account node (Site)” (Only accepts orders from its home location.) Or “All Account Nodes” (Accepts orders from the entire company.)

If you need to have a step perform another function, please contact SPOT Support Support@Spotpos.com to get the best configuration.
[WARNING!] Changing this template could have serious consequences for your live production. Please seek the help of SPOT Support if this is your first time changing the template!
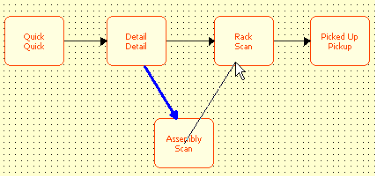
Production Template
Most companies only have one production template. It is used to govern price tables and the production process.
The template can be found under:
Setup > Program Configuration > Company > Workflow settings > Production Template > Standard Production > Edit
The column on the left will let you modify the template to add and/or remove process steps.
To allow an invoice to pass from one step to the next, there must be an arrow pointing from the originating step to the end step. You can do this by clicking on a step in the graph to select it, then dragging a line from the center to the end step.