Subscriptions are a great tool to encourage customer loyalty and create a stable base of income for your company. By utilizing auto-renewals and different subscription plan levels you can find the right fit for all of your customers.
Subscriptions created through the following process will allow you to sell Subscriptions in-store through Spot or Connect. Additionally, your customers will be able to purchase configured Subscriptions through your MDCM or CustomerConnect interfaces, with no need to visit your store! See the CustomerConnect Mobile and CustomerConnect pages for more information.
For a video walk-through of Subscription and Configuration, click here.
Setting up a subscription consists of four parts. In order, the four parts that should be generated are:
Create Item(s) in Price Table
Best practice for setting up Subscriptions for your business includes creating one or more new items for mark-in. This item is processed for each Route or Counter interaction, after the customer has purchased their Subscription; i.e. a customer with an existing subscription arrives at the store with a bag full of garments needing service.
These items are priced either per-bag or per-pound, depending on how you'd you like your Subscription plan to work. Depending on how many Price Tables you want to contain Subscription items, you will need to create an item in each.
You can create a Subscription item in any category you like, but Wash Dry Fold will be the most common.
NOTE: We recommend either adding Subscription items to, or creating, a Department which does not use HSL by default. Associating Subscription items to a Department which uses HSL by default will prevent you from entering the desired quantity (of pounds or bags) at mark-in.
Navigate to Mark-in Settings > Price Table > (Your Price Table) > Departments > (Your Department) > Categories > (Your Category) > Add
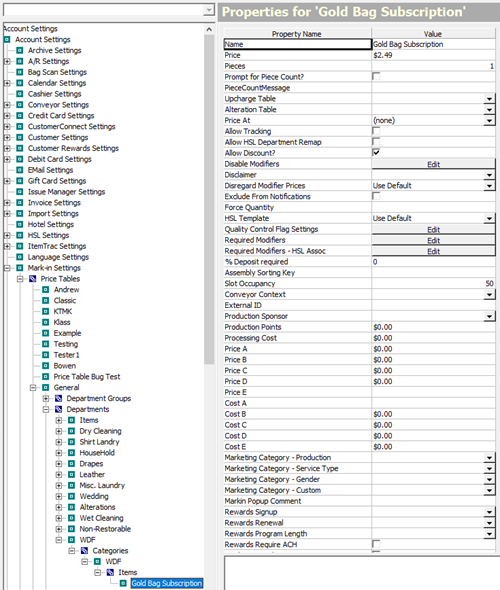
Name: Name that will appear in the customer view and when being sold.
Price: Here you need to decide whether your subscription plan will be charged per-bag or per-pound. Enter the per-pound or per-bag price here.
Pieces: Typically set to 1.
The rest of the settings are personal preference.
Repeat this process for every level of Subscriptions you want to sell to customers.
Save out of Program Configuration before moving to the next step.
Coupon Setup
The next step in creating your subscriptions is creating the coupon that will be used with the subscription. This is necessary because the Subscriptions functionality is piggy-backed onto the coupon functionality. Your customers will effectively pre-pay (subscribe) for a coupon, which will be credited against the future transaction(s) when their order is checked-in.
To set up the coupon navigate to:
Setup > Program Configuration > Company > Mark-in Settings >Coupons
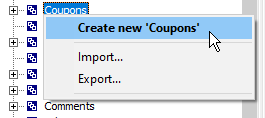
Right click coupons and select Create New 'Coupons'.

Name the coupon something easy to associate with the subscription level.
Select Edit and choose Coupon Type 3. (Only type that will work with subscriptions.)
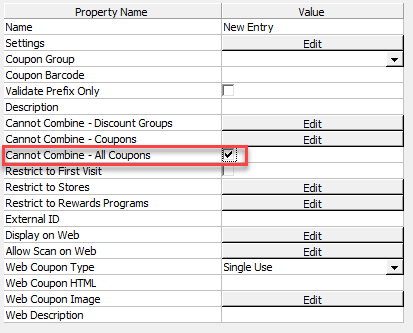
Check the box next to Cannot Combine - All Coupons. This ensures that other promotions or coupons do not interfere with Subscription transactions.
Enter 1 for the Bring in at least field.
Check the box Used only with subscription.
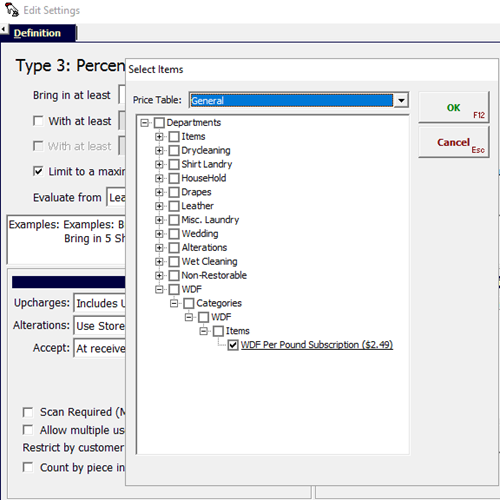
Click Select Items button and choose from the drop-down each subscription item in each Price Table created above.
Then Select the Limit to a maximum of button. Tip: The actual amount here is ignored and is dictated instead by the subscriptions settings.
Finally, complete the rest of the coupon to match your preferences. For help with these settings see our coupon setup page.
Tip: You must select items that have an associated price. (No upcharges or describe and price.)
Create a new coupon for each different Price Table Subscription item which you created (described above).
Set the get each for field to 100 Percent Off.
Check the Used only with subscriptions box.
Set the Limit to a maximum of field to the highest possible item-count, relative to your desired highest subscription level (i.e. Gold-tier might be 90lbs or 5 bags).
Tip: You can use the same coupon for different levels if you intend to only scale the number of uses per level.
Save out of Program Configuration.
Create Merchandise Item(s)
To create the actual item sold to the customer when they purchase a subscription, we need to set up a Merchandise Item. It may seem simpler to associate subscriptions with existing items; however, in our experience, setting up whole, new items is the best practice.
Navigate to:
Setup > Program Configuration > Company > Merchandise Settings > Merchandise Item Setup > Insert
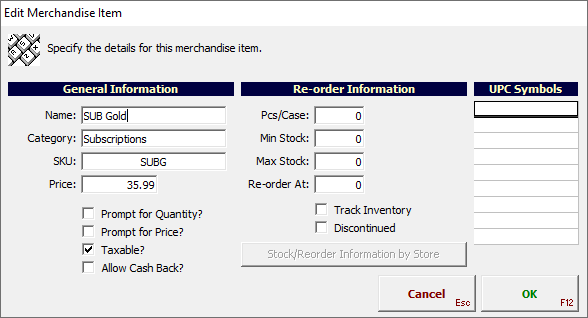
Name: Name that will appear in the customer view and when being sold.
Category: Type Subscriptions.
SKU: This will be the code used to sell the subscription. Tip: Keep an external list to make it easier to use at checkout.
Price: Select the price. Keep in mind that this can be a monthly or weekly charge.
For most businesses, subscriptions are not taxable, as they are categorized as a service.
The rest of the settings are personal preference.
Repeat this until you have Merchandise items associated with each level of subscriptions you plan on using.
Save out of Program Configuration before moving to the next step.
Create Subscriptions Plans & Levels
At the heart of subscriptions is Plans and Levels.
To set these up navigate to:
Setup > Program Configuration > Company >Subscription settings
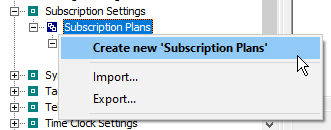
Right click Subscription Plans and select Create New 'Subscription Plans'.
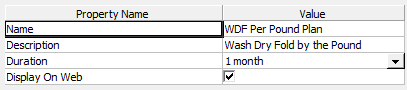
Name Name the plan something descriptive.
Description (Optional) Expand the description for the plan.
Duration Select how long the plan lasts. Monthly or Weekly.
Display On Web Toggle whether the Subscription Plan will be displayed on your Customer Connect and MDCM mobile app. If unchecked, will only show on SPOT Counter Client.
Once you have your plan in place you need to create at least one plan level, but most customers will have a variety, i.e. Gold (50 lb.), Silver (25 lb.), Bronze (10lb.).
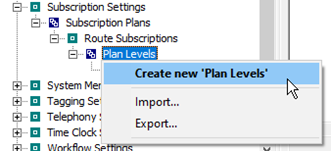
Right click Plan Levels and select Create New 'Plan Level'.
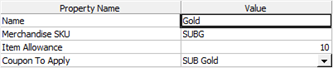
Name: Name the level something descriptive.
Merchandise SKU: This should match the SKU for the Merchandise item you created.
Item Allowance: This is the number of times the coupon assigned can be used during the subscription period.
Coupon To Apply: Select the appropriate coupon you created for the subscription level.
Repeat level creation until you have all the levels you need.
Click Update Company to push these coupons out and Save out of Program Configuration.
Congratulations! You are ready to sell Subscriptions.