With the ever-growing demand of home delivery services, routes can help you stay current with your customer base and offer a convenient service. This training will go over the basic setup and usage of routes in SPOT, along with some common settings.
Setup
Route Setup
To begin, you will need to navigate to the route settings in Program Configuration.
Setup > Program Configuration > Store > Route Settings > Routes > click ‘Add'
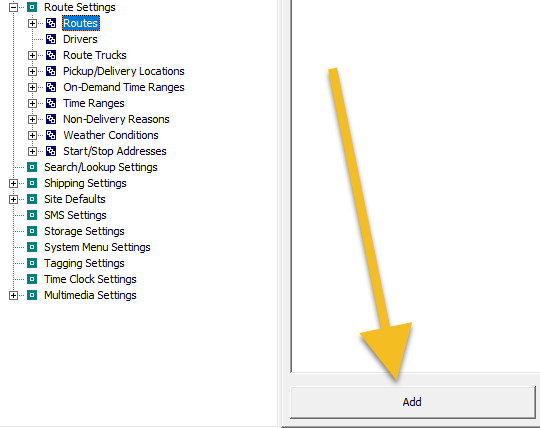
You will now have a new route!
The route settings will now be automatically displayed on the right.
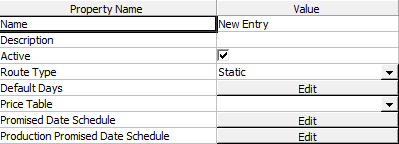
At minimum, it is recommended that you define the following settings:
Name: We recommend using the name to reflect the route days, general location of the route, or both. (Example: ‘West Jordan Tues - Thurs’.)
Active: This will need to be checked.
Route Type: Set this to Dynamic.
Default Days: These will be the standard days on which the route runs.
Price Table: Assign the applicable price table.
Promise Date: Assign the promise date table this route will use.
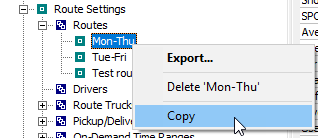
Tip: You can save time if you already have a route and want to copy most of the settings to a new route. Right-click the existing route in the left setting column, then select Copy. Next, right-click ‘Routes’ next to the blue box and select Paste. At minimum, you will need to change the name of the route.

Add Customer to the Route
Once the route has been created, you will need to add the customers you want to visit.
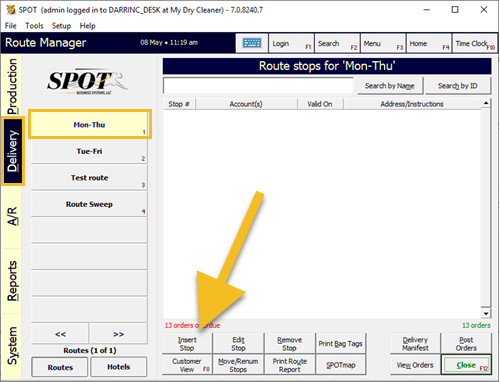
From the SPOT home screen, go to the 'Delivery' tab and select your route.
Click ‘Insert Stop'.
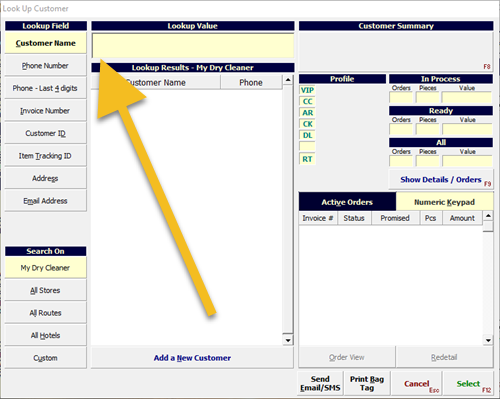
Use the customer lookup screen to choose your customer if (s)he is already in SPOT. If needed, you can create the customer now by choosing 'Add a New Customer' at the bottom.

Put in any customer-specific delivery instructions and click ‘OK’.
The 'Days to visit this stop' on the insert stop page should be filled out by the default route settings in Program Configuration. At this time you can make any custom changes as needed for the individual stop.
For a more detailed look see
Adding Multiple Customers to a Stop
In some instances you may want more than one customer to be at a stop (e.g., in an apartment building). This is easily accomplished through the insert stop button. Warning! Removing a multiple stop will remove ALL customers on the stop. This is not reversible.
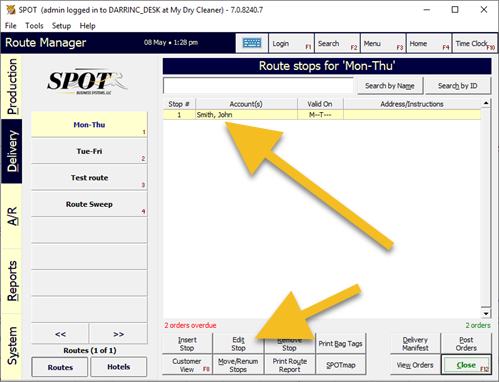
Select the stop to which you would like to add the customer.
Click ‘Edit Stop'.
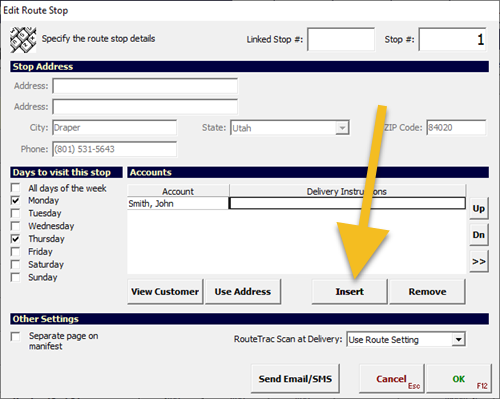
Click ‘Insert'.
Use the customer lookup screen to choose your customer if (s)he is already in SPOT. If needed, you can to create the customer now by choosing 'Add a New Customer' at the bottom.
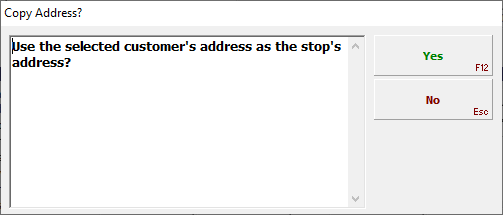
Choose ‘Yes’ or ‘No’ for using the selected customer's address as the stop's address.
Click 'OK'.
Congratulations! You now have a single stop with multiple customers. You can repeat this process as many times as necessary. If needed you are able to remove a single customer from the stop using the 'Remove' button.
Add a Drive to the Route
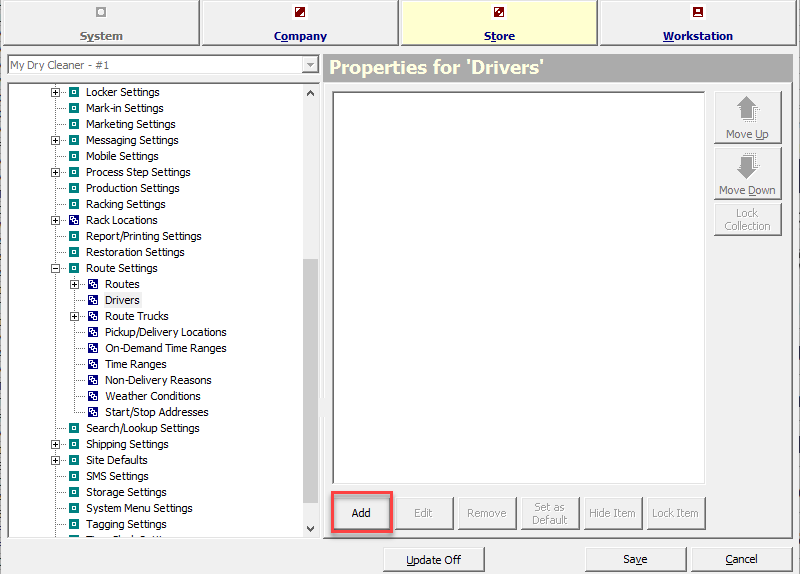
Once the route has been created, it's time to add drivers. Navigate to Program Configuration > Store > Route Settings > Drivers , select Add then Create new 'Drivers' to add a new driver.

Enter contact information for the new driver. You can optionally save a photo of your driver by selecting Driver Image. Navigate through the prompts and select a file on your computer to use as the image of the driver. You will then be able to use this image in automated email messaging to your customers, notifying of pickups.
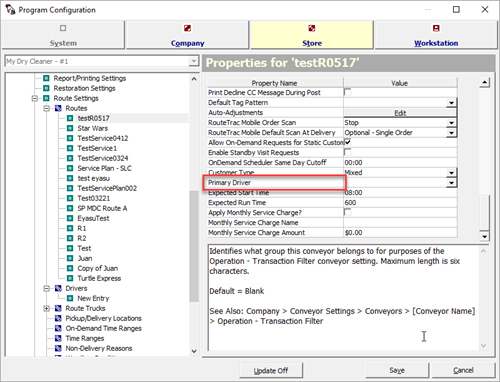
After you've created your routes and drivers, you will need to add drivers to routes.
Navigate to Program Configuration > Route Settings > Routes and select the needed Route. Scroll down to the setting, Primary Driver and select the appropriate Driver from the scroll-bar menu. Click Save.
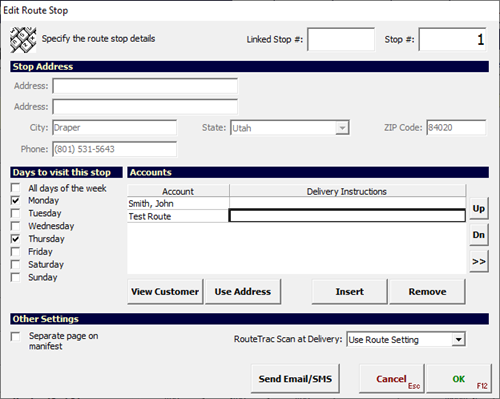
Insert/Edit Stop Explained
Insert Stop: Inserts a new stop on the route. If a route stop is selected when this button is selected it will place the new route stop in front of the selected stop. If you use this button without a route stop selected it will place the stop at the end of the route.
Linked Stop: This is a field you will use if you want a route stop to follow a stop with no exception. This can be used for an apartment that is located next to an address, an office in a building or a unresolvable address with SPOTMap. An example is if you use stop 10 as the linked stop and stop 10 gets moved to 22, your defined stop will move with the linked stop.
Stop #: This is the stop number you would like to insert. If you selected a stop before selecting insert stop that stop number will be displayed. You can type any number for a stop number in this field and it will insert it at that defined stop. If you select a higher stop count than currently on the route, it will be placed at the end of the route.
Address, City, State Zip, Phone: By default the selected customer’s information will be used to fill in these fields. If the customer has a route address defined via the 'more address' button on the customer profile, this address will be used.
Days to visit stop: These are the default days the stop will be visited. For example, if you specify a customer to be a Tuesday - Thursday stop, (s)he will be included on the manifest when run for any Tuesday or Thursday.
Accounts: This is a list of customers that will be located on this stop. Most route configurations will only include one customer per stop. An example of multiple customers on a single stop would be an office building or a retail business that has a single address but has multiple customers. Tip: Create a customer using the office/apartment building name and building address for the stop. Then you can assign your resident customers to the now easily identified stop.
Delivery Instructions: These are instructions that are included on the manifest for any special instruction required by the office or by the delivery driver. Examples are "Deliver to the back doorâ€, “Make sure you close the garage doorâ€, or “Do not leave clothes in bad weather.â€
View Customer: If you have a customer selected in the account list and select this button it will take you directly to the customer’s profile.
Use Address: If you have a customer selected in the account list and select this button it will use that customer’s address or that customer’s route address if available on the customer’s profile. This is used if you have multiple customers on the stop and want a particular customer’s address to be used for the stop address.
Insert: Use this to add customers to the stop.
Remove: Use this to remove the selected customer from the stop. You must have at least one customer selected to create a route stop.
Usage
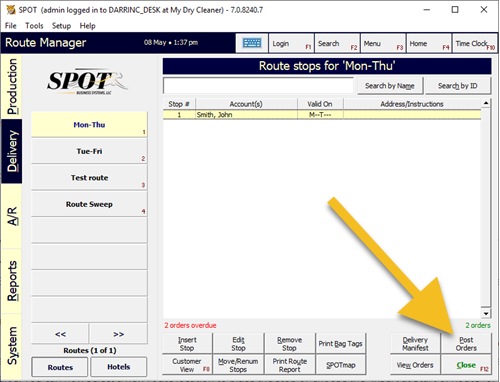
Route Manager
The Route Manager screen will provide you with quick and easy tools to streamline your route operations.
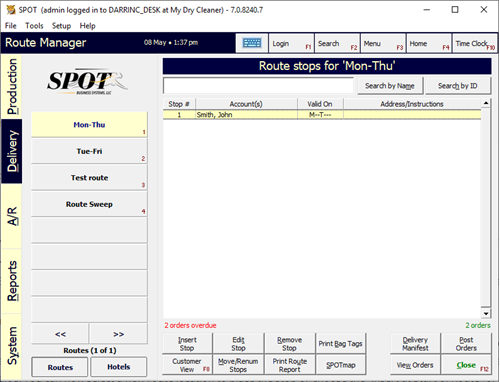
Remove Stop: This will remove the selected stop and remove any customers assigned to the stop from the route. Tip: If you remove a stop, the only way to get it back is to recreate it.
Print Bag Tags: This is a feature that will allow you to print bag tags for all customers on the route or just the selected customer. You will need to have the workstation bag tag printer and template set up to take advantage of this option.
Customer View: This will display the selected customer’s profile.
Move Stops: This feature can be used for moving existing customers in the same route or moving them from route to route, or to alphabetize the current route.
Print Route Report: You can get an alphabetical listing or a list sorted by stop number for the route selected. This will include every customer on the route.
SPOTmap: This will open a map with all route stops marked.
Delivery Manifest: This will begin the process of generating a manifest, see Running a Delivery Manifest for more information.
Post Orders: This will begin the process of selling out orders, see Posting Orders.
View Orders: Use this feature to display all open orders for the entire route.
Running a Delivery Manifest
The culmination of a route is the delivery manifest. This will give drivers all the information needed to complete their deliveries.

Begin by selecting the 'Delivery Manifest' button from the Route Manager page.

Select the delivery date for the manifest: You will be prompted for what type of manifest to run and the number of orders that will be included on the manifest.
Select type of manifest:
Full Manifest: Includes all stops scheduled for this day and will include all customers with static or on-demand visits assigned. It will also include stops/customers with no orders promised, or ready for this date.
Scheduled / Delivery Date: Includes all stops that have promised/ready orders or have an on-demand visit defined.
Select the what manifest information to print:
Detailed Manifest: Line-by-line invoice detail including department, pieces, amount, unpaid amount, and balance. This manifest includes line-by-line detail for all orders due or ready for the customer (specific information may vary, based on settings/templates).
Summary Manifest: A single line per stop shows the total number of orders, pieces, and amount due for the orders.
Posting Orders
The Post Orders Process is designed to make the delivery of orders and the posting to the customer's A/R as simple as possible. The post orders screen works in conjunction with manifests generated for the route. This means that an invoice will not appear on the post orders screen unless it has been on a manifest. Once a driver has completed the route, he is able to return and use the post orders screen to mark orders that were actually delivered.
Begin by navigating to the Route Manager screen for the route you intend to post orders. Then select the 'Post Orders' button.
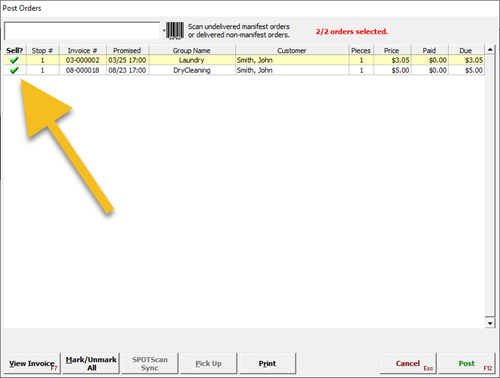
Ensure that all orders that were delivered on the route are marked with a green check mark. Tip: You are able to scan orders that were not delivered at the top to remove the check mark.
Once you have all the orders delivered marked, select the 'Post' button. This will charge each customer based on their payment preference.
Tip: If you have a 'P*' in the sell column it indicates a price-later issue that is unresolved and must be addressed prior to closing the order.
Common Settings
Company
Setup > Program Configuration > Company > Route Settings
Auto Enable Account for Route Customers: When enabled a customer added to a route will be made an A/R customer automatically and added to your default billing group.
Show Only Ready Orders on Manifest: If this is enabled you will only see orders in a ready status on your manifest. If this is not enabled you will see all orders ready or promised on or before the day the manifest is run.
Setup > Program Configuration > Company > SPOTMap Settings
Mapping Component: Set this to System Default.
Store
Setup > Program Configuration > Store > Route Settings
Show Only Ready Orders on Manifest: This may be set to "Yes", "No", or "Use Company Setting" to defer this setting to the company settings level. Setting this option to "Yes" will cause the Route Manifest (and therefore Post Orders) to include only racked orders.
Setup > Program Configuration > Store > Route Settings > Routes > (Your Route)
Use Custom Invoice template: This check box enables the following setting.
Custom invoice template > Edit: You must use the import/export function inside the editor. You can export a template from:
Setup > Program Configurations > Company > Report Settings > Document Templates > Invoice template
Setup > Program Configuration > Store > Customer Settings
Show Route Eligibility: This setting will show a non-route customer, route eligibility in the search screen and on the visual invoice.
Workstation
Setup > Program Configuration > Workstation > Mark-in Settings
Prompt for Counter / Route Order: If enabled, this setting will prompt the clerk for 'all' customer or just 'route' customers to mark the Quick / Detail for counter pickup or route delivery.
Setup > Program Configuration > Workstation > Customer
Verify Map Address: Setting this option will enable a button on the 'General' tab of the 'Customer View' screen, allowing the user to verify/map a customer's address immediately as it is entered. This will allow you to verify an address directly from the customer's view. This option can be useful when a new customer is added and can be verified prior to the first delivery.