On The SPOT (OTS) marketing services, managed by a separate company called BeCreative360, was built by SPOT for the operator that does not want the hassle of the daily or weekly processes required to carry out a consistent and full-featured marketing campaign. The OTS marketing service takes advantage of your current branding and will deliver full-featured customer contact marketing. Take a look at BeCreative360.com or click here and review the long list of automated emails available to you. You can reach BeCreative360 by phone at 949-270-1609.
By default, OTS campaign’s communicate with your customers via email. You also have the option to integrate SMS and print into your OTS communication offering. Let us show you why OTS has become one of our most popular options in the SPOT community. For more details on OTS options, please contact create@becreative360.com.
Required
OTS Prep
Once you have chosen your package with BeCreative360 you will need to change/manage a few settings in SPOT. In addition, you will need to provide BeCreative360 with logos and pictures.
What BeCreative360 Needs From You
Logo
Logos will need to be sent over to BeCreative360 in Ai, EPS, or PSD format. This should be done as soon as possible.
Pictures
If you have any specific pictures you would like on your emails, you can send them to BeCreative360. There can only be one picture per email template. It is possible for BeCreative360 to use your store picture setup in SPOT. Setup > Location Information > Contact Picture. You will need to inform BeCreative360 if this is the case.
(Optional) Text Messages
If you are taking advantage of text message templates, you will need to provide BeCreative360 with your Twilio information. (If you do not have Twilio click here.)
Account SID Number
Authorization Key
Twilio Phone Number
In addition you will need to provide them with all message templates you would like to send.
You will need to set up a customer service email with your domain address. i.e Customerservice@becreative360.com. This will be the email that all OTS emails are sent from. Please let BeCreative360 know what this email address is so they can add this to their system to build your OTS marketing.
Route/Counter Holiday Schedules
Create/Edit Holiday Schedules
You will need to set up your route/counter holiday calendar so that the reminders do not go out on the days you are closed.
To begin, navigate to:
Setup > Program Configuration > ​Company > Mark-in Settings > Holiday Schedules
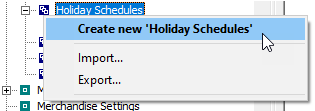
If you do not have a holiday schedule, right click on Holiday Schedules. Then select Create new 'Holiday Schedules'.
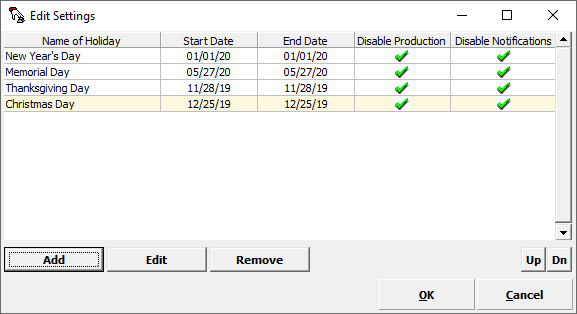
Once you have your holiday schedule selected, use the edit button to review holidays listed. To prevent notifications like Route Reminders from going out, make sure the Disable Notifications checkbox is ticked.
When you are satisfied, select OK.
Tip: You may need to create multiple holiday schedules based on what store/route they will be assigned.
Select Save in the bottom right of program configuration before you continue.
Assign Your Store Holiday Schedule
Now that you have holiday schedules, you will need to ensure your holiday schedule is assigned at the store level. For each store, navigate to:
Setup > Program Configuration > Store > Mark-in Settings > Holiday Schedule
Select from the drop down to assign your holiday schedule for the store.
Assign Your Route Holiday Schedule
If your routes need different holiday schedules, you can overwrite the holiday schedule for the store at the route level.
To do this, navigate to:
Setup > Program Configuration > Store > Route Settings > Routes > (Select your route) > Holiday Schedule
Use the drop down menu to select your route holiday schedule.
Once you are satisfied with your holiday selections, save out of program configuration.
Store Hours and Manager Assignment
To make sure your customers are getting correct information you will need to setup, edit, or review your store hours and contact settings.
At each store, navigate to:
Setup > Location Information...
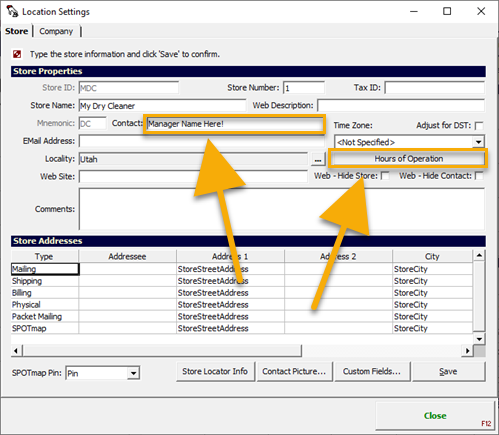
Under Contact, make sure the store manager name is listed.
Next select Hours of Operation and ensure that the correct store hours are listed.
The information in these two areas will be used for the templates.
Unsubscribe list
It is important for your customers to be able to opt out of any of the marketing BeCreative360 generates.
To do this, navigate to:
Setup > Program Configuration > Company Settings > Customer Settings > Notification Settings> Edit > (Select Notification Type) > Edit
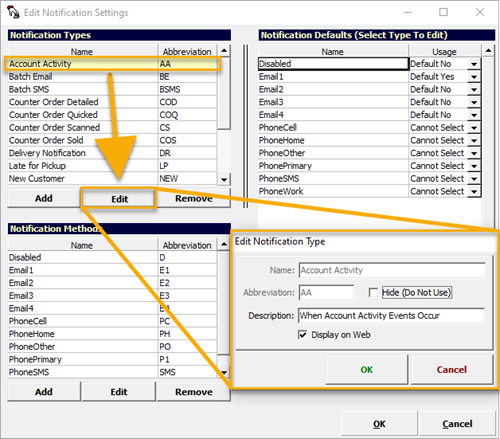
Hide (Do Not Use): Removes the notification from SPOT completely. (Not accessible by clerks or customers.)
Display on Web: When unchecked, removes the ability for the customer to modify this notification type(CustomerConnect), while preserving it in SPOT. (Accessible by clerks but not customers.)
Be sure to check the Specials/Promotion notification, this should have the Email1 default set to Yes and Disable set to default No, in addition, this should be set to Display on Web: in order to let CustomerConnect customers unsubscribe.
Dashboard
In order to track your OTS emails, you will need to setup user rights and credentials to access it.
First, you will need to make sure any user that wants to access Dashboard has the activity rights to do so.
To do this, navigate to:
Setup > Users Groups Rights... > User
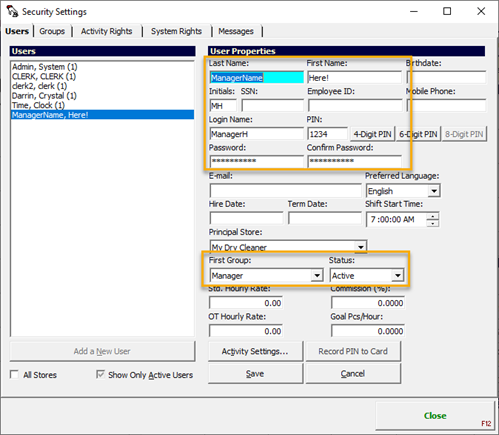
Select the user or create a new one.
Make sure all fields in the boxes that are populated, have accurate information.
The Login Name and Password fields will be used when logging into dashboard.
The First Group will be used in the next step.
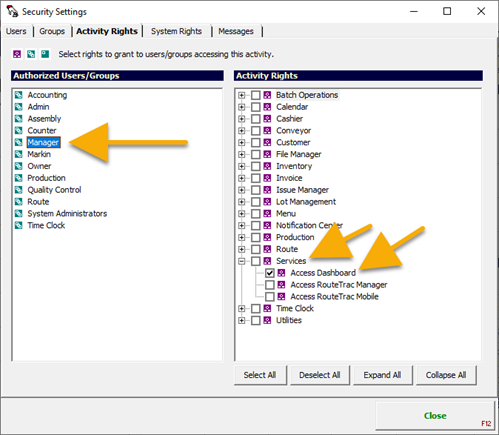
Now to give access to the user we just created/edited.
While in Users Groups Rights navigate to the Activity Rights tab.
Select the group on the left (First Group). Then expand Services and make sure Access Dashboard is checked.
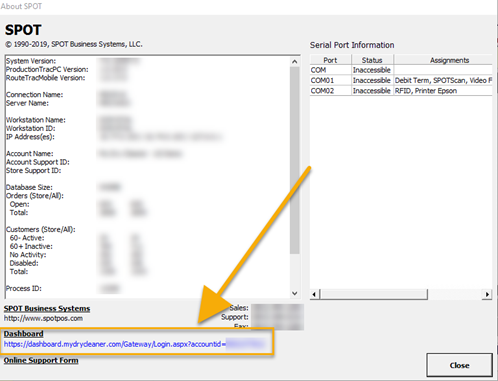
Now that the user has access to Dashboard, you will need to navigate to the link.
From the SPOT home page, navigate to:
Help > About
Select the Dashboard link.
The Account ID should already be populated. If you need this information, it is listed at the end of the dashboard link.
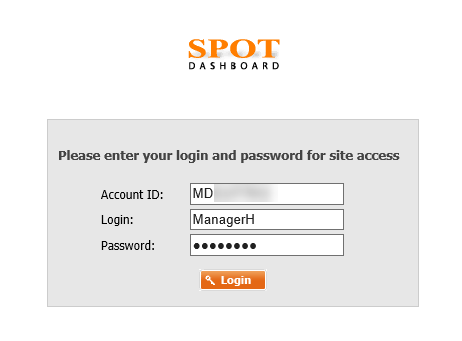
Use the Login Name and Password from the User tab in SPOT.
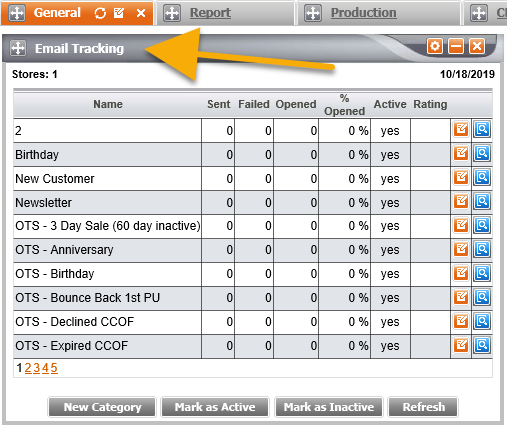
Once logged in, you can view each of the email campaigns through the Email Tracking widget under the General tab.
CustomerConnect Signup Emails
If you currently have CustomerConnect with SPOT you will need to ensure that your signup emails are no longer send. BeCreative360 will be sending them going forward.
To begin, navigate to:
Setup > Program Configuration > Company > Customer Connect Settings > Customer Connect Profile > (Profile you want to change.) > Edit > Configure... > Email > Templates > Signup > File Name.
.png "image(96).png")
Make sure that this setting is blank. WARNING! This will cause your signup emails to no longer trigger. Be sure you are ready for this to happen.
Coupon Generation
Once you have decided on a package with BeCreative360, you will be sent an email requiring coupons to be generated to match the that package.
Be sure that all coupons have the setting Scan Required checked.
See Learn more about coupons for instructions on coupon generation.
Add BeCreative360 Team to SPOT
In order to properly test your new emails, you will need to add members of the BeCreative360 team to SPOT as customers. You will receive an email from them on who will need to be added.
Usage
Email Campaign Tracking
Once you have completed all of the setup with BeCreative360, you will have the ability to monitor the output of your email batches.
To do this, navigate to:
Menu > Email/Messaging > Email Campaigns
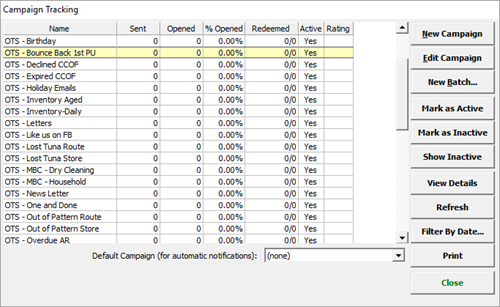
Each OTS campaign is named as such in this campaign tracker. For further information on an individual campaign you can select View Details.