Spot’s mobile app CustomerConnect Mobile lets you bring your brand into the digital era. This app will let you and your customers experience real-time interaction with their orders and information. This page will go over what is required for the mobile app and how to configure the necessary settings in Spot.
Spot takes the work of creating and customizing your mobile app out of your hands. We will fully build-out and customize the app to your specifications and requirements, publish to the Apple and Android app stores, and support the app with regular performance and feature improvements.
Spot’s mobile app setup is an involved process. The following will guide you through the process, step-by-step.
Requirements
Preliminary Requirements
To start the process, you will need to get in contact with our Sales department at 801-208-2212. Once that is done, we can begin the process.
Publishing takes a bit of work on both sides. In order to get the app published, you will need to fill out the 'Spot Mobile App Asset Requirements' document and send it to Appsetup@Spotpos.com, along with all of the artwork that goes with it. You can find this document below.
If you need assistance with artwork and the branding of your mobile app, BeCreative360 has you covered with a 'Build it For You' design service. Please contact BeCreative360 directly at 949-270-1609 for more information.
Overview
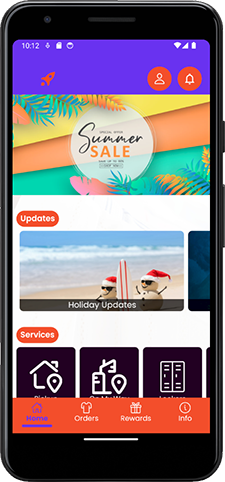
What Customer Connect Mobile can do
Device Support - iOS and Android platform support
Use Your Graphics - Customize the welcome page main banner, updates banners & legal information. See how to customize your app’s homepage here.
Customize Menu - Enable or disable features and options.
Support for Multiple Brands - Use store groups to create different branded apps by location.
Profile - Update personal information including address(es), phone(s), preference(s), and credit card(s)
On My Way - Customers notify your retail store they are en-route to pick up their orders.
Route Pickup Request - Static or optional On-Demand pickup request with available Time and Day pickup options
Non-Route Customer Pickup Request - A non-route customer can use CustomerConnect Mobile to submit a one-time pickup request. CustomerConnect Mobile will verify that the customer has a Credit Card on File or is set up as A/R and confirm the customer is located within a Service Zone attached to an active Service Plan.
If these two qualifications are fulfilled, the customer will be presented with the respective Service Plan's options to choose a pickup day.
My Orders - Customers can view detailed information about their ready and sold orders, with customizable on-screen details. You also have the option to disable item, special charge, and modifier pricing details.
"On My Way" & "I Am Here"- Customers can alert store staff that they're on their way to pick up an order and when they arrive, enabling socially-distanced transactions. They can also use a CCoF to pre-pay for orders. See this page for more information.
Subscriptions- Customers can sign up for and manage their bag-and-fold or other Subscriptions, as configured in Spot. See the Subscriptions page for more information.
Coupons / Specials - Include custom graphics and a barcode for the coupon, or use the app's special/coupon activation feature. Available and Redeemed/Expired coupons are viewable by your customer in the app.
Kiosk Access - Display the Customer ID as a 2D barcode for quick and easy MetalProgetti kiosk access
Gift Cards - Display and access active gift cards with 2D barcode for quick and easy access to card information
Pricing - Display selected garment/item prices
Refer-a-Friend - Enhanced customer referral logic via a "referral code", including configurable referral coupon activation
Help/Information - Store phone, location(s), email address, FAQ, and website links
Feedback - Get feedback on your services
Push Notification - Notification for ready, sold, and overdue orders, as well as route pickup reminders
App Widget - "Route Pickup" and retail "On My Way" widget support
Order Notifications - Your customers receive notifications, alerting them when orders are ready for pick-up, scheduled for delivery, etc.
Setup
Once you have the app created, there will be a few settings in Spot that require attention.
Location Settings
Setup > Location Settings > Store
Add SPOTmap Address.
Add Lat/Long to SPOTmap (use <http://www.latlong.net/convert-address-to-lat-long.html>).
Select 'Time Zone' and check 'Adjust for DST'.
Set 'Hours of Operation' for each store.
Enter 'Email Address'.
Setup > Location Settings > Company
Create a Primary Contact in the 'Contacts' list.
Verify 'Store Groups' > Context > CustomerConnect has the correct published store list assigned. (DO NOT RENAME LIST; you must include your route store.)
To remove stores from the store locator on the app:
Setup > Program Configuration > Company Settings > CustomerConnect Settings > CustomerConnect Profiles > (Select Profile) > Edit Settings > General > Store Locator - Exclude List
Select stores that should not be listed in the store locator.
Pricing Configuration
If desired, you can change how departments, categories, and items in Spot Price Tables are displayed in CustomerConnect Mobile.
Setup > Program Configuration > Company Settings > Mark-in Settings > Price Table
Select a department, then enter 'Web Description'.
Select a category, then enter 'Web Description'.
If you want an item to appear in the price list in CustomerConnect Mobile, select the item and check 'Display on Web'. Enter 'Web Description' if desired.
Coupon Settings
Setup > Program Configuration > Company Settings > Mark-in Settings > Coupons (If Enabled)
Tip: Coupons will be displayed in the app according to both the settings in this topic and the valid-on dates of the coupon itself. This means that specials that have not yet started or have already expired will not show in the app itself. This allows you to configure several months’ worth of coupons in advance, with the app seamlessly transitioning from one coupon to the next based on the starting and ending dates.
Coupon Barcode
Unique barcode/ID that the app uses to identify the coupon in Spot (e.g. 'DCBOGO092017').
Display on Web (Edit)
Select the Mobile profile in which to display the coupon.
Web Coupon Type
Single Use (Default): The coupon may be used once by any given customer. Once it has been redeemed, it will no longer appear for that customer.
Multiple Use: The coupon may be used multiple times by any given customer. Once it has been redeemed, it will not appear for that customer until the active orders using it are sold, at which time it will reappear and be available again for redemption.
Special: The coupon is a special, and no redemption is necessary. The coupon will appear by default in the list of coupons until it is removed or has expired.
Web Coupon HTML
HTML link for the 1024x1024 coupon image to be displayed in the app. Can be used optionally instead of 'Web Coupon Image'.
Web Coupon Image
1024x1024 image to be used for display. Takes precedence over 'Web Coupon HTML'.
Customer Connect Settings
Account Update / Credit Cards
Setup > Program Configuration > Company Settings > CustomerConnect Settings > CustomerConnect Profiles > (Select Profile) > Edit Settings
Account Update
Enable 'Bypass Web Requests'.
Enable 'Send Manager Email'.
Credit Cards
Select the default 'Credit Card Profile'.
Enable Tokens: Check if using credit card tokenization.
Session ID: Credit card profile name.
Setup > Program Configuration > Workstation > Hardware Settings > Credit Card Settings
Confirm Terminal - Terminal ID value is populated
Confirm Terminal - API Key value is populated (not required for hosted Spot licenses)
If either of these values are wrong or missing, you will not able to perform credit card transactions with CustomerConnect Mobile. Contact Clearent at 866-203-7157 to request or confirm these values.
Email
Setup > Program Configuration > Company Settings > CustomerConnect Profiles > (Select Profile) > Edit Settings
Email (These settings can be found with your SMTP service provider.)
Configure 'Manager Email' address. This email information is used when customers process transactions on the App or CustomerConnect site.
Configure 'SMTP Server'.
Configure 'SMTP Port'.
Configure 'SMTP Username'.
Configure 'SMTP Password'.
Configure 'Use SSL' as required.
Email > Templates
Using Spot's File Manager, you can customize and upload email templates to your shared \WebTemplates folder. If you need assistance with this, contact Spot support at Support@Spotpos.com.
Request Visit
Setup > Program Configuration > Company Settings > CustomerConnect Profiles > (Select Profile) > Edit Settings
Request Visits (If Enabled in App)
Allow En-Route Requests
Used with Delivery Connect Mobile to allow Pickup Requests after the driver has already begun the route.
Allow Route Customers Only
Unchecked - Allows Counter/Retail Customers who reside within a route zone to schedule an on-demand pickup/delivery.
Checked - Only customers belonging to a route can schedule on-demand pickups/deliveries.
Allow Same Day
Allows same-day pickups when the pickup is requested prior to the 'Allow Same Day Cutoff' threshold.
Allow Same Day Cutoff
Time of day before which same day pickup requests must be scheduled.
Setup > Program Configuration > Company Settings > CustomerConnect Profiles > (Select Profile) > Edit Settings
Request Visits (If Enabled in App)
Days for Delivery - Normal.
Determines the minimum number of days from pickup to delivery (turnaround). Fewer turnaround days will not be offered for delivery unless 'Enable Rush Delivery' is enabled.
Enable Rush Delivery
If enabled, create 'Rush Delivery Fee Schedule' and set Invoice Adjustment - Rush Fee.
Rush Delivery Fee Schedule.
Allows the creation of one or more rush delivery options.
Rush Delivery Fee Schedule > Days: Number of days separating pickup and delivery. (e.g. 0 = Same Day, 1 = Next Day)
Setup > Program Configuration > Company Settings > CustomerConnect Profiles > (Select Profile) > Edit Settings
Request Visits (If Enabled in App)
Maximum Number of Entries
Total number of pickup requests allowed at one time for a customer. Further pickup requests are not allowed when this number is met.
Invoice Adjustment - Rush Fee
Invoice Adjustment applied to rush orders.
Invoice Adjustment - Service Fee
Invoice Adjustment applied as a service fee. This is only applied to one order in the visit.
Signup
Setup > Program Configuration > Company Settings > CustomerConnect Profiles > (Select Profile) > Edit Settings
Signup
Enable 'Bypass Web Requests'.
Select 'Default Store'.
This is the store that all customers who sign up with CustomerConnect Mobile will belong to. If you are using Delivery Connect, this must be the store where Delivery Connect service plans are housed. See the Delivery Connect Quick Start Guide for more information.
Enter the 'Default Route Name' (a route with this name must exist in the default store).
NOTE: Only enter a value here if you want all signups to be added to this route. There is no address or zone validation if a value is entered here. If you are using Geocoding to validate zone-assignment for customers, you must not have a value in this field.
Configure 'Prompt for Credit Card'.
Enabled - Will prompt all customer signups for a credit card.
Disabled - Will not prompt for credit card on signup.
Setup > Program Configuration > Company Settings > CustomerConnect Profiles > (Select Profile) > Edit Settings
Signup
Counter
Create AR Account.
If checked, automatically creates A/R account for counter customers upon signup.
Default Payment Precedence
Establishes the payment precedence between credit card and account. Only relevant if 'Create AR Account' is checked.
Default Billing Group
Specifies the default billing group. Only relevant if 'Create AR Account' is checked.
Require Credit Card
Requires credit card for signup for counter customers.
Setup > Program Configuration > Company Settings > CustomerConnect Profiles > (Select Profile) > Edit Settings
Signup
Route
Create AR Account
If checked, automatically creates A/R account for route customers upon signup.
Default Payment Precedence
Establishes the payment precedence between credit card and account. Only relevant if 'Create AR Account' is checked.
Default Billing Group
Establishes the default billing group. Only relevant if 'Create AR Account' is checked.
Require Credit Card
Requires credit card for signup for route customers.
Gecoding
You may want your customers' address to be verified at sign-up, particularly if you have multiple zones configured. This service will validate the address entered by your customer as either valid or invalid.
System Configuration > Company > Customer Connect Settings > GeneralGeocoding toggled on
Route Settings
Setup > Program Configuration > Store Settings > Route Settings > (Select Route)
Configure Default Days.
Determines the days available for customer pickup requests for this route zone.
Set 'Route Type' to 'Dynamic'.
A route will not work with the app unless it is configured as 'Dynamic'.
Create Delivery Zone: A delivery zone must be created.
Click on 'Edit' to define a zone for this route.
Set Expected Start Time.
Set Expected Run Time (in minutes).
Geocoding
You may want your customers' address to be verified at sign-up, particularly if you have multiple zones configured. This service will validate the address entered by your customer as either valid or invalid.
System Configuration > Company > Customer Connect Settings > General
Geocoding toggled on
AddressLookupMethod T for Telogis or G for Google. T is the default value. This is the mapping service used for Geocoding. Depending on your city, if some locations are failing to Geocode, switching this value to the alternate service may solve the problem.
Locker Setup
To enable Locker Drop Off, go to Program Configuration > Company Settings > CustomerConnect Settings > Select Profile > Edit > Configure Settings > General and check the box next to Locker Dropoff Enabled.
Checking this box will enable your mobile app's Place Locker Order option.
Ensure that lockers have also been created and added to a service plan(s) in Delivery Connect. See the Delivery Connect Quick Start Guide for more information.
Customer Referral Settings
Setup > Program Configuration > Store Settings > Customer Settings > Customer Referral Settings
If you want to use the customer referral functionality, check 'Enable Customer Referral'.
Set 'Referral Incentive Type' to 'Award Coupon'.
Set 'Select Referral coupon' to the coupon awarded to the new customer on signup.
Set 'Referring Customer Coupon' to the coupon awarded to the customer that referred the new signup.
Set 'Referring Coupon Event' to the event when the coupon will be awarded to the referring customer.
Subscriptions Settings
The first step to offering Subscriptions to your customers in CustomerConnect Mobile is configuring them in Spot. See this page for more information.
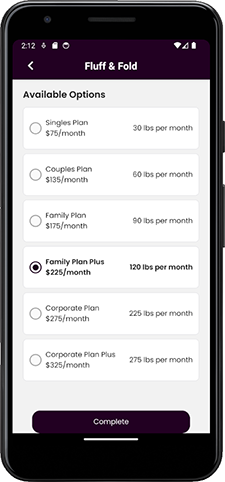
Once your Subscription plans have been properly configured in Spot, they will automatically populate in CustomerConnect Mobile, and your customers can purchase them! Here we see each Subscription type and Plan Level.
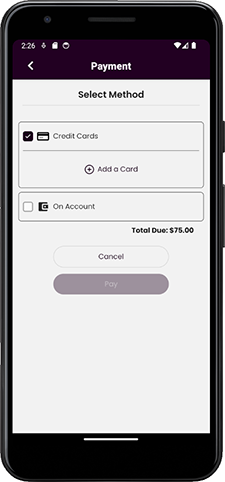
After your customer has selected a Subscription Plan and Level, they can select their preferred payment method and pay for their Subscription from the same screen.
Email Template Updates
You are able to update and brand emails found in the Get started with File Manager / WebTemplate directory.
AccountUpdate.htm
ARPayment.htm
Cancellation.htm
PasswordReminder.htm
Pickup.htm
Referral.htm
Signup.htm
Mobile App Data Collection
Direct Collection
Name
Email Address
Username (same as email) and password
Contact Preferences
Mailing Preferences
Billing Addresses
Phone Number
User Payment information (Debit/Credit Card Numbers)
Automatic Collection
Log and Usage Data
Use of Information
Facilitation and Delivery of services
Fulfillment and management of user orders