The customer view helps you record and track customer information. In this article, we will describe each tab of the Customer View screen to help you understand the information displayed on each page.
General
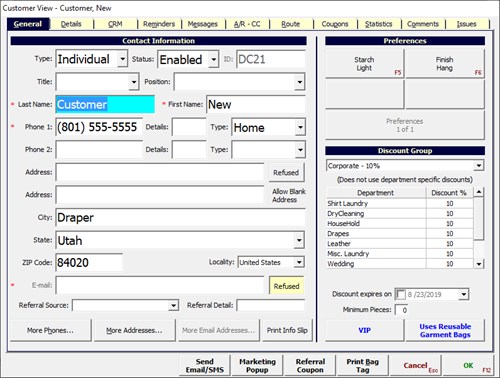
Contact Information
As the title indicates, you can store the customer's contact information in this section. Pay special attention to the Type, where you can switch between business and Individual to describe the customer better. In addition, set the Status to enabled so the customer can appear in any searches besides customer maintenance.
To set defaults for this section, including the required (*) go to:
Setup > Program Configuration > Store > Customer Settings
Preferences
Here, you can set the default starch preference for the customer.
You can add options here by going to:
Setup > Program Configuration > Company > Mark-in Settings > Preferences
Discount Groups
You can assign pre-defined discount groups to the individual customer here.
Create a discount group here:
Setup > Program Configuration > Company > Mark-in Settings > Discount Groups
Details

Extended Lookup
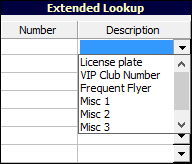
This section allows you to use alternative methods to look up a customer.
To enable extended lookup in the search page, go to:
Setup > Program Configuration > Store > Search/Lookup Settings > Customer Lookup Types
Check the box for Extended Lookup.
Other Contacts

This section allows you to list additional contacts for a customer.
Dates

This section will let you add birthdays to the account and reflect the customer sign-up date.
Promotion Setup
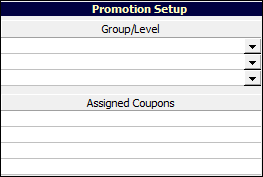
You can use the drop-down to add customers to Customer Groups. In addition, you can make manual notes on coupons available to customers.
Custom Fields
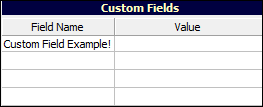
The custom fields section allows you to generate pre-defined fields to hold specific information.
Create a field name here:
Setup > Program Configuration > Company > Customer Settings > Custom Fields
Tax Authorities
Here, you can select special tax options for the customer for things like government and charity purposes.
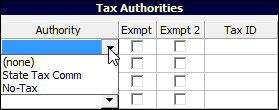
The two defaults are:
State Tax Comm - This is a predefined tax rate of 6.35%
No-Tax - This will alter the tax to be 0.
Additional tax rates can be created if required. Please contact Spot support at Support@Spotpos.com to have these created.
If you need to exempt the special tax charge from one of your tax rates, you can check the appropriate box.
When a Tax ID is available, you can record it here.
Other Details
This section contains many options for customers.
Most notably, you can set a customers price table. This will override any settings in Spot and allow the customer to use that price table exclusively.
Other options here include:
Setting a rewards program and reprinting those coupons.
Enabling lockers and setting locker pin
Enable customer for restoration work
Subscriptions
Assigning a store as the 'home' location for a customer
Allowing payment types. Cash, Check, Credit, etc.
Heat Seal Items
Search Customer HSL's by ID
HSL History
Edit HSL
Reprint HSL
Special Flags:
Disable Printing Invoice at Detail
Disable Print Visit
Disable Auto Coupons
Disable Minimum Order Surcharge
Disable Enviro Surcharge
Disable Tender Surcharge
Convetor Automatic Bagger Passthru
CRM
'CRM' Stands for Customer Relationship Management. This section allows you to do exactly that.
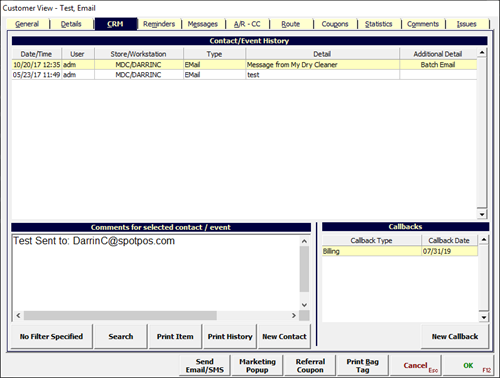
Contact/Event History

This portion of CRM will give you a single line for an event, such as 'Batch Email'.
The line will contain information to help you determine when it was triggered, where (Workstation), and who triggered the event.
Comments for selected contact / event

This section of CRM will give you more information about an event. For instance, it will tell you the email's subject and the recipient's email address after sending an email.
Callbacks

Here, you can create a note to call the customer back by selecting the New Callback button. You will then have a small window to take notes and set the issue's title.
Reminders
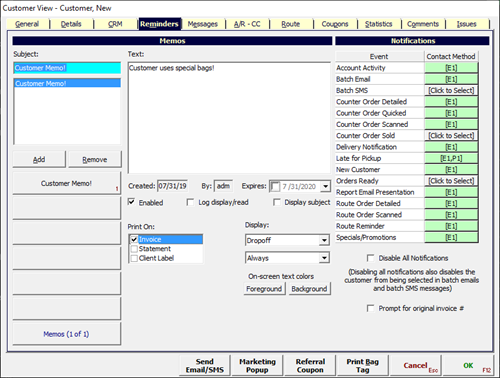
Memos
You can use Memos in a few different ways. These messages can appear on screen, printed on invoices or statements, or even sent via SMS to staff members.
For memos sent via SMS to staff members, as triggered by customer-specific processing events, see this this guide.
To create a manual memo for a customer, type a subject under Subject:, then type what you would like to appear in the message under Text:. Finish by selecting the Add button.
Once you have your memo, you can select how and when to display it.
Enable: Turn the specific memo 'on' or 'off'.
Log display/read: If enabled, this will create an entry in the activity log when the memo displays on the screen.
Display Subject: This will include the subject in the text pop-up for the memo.
Print On: Here, you can choose if and where to print the memo.
Display: The first drop-down will let you choose where to display the memo. Either at Dropoff, Pickup, or Always(both). The second will let you choose if it will show up every time(Always), once, or once per user.
On-screen text colors: Choose the color of the font(Foreground), and the background.
If you want to create pre-defined memos, you must go to:
Setup > Program Configuration > Company > Customer Settings >Memos
Right Click 'Memos' and select 'Create new 'Memos'.
To finish, edit the subject and the text, then save out of Program Configuration.
Messages
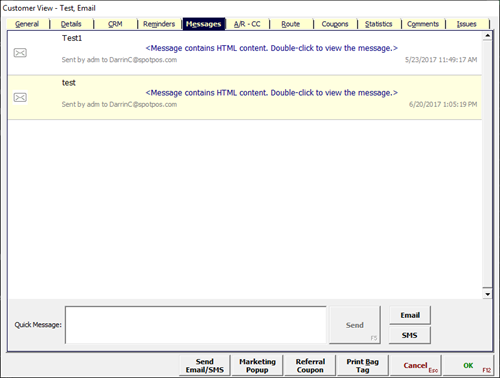
The Messages tab lets you view SMS and Email messages exchanged with the customer. In addition, you can send a quick email or text to the customer.
Double-clicking on an entry lets you view the email or text message fully.
A/R - CC
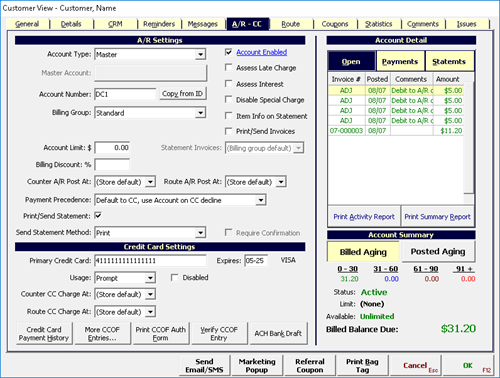
A/R Settings
Account type:
Master: This account type can create statements and is responsible for all invoices created for it and any of its ‘Sub-Accounts’.
Sub-Account: This account may not create statements. Select a master account to create statements.
Account Number: ’Copy_From ID’ should be used by default unless an external number is needed.
Billing Group: Assign the appropriate group.
Payment Precedence: Make sure this is correct. You can set the default at:
Setup > Program Configuration > Store > A/R > Default A/R-CC Precedence
Credit Card: Orders usually charge the Credit Card on File (CCOF). The account is only used for route customers for a declined CCOF.
A/R (CC pays monthly balance): Orders are normally charged on account. The CCOF can be used to make payments on account, including using the "CCOF Payments" option. When using "CCOF Payments", the card will be charged for the total account balance.
A/R (CC pays overdue balance): Orders are normally charged on account. The CCOF can be used to make payments on account, including using the "CCOF Payments" option. When using "CCOF Payments", the card will be charged only for the portion of the account balance that is overdue.
Print/Send Statements: This should be checked.
Send Statement Method: This should be ‘E-mail (.PDF)’
Account Enabled: This should be checked. Tip: If you want to disable a particular customer, you only have to uncheck this box to stop invoices from being posted to A/R.
Account Detail
Open: This tab shows all invoices, Adjustments, and Credits that have not been paid or used.
Payments: This is going to show all payments made to the account.
Statements: This is going to show all statements that are currently available.
Tip: If you delete a statement, you must recreate it to view that information.
Credit Card Settings
Primary Credit Card: This field is used to store the customer's credit card number.
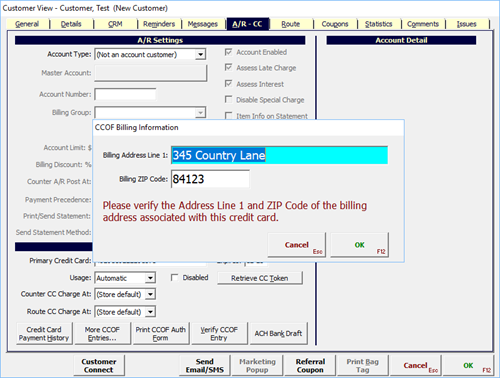
Spot will prompt for billing address line 1 (optional) and billing postal code (required) when a CCOF is added and tokenized.
Expires: Use this field to store the customer's credit card expiration date.
Usage:
Never: We won't use the customer's card during pickup or when processing route orders.
Prompt: During pickup, the clerk will be prompted to use the CCOF Credit card on file.
Automatic: During pickup, the CCOF is the tender will by default.\
Disable: By checking this box, you will disable the card, and it will not be available for use.
Counter CC Charge At:
Store Default: This will use the setting found at:
>Setup > Program Configuration > Store > Site Defaults > Auto Credit Card Apply EventRack: This will use the CCOF automatically once an order is racked.
Pickup: This will use the CCOF during pickup.
Route CC Charge At:
Ready: This will use the CCOF automatically once an order is marked as ready.
Delivery: This will use the CCOF automatically once an order is marked as ready.
Credit Card Payment History: This brings up a small pop-up window that shows you the credit card payment history of the customer. The status column shows a list of declined payments or prepayments.
More CCOF Entries: This will bring up a small pop-up window that will allow you to store additional credit card information.
Print CCOF Auth Form: This will print an authorization form to have a customer sign to collect the CCOF. There are two related settings.
Authorization Template:
Setup > Program Configuration > Company > Credit Card profile > (Credit card profile) > CCOF Auth Form Text
CCOF Auth Pritner Assigned:
Setup > Program Configuration > Workstation > Report Settings > Printer assignment > CCOF Auth. Form
Verify CCOF Entry: By pressing this button, you will charge the customer's card $1.00 and then immediately refund the amount to ensure that it is a valid card.
Regarding ACH
SPOT will no longer support ACH (Automated Clearing House) due to evolving regulatory requirements. ACH transactions carry inherent security limitations that make them increasingly difficult to support under current compliance standards.
Account Summary
Billed Aging: Represents the value of charges that have been billed to the customer via statement creation, minus what has been paid.
Posted Aging: Represents all invoices posted to A/R (Billed or not), minus what has been paid.
Route
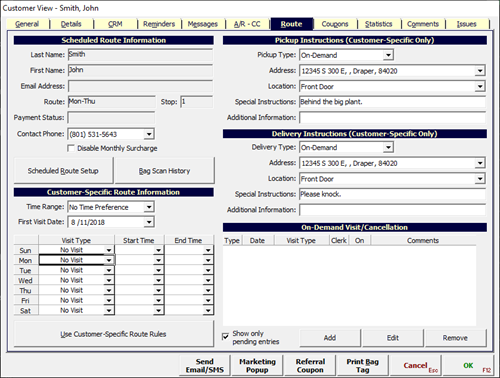
Scheduled Route Information
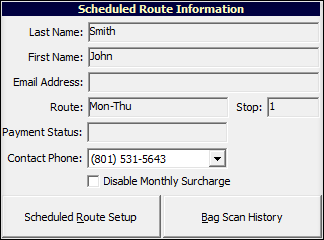
In this section, if applicable, you can see the customer's route, stop, and payment status.
Scheduled Route Setup: This brings up a route menu that allows you to schedule the stop.
Bag Scan History: This shows any bags scanned on the route. (Delivery Connect Mobile only.)
Customer-Specific Route In formation
This section is only used if the Use Customer-Specific Route Rules button is highlighted at the bottom. This will override any of the rules already set by the route the customer is on. See Get started with Routes for more information.

Pickup Instructions (Customer-Specific Only)
Choose the On-Demand or Scheduled route type and the address used.
Location and special instructions can be included to assist the driver on the route.
Delivery Instructions (Customer-Specific Only)
Choose the On-Demand or Scheduled route type and the address used.
Location and special instructions can be included to assist the driver on the route.
On-Demand Visit/Cancellation
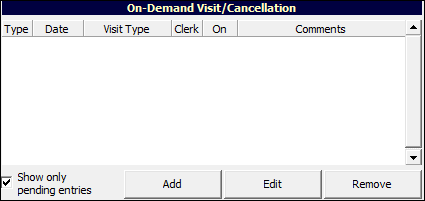
This section allows you to view On-Demand visits. By selecting the 'Add' or 'Edit' button, you can enter the on-demand scheduler screen.
Coupons
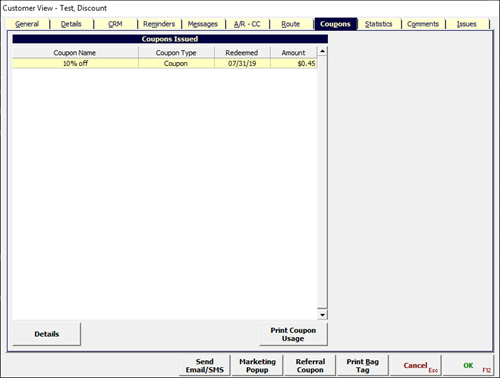
This section lists the coupons used by the customer. Click Details to view the related invoice. Print Coupon Usage prints the list as shown.
Statistics
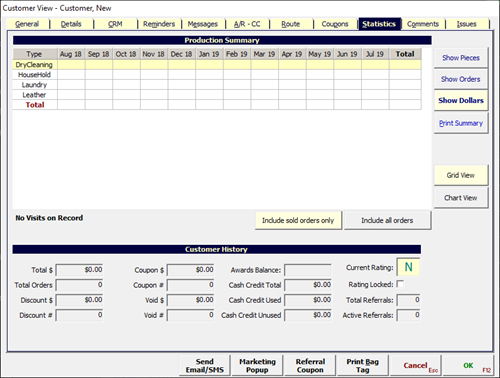
Production Summary
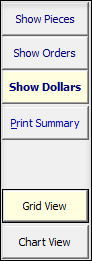
This section will give you totals, by department, then by month, of the individual customer's invoices.
You can select between pieces, orders, or dollar amounts on the right side. In addition, you can select either a grid or chart view of the information.
At the bottom, you can exclude order not sold, or view all orders.
Customer History

This section will give you totals for the customer.
Comments
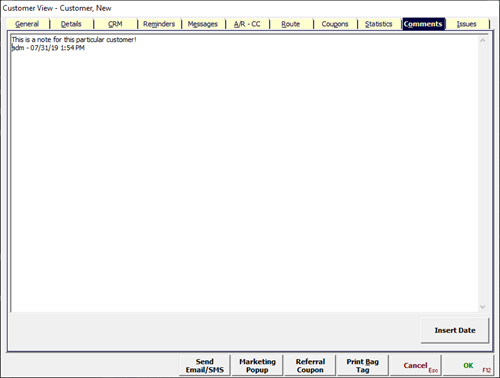
This section is to keep notes on the customer. Use the 'Insert Date' button at the bottom right to put a time/date and clerk initials.
Issues
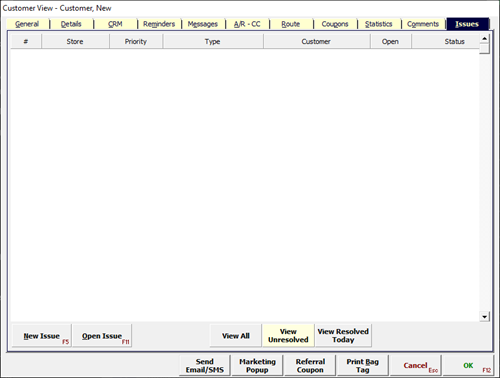
This tab is used to record, monitor, and resolve issues the customers have. This can be anything from a missing garment to trouble with receiving emails. Learn more about setting up and managing issues
Recent changes
2023-05-04: Reformatted article. Added new declined status in AR/CC > Credit Card Settings > Credit Card Payment History.