Spot was designed from the ground up to accommodate your Route and Valet needs. The route and valet functionality are not an add on to the counter operations, rather it is a complete module that takes your delivery options and reporting to a level not seen in the industry. We have implemented an impressive route/valet feature set by integrating the latest technologies allowing you to improve operational efficiency and customer service. It has been designed to remove the paper manifest and provide your company with route driver accountability and detailed reporting using the integrated real time Route Manager. In this article, we will discuss the general usage of Delivery Connect Mobile.
Choose an option to learn more about that screen.
Load Screen
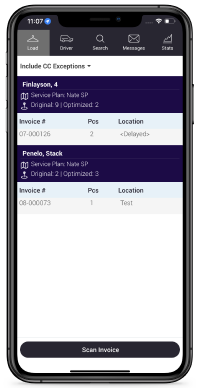
Once you have selected a Manifest and Vehicle and entered the vehicle's odometer reading, you will see the Load Screen. The Load Screen shows all the invoices that are on the loaded Manifest.
Reconciliation can be done here by scanning the invoices.
Tapping on the Invoice will display the Order Details, including pricing.
From the Order Details screen, select the History button to view the full Order History for the customer. Note that the orders are included in three tabs: In Process, Ready, and Sold.
Driver Screen
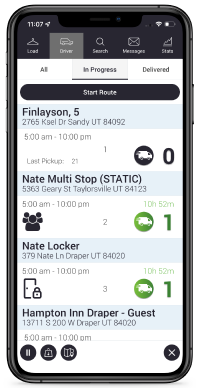
To begin the loaded manifest, press Start Route.
Customers will be added or removed here in real time, meaning that if an On-Demand order gets created for the route today or a pickup request is canceled, then the stops will change. Note that, for stops with no bags to deliver and "O" displayed, you can hold your finger on the zero for a few seconds to process the stop and mark it as completed. Be aware that drivers' location is still tracked for this action.
There are three tabs on this page:
All: All customers on the Manifest.
In Progress: All customers that have not been processed.
Delivered: All customers that have been processed.
Tip: Stop numbers listed here are based on Optimization and may differ from Spot.
Choose an option below to learn more:
Driver Screen Stop Type Icons
 = Multi-customer Stop
 = Hotel Stop (Requires Delivery Connect)
 = Locker Bank (Requires Delivery Connect)
 = Store/Plant
Stop Type details
For Hotel, Multi-Customer, and Locker stops, there are some important differences in process and interface.
Hotel Stops
Each delivery for the hotel included in the manifest is listed here. Select the bubble next to each invoice tomark these invoices as delivered or select Scan Invoice (preferred) to scan them in. Note that using Hotel stops requires Delivery Connect.
Note that you can select Multi View to select which Hotel Divisions are displayed. Multi View displays all Divisions for the Hotel.
For hotel pickup requests, select Scan Bags, select the appropriate division for the bag, enter the guest's name and room number, and scan the bag. Repeat as necessary.
Select the Information Button. to view, edit, or add delivery instructions, photos, and other notes associated with the Hotel.
Multi-customer Stops
For multi-customer stops, you will first see a list of customers and their respective invoices included in the manifest for the stop. Select either an individual customer's name and then Single Customer or the multi-customer button to the right.
If you selected the multi-customer option, toggle the delivery slider to indicate which invoices you are delivering or select Deliver All.
If there are bags to be picked up at a multi-customer stop, select Bag Options. Here you can pickup or assign bags as needed. Refer to the Overview section above and the Assignable Bags page for more information on bags.
Locker Banks
Note that using Locker stops requires Delivery Connect. Also note that any special instructions entered by the customer at the time of drop-off will appear when garments are Detailed.
Upon arriving at a locker bank, open all locker doors and proceed through these three screens and processes.
Old Orders If any order marked as ready for customer pickup is still in the lockers, confirm whether it is still in the locker. If it is, toggle the slider from "Not Present" to "Present." Repeat for each Old Order. If an order has been in the locker longer than the Return to Store Interval (set in Delivery Connect Mobile), the driver is prompted to return the order to the store or plant, where management or other staff can decide what to do with the order.
Pickup Bags Any orders ready for pickup are listed here, along with the Locker Id, customer name, and number of bags. Select an order, and select either Scan Invoice or select the Order description to scan bags.
Delivery Orders Any orders ready for delivery to the customer are listed here. Select the order or Scan Invoice to process these orders and deposit them in lockers.
If you selected the multi-customer option, toggle the delivery slider to indicate which invoices you are delivering or select Deliver All.
If there are bags to be picked up at the locker, select Bag Options. Here you can pickup or assign bags as needed. Refer to the Overview section above for more information on bags.
Store Drop-off
If store management has triggered a mid-route dropoff via Delivery Connect, a stop at the selected store or plant will be added to the route.
Upon arriving at the store or plant, the driver will select Drop-off Bags, then either the number of bags to drop off or toggle Drop-off all.
To drop off individual bags, scan each bag and confirm each in the Scanned Bags list below the scanning window.
For Hotel, Multi-Customer, and Locker stops, there are some important differences in process and interface.
 = Park the route In order to successfully park (pause) the route, you must next select another New or Parked manifest.
 = Bag drop-off Select the store/plant at which you need to drop bags off and it will populate as the next stop on the route. Upon arrival at the plant/store, select the stop and then scan/select which bags you are dropping off.
 = Navigation Launch the device's native navigation app and navigate to the next stop on the route.
 = End Route Ends the route. If bags have been collected, but not dropped off at a store/plant, the driver is prompted to drop off the bags at the plant/store that owns the manifest. If another store/plant is receiving the bag(s), use the drop-off button, as described above.
Stop Screen
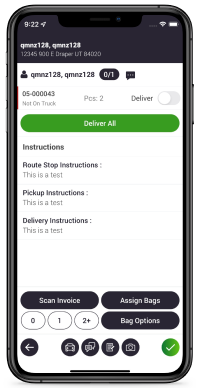
After you have selected a stop, you will see a list of invoices available for delivery. This screen will also display Route, Pickup, and Delivery instructions respective to the current stop. Note that, whenever a bag is picked up, the respective customer will receive an SMS notification of the pickup.
Review the stop's instructions for delivery, pickup, and other location-specific notes, listed below the order(s).
Select either individual invoices from the list, Deliver All, Scan Invoice, or Scan Bags, as appropriate for the delivery.
Once the visit has been completed, the customer will be removed from the In Progress tab on the Delivery page.
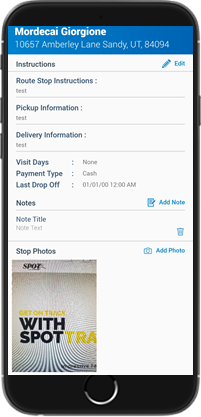
Select the information button  next to the customer to edit this information and view photos of the stop. Notes, photos, and instructions added with the information button are permanently associated with the customer for future use, such as a new driver taking over a route for a day.
These buttons will help you complete and confirm deliveries along the route.
 The car icon will give you driving directions through the device's native mapping software using GPS.
 The note icon will allow you to review or add notes for the delivery only, i.e. to describe something specific to that stop ON THAT DAY only, such as confirming delivery of a bag. These are different from notes added with the information button adjacent to the customer's name, which are permanently associated with the customer.
 The camera icon will allow you to review or add photos for the stop. These photos are used specifically for this delivery, ON THAT DAY, such as confirming that a bag was left outside a door. These photos can be automatically sent to the customer via email. These images can be reviewed in SPOT at Menu > Delivery > Delivery Connect Mobile > Select a Route > Select an Order from Route Detail View .
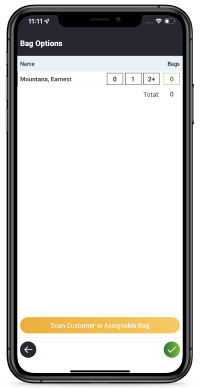
After pressing the Bag Options button, the user can choose either Pickup or Assign Bags.
Pickup: Use this mode if the customer's order is in a bag permanently associated with that customer.
Assign Bags: Use this mode to associate the customer's order with a re-assignable bag not already associated with any customer. This bag assignment is temporary. When the order is Quicked or Detailed, the bag assignment will be erased; allowing the bag to be assigned to a new order in the future. Note that reassignable bags use barcodes distinct from HSL or other barcodes you are likely using. Please contact Spot Sales at 801-208-2212 for ordering information.
Search Screen
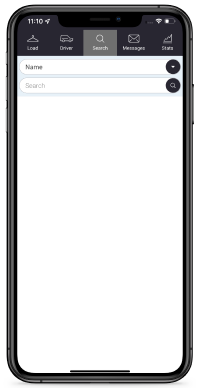
Use this tab to search for customers or bags, including options to navigate to the customer, schedule pickup requests, view their contact information, or access information for particular bags.
When you find the desired customer, select their entry in the list to view contact, signup, drop-off history, and service information or select Add Pickup Request to schedule a future pickup or delivery.
Messages Screen
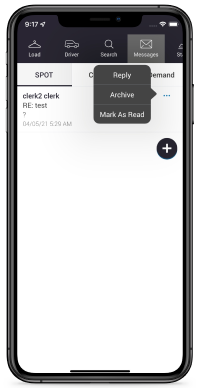
Use this tab to communicate with store management/staff and route customers.
Use the Spot Messaging tab to communicate with your store's management and staff. Press the  to create a new message. Select the recipient from the dropdown.
Use the Clients and On Demand tabs to communicate with the respective Routes customers via SMS. With this functionality, Delivery Connect Mobile mobile will send and receive SMS messages directly to and from Routes customers.
Note that drivers can only respond to messages in these tabs and cannot create new 'conversations' with customers here. To create a new 'conversation', use the communication options under the Driver tab.
Stats Screen
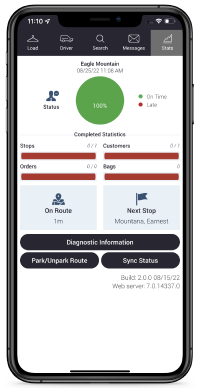
This is a breakdown of some real time statistics of the route, app diagnostics, and other options.
On Time/Late Graph. Drivers can use this pie graph to quickly assess which percentage of the Route's stops are On Time or Late.
Completed Statistics. The number of completed Stops, Orders, Customers, and Bags for the Route.
The current status of the Route and time spent in that status.
The next stop on the Route.
Diagnostic information which may be referenced if you need to contact support or validate certain settings.
Park/Unpark Route. Can also be used to switch between manifests, if needed.
Sync Status. Use this to confirm whether all Route data stored on the mobile device has been synced with the SPOT database.