In Delivery Connect, use the Route Plans tab to plan delivery and pickup routes and generate manifests. Manifests instantly sync with Delivery Connect Mobile! You can even schedule a one-time On-Demand Stop with the On-Demand Route Scheduler. This article describes the different tabs on the Route Plans screen to help you generate manifests. Learn more about getting started with Delivery Connect.
Select an option to learn more about that screen:
Select Plans

This first pane is used to select which Routes will be included in the manifest. Use these options to filter the AVAILABLE ROUTES to choose from:
Date: Set the day of the week for which you need to prepare a manifest.
Time: Filter the listed Routes/Service Plans by Start Time and End Time, as listed in Available Routes.
Select a Store or Group: Use these guidelines:
Store: Select the individual Store which the desired routes or service plans are assigned.
Group: Select the Service Plan Group to which the desired Routes/Service Plans are assigned. If you ever need to edit or delete a Service Plan Group, use the Pencil (edit) or Garbage Can (delete) buttons after you have selected the relevant Service Plan Group. You can also create a new group by clicking the New Group button.
New Group: Select New Group
 to create a group of Service Plans. This feature is useful for drivers who drive multiple Service Plans in a single day, including those associated with multiple stores. Use these steps:
Name the Service Plan Group.
Select the first store with Service Plan(s) to be included in new Group.
Select each Available Route needed.
Repeat for each store with Routes to be included. When you have finished your selections, click Save.
Routes: A list of available Routes/Service Plans, as filtered by the above options. Select which Routes/Service Plans to include in the manifest.
Note: If a Service Plan Group has been selected, this section will display the included Service Plans only, and is not selectable.
Once you've selected a Service Plan or Group, click Preview Manifest to progress to the Order Preview tab.
Order Preview

This screen shows the orders that are ready for delivery from the stops included in the route(s) selected on the last screen, including settings for pre-payment and inclusion/exclusion from the Manifest. Use these guidelines:
You can choose to filter orders by whether they are paid or declined/failed.
Use the check boxes next to each order to toggle prepayment and inclusion on the manifest.
Prepayment for orders marked as such will be attempted as a batch after you click Prepay.
Any orders with a declined payment will be visible in the PAYMENT STATUS column. Consider excluding these orders from the Manifest by un-checking the INCLUDE box for each order.
Un-check the INCLUDE box for any orders that you don't want included on the manifest.
After you've made your selections, click Next to progress to the Opportunities tab.
Opportunities


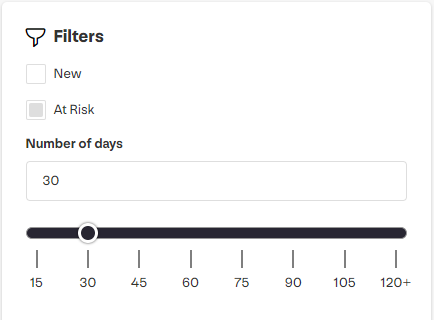
The Opportunities screen shows all new and at-risk customers. A new customer has never been on a manifest, and an at-risk customer hasn’t been visited for a pickup or drop off in a certain number of days. The opportunities list is great for sending new customers welcome packages, visiting at-risk customers, and understanding which customers can be removed from your manifest. If you want to visit any of the new or at-risk customers, check the box in the visit column and click next to add them to the manifest. You can also choose skip to move past this screen.

You can filter the list of opportunities by new or at risk using the options on the right. The default number of days for a customer to be considered at risk is 30. You can adjust the number of days using the slider in the right panel.
Review

This is the final Route Plans pane. Use it to confirm Manifest totals, toggle route optimization, and review any non-geocoded stops, etc. Use these guidelines:
Preview Totals: Confirm the final totals for Customers, Total Orders, Stops, Ready Orders, and Delayed Orders for the configured manifest.
Non Geo Coded Stops: These are stops that the configured address may be new or incorrect and doesn't register as valid. Click the drop-down arrow to see a list of non-geocoded stops. Click Edit Stops and then Edit to open a Customer Console module or click the pencil icon to edit and verify only the Route address.
Optimize Settings: Toggle whether the route will be optimized by Route4Me, a third-party solution. Click here for more information. The following settings can only be edited if Optimize is toggled-on. Click the drop-down arrow next to Optimize to view these settings.
Number of Vehicles: Set the number of vehicles running the Manifest.
Start and Stop Location: Confirm the initial and final locations for the Route.
Click Create Manifest. That's it! You have created your delivery manifests and your Delivery Connect drivers are ready to run their routes!
A PDF manifest will automatically download to your computer. Note that, if you're using multiple vehicles, because multiple manifests are attempting to download, your browser may prompt you with a warning. If so, click Continue or Ok to download all generated manifests.
On-Demand Route Scheduler
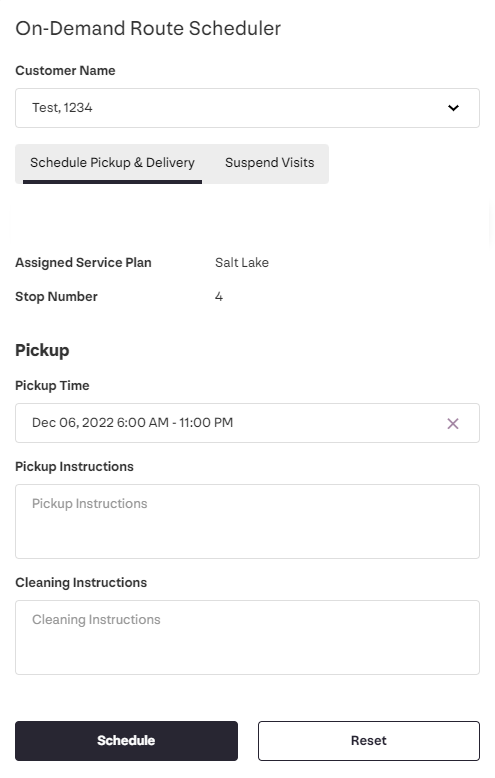
Delivery Connect allows you to quickly and conveniently schedule a one-time On-Demand Stop with the On-Demand Route Scheduler. The On-Demand Route Scheduler also allows you to suspend a customer's service for a set period of time. The scheduler is available from the Route Plan tab.

To schedule a one-time on-demand stop, complete these steps:
Click On-Demand Route Scheduler at the top-right of the screen. This option may not be available while editing or otherwise managing other assets. The Scheduler dialog will appear.
Enter the customer's name. Note that, after selecting the customer, their assigned Service Plan will be displayed, if available.
Select a Pickup or Delivery time. Note that Delivery Time will be available only if the customer has an order ready for such.
Enter any needed Pickup or Cleaning Instructions and click Schedule to add the requested On-Demand Stop to the next appropriate manifest.
To suspend a customer's service, use these steps:
Click the Suspend Visits tab.
Enter the appropriate Start and End Dates.
Click Schedule to suspend service for that time period.