Managing employee clock-in/out times and pay periods is an integral part of any business. With SPOT's robust time clock system you can tailor the experience to meet your business needs.
Requirements
User Rights
To set the user rights necessary for time clock access you will need to navigate to:
Setup > Users, Groups, Rights... > Activity rights
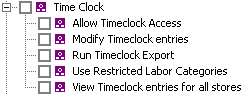
Allow Timeclock Access: Allows the user group to clock in.
Overview
Overview
Once the time clock settings, more specifically the pay periods (described below), are set up, the user is able to use the time clock button located on the SPOT home page to clock in and out.
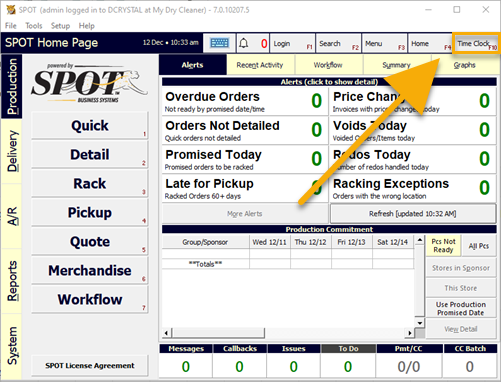
The button will trigger a pop-up that lets the user log in.
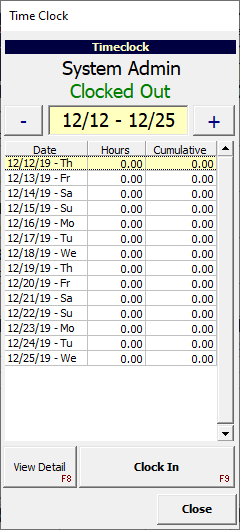
At the top, the user name will be populated based on the pin used when accessing the button.
Under the user, the current status of the user will be displayed.
The  and
and  buttons will allow you to navigate between pay periods, though the one in-line with the current date will already be selected by default.
Below that, the days for the selected pay period will be displayed.
Use the View Detail button to see time clock information for the specified user based on the day highlighted.
Use the Clock In or Clock Out button to create the appropriate time stamp.
Using the base time clock system is that easy!
Setup
Company Settings
To start the setup process, you will want to navigate to:
Setup > Program Configuration > Company Settings > Time Clock Settings
Required
Workweek Start Day: This is the day of the week your workweek starts and is used for calculating overtime hours. This is usually paired with Overtime Cut off Time - Week in the store settings.
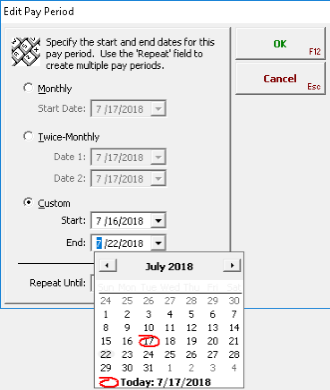
Pay Period Setup: Before any time clock information can be gathered you must first create pay periods. Pay periods are time ranges that are predetermined in order to organize your employees' time in order to match your pay schedule. You have the option of creating pay periods one-by-one or by using the pay period wizard to assist you in creating pay periods. The periods may be based on single-week, two-week, and bi-monthly periods.
Pay Period Wizard
Monthly: Same date (Such as the 15th) will be used for each pay period.
Twice monthly: Same two dates (Such as the 1st and the 15th) will be used for each pay period.
Custom: This allows you to pick a start and end day. (This example is Monday - Sunday.) This will allow you to create weekly/bi-weekly pay periods.
Repeat Until: This will create pay periods for the one of three options selected. We recommend that no more than a year be put here. Once the pay periods are set, the only way to remove them is one at a time.
Optional Settings
Clock-Out Alert Threshold: Threshold time (in minutes) after which a user, when clocking out, may be considered to have forgotten to clock out. The system will prompt the user and ask if their intention was to clock in and, if so, will clock them out after a typical shift time (set with Clock-Out Alert Shift Time) and then clock them in again. This shift will be flagged for manager's attention. Set to zero 0 to disable.
Example: This setting is set to 480 (8 hours). If an employee attempts to clock out after a consecutive 8 hour shift they will receive this prompt.
Clock-Out Alert Shift Time: Sets the auto-clockout shift time (in minutes) to be used when the Clock-Out Alert Threshold is invoked. If the above example is used, the recommended setting here would be 480.
Page Break after each Employee: Indicates whether to force a page break after each employee's record when time clock reports are printed. The default is No. This can be useful when viewing the Time Clock Employee Detail report, as you will clearly be able to see when the time stamps change to a different employee.
Store Settings
After you have completed your company settings you will want to navigate to:
Setup > Program Configuration > Store > TimeClock Settings
Overtime Cut off Time – Day: Number of hours worked in a day by an employee that will contribute to the calculation of overtime hours. If your state requires overtime for any time over an 8 hour shift you will place 8 hours in this field.
Overtime Cut off Time – Week: Number of hours worked in a work week starting with the Workweek Start Day. Any hours after this configured number will contribute to the calculation of overtime. If your state requires overtime pay for more than 40 hours per week you will place 40 hours per week in this field.
Prompt for Shift Start Time:
Yes: The clerk will be prompted for the start time of their scheduled shift when they clock in for the first time each day. The default time will be the time associated with the clerk in User Manager. This time will be saved with the time clock record so that it can be reported on.
No: The clerk will not be prompted for the shift start time when they clock in. (Default)
Workstation Settings
With Company and Store settings completed, navigate to:
Setup > Program Configuration > Workstation > TimeClock Settings
Display Clocked in Users on Exit: Enabling this feature will display all clocked-in users at the store at the time you exit SPOT. This is usually enabled on the stations at the front counter to inform clerks / managers of employees that are still clocked in. This will help with the amount of time clock management needed for clerks that forget to punch out.
Allow Clock-In From This Workstation: Enabling this feature will allow any employee to use this station to clock-in or out. You may have a single machine that is used for time clock and then restrict all other stations from being used for clock-in and -out functionality. This is enabled by default.
SPOT User
To avoid accidents, you can enforce a forced clock-in by user. To do this, navigate to:
Setup > Users, Groups, Rights…> Users > (User) > Activity Settings > User Settings >User Settings
Force Clock-In: Enable this feature per user to force the employee to clock into SPOT before they can use the system. If a clerk has this enabled and is not clocked-in they, will be warned when they attempt to use any functions in SPOT that they are not currently clocked-in.