Price Tables are at the core of SPOT’s functionality. Price Tables allow you to set up how SPOT records, handles, and prices garments. It is important to take the time to learn how to create and maintain these for your business, in addition to the related settings within SPOT.
Overview
Price Table Components
Creating a price table can be a daunting task; however, it is simplified once you understand how SPOT helps you structure it.
Department/Category/Item
The department, category, and item are the three basic elements of a price table:
Department: This is used to distinguish between major methods of cleaning/treating items. The most common used are 'Drycleaning', 'Household', 'Laundry', 'Leather', and 'Wedding'.
Category: Under the department, this is used to group items by general design. For instance, categories under the 'Drycleaning' department could be described as 'Shirts', 'Pants', 'Dress', 'Coats', etc.
Item: Under the category, this is used to describe a the particular garment. For instance, an item under 'Pants' could be described as 'Jeans', 'Slacks', 'Ski', etc.

Department Groups
Department groups are a key part of SPOT operations. These groups allow you to organize your departments and provide opportunities for setting changes and reporting. It is important to keep in mind that department groups are a required setting in the departments themselves, if used for nothing else.
Example: You might have a department group called ‘DryCleanin’. This department group will contain all your drycleaning departments such as ‘Men’s DryCleaning’ and ‘Women’s DryCleaning’.
Promise Date Table
The promise date table is used to set default due dates for orders at the mark-in stage. A single price table can use multiple promise date tables based on your needs. In particular, routes and hotels generally have different promise date needs.
In addition to the regular promise date table there is now a production promise date table that is optional. This can be configured to give your in-house staff a due date to complete the invoice.
Upcharge Table
Upcharge tables are used to complement the price table. These tables are used to change the price of a item based on special care it might require. This could be based on a something like fabric or specific customer request. The upcharge tables are linked to the price table at the item level, allowing you to customize each one to meet the item's needs.
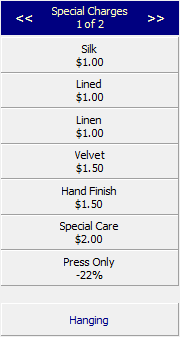
The upcharge table is represented in the mark-in process by the Special Charges column.
Alteration Table
The alteration table is used in conjunction with the price table to label items with one-time changes. Depending on your range of services, this could be anything from adding a button back on to hemming pants. The alteration tables are assigned at the item level in price table settings. These can be used during mark-in, using the 'Item Alteration'.
.png "image(101).png")
Setup
Create/Copy a Price Table
When creating a price table it is important to consider the day to day operations and efficiency. The price table will govern most of SPOT's operations. Thus, a well-planned and thoughtfully created table will streamline your business and put you a step above the competition. In addition, utilizing separate tables for different aspects of your business, like hotels and routes, can assist in management and maximizing profits.
WARNING! Changing the name of an existing table will render its current production invoices unusable. If this is a new table that has not been in production, there will be no issue with renaming.
The price table settings are located at:
Setup > Program Configuration > Company > Mark-in Settings > Price Table
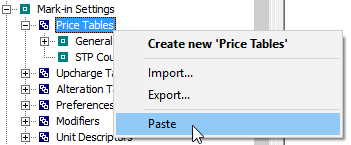
If you already have a price table created that you want to emulate, you can save time by right-clicking on the current price table and selecting 'Copy'. Then you will want to right-click on ‘Price Tables’ next to the blue box and paste. This will give you a fresh copy to make your desired changes.
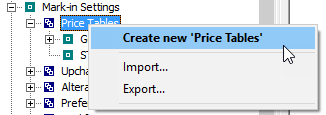
Alternatively, you can right click on ‘Price Tables’ and select ‘Create new ‘Price Tables’.
Now that you have your new price table, it is time to fill out or edit its components.
Department Groups
WARNING! Changing the name of an existing department group will render its current production invoices unusable. If this is a new copy that has not been in production, there will be no issue with renaming.
Because department groups are required for each department, they should be completed first.
Setup > Program Configuration > Company>Mark-in Settings > Price Table > (Your Price Table) > Department Groups
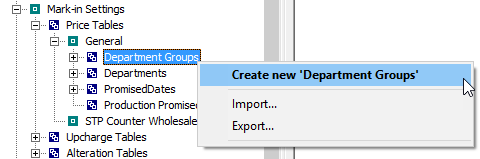
Right-click ‘Department Groups’ next to the blue box and select ‘Create new ‘Department Group'.

There are three main settings here that need to be filled out.
Name: Name the department group in a way that makes sense to you. (Normally something like DryCleaning, Laundry, Household, etc.)
MaxPieceCount: This will be used later with automatic split settings if you choose to use them. (Recommended at 5 to start, or 999 if you will not split at mark-in.)
Workflow Template: This MUST be set, otherwise the price table will malfunction. (See more on Workflow templates in our Order Process & Settings .)
Repeat this process until you have all of the department groups that you require.
Departments
WARNING! Changing the name of an existing department will render its current production invoices unusable. If this is a new copy that has not been in production, there will be no issue with renaming.
This is where you are going to create the header for specific groups of clothing. Under this header you will also create categories and the individual items themselves.
Setup > Program Configuration > Company > Mark-in Settings > Price Table > (Your Price Table) > Departments
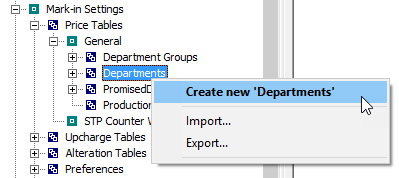
To create a new Department, right-click ‘Department’ next to the blue box and select ‘Create new ‘Department’.
Once you have your department there are a few key settings that should be set:
Name: Name this something appropriate as customers will see this on invoices. (Example: Men’s Drycleaning.)
Department Group: This MUST be set, otherwise the price table will malfunction. (Link this with the appropriate group. If you are following the examples so far, this would be DryCleaning.)
EnviroCharge?: Check if applicable. (Some states require a fee for dealing with the solvents used by dry cleaners.)
Preferences to Print: Select your customer's preferences you would like to add to the printed invoice.
Taxable: Check if applicable. (Some states require dry cleaning to be taxed while others do not. If you are unsure what applies to you, consult a tax professional.)
Repeat this process until you have all of the departments that you require.
Category
WARNING! Changing the name of an existing category will render its current production invoices unusable. If this is a new copy that has not been in production, there will be no issue with renaming.
Categories are the next stepping stone to your items. This will give you greater control over what Items are grouped together.
Setup > Program Configuration > Company > Mark-in Settings > Price Table > (Your Price Table) > Departments > (Your Department) > Categories
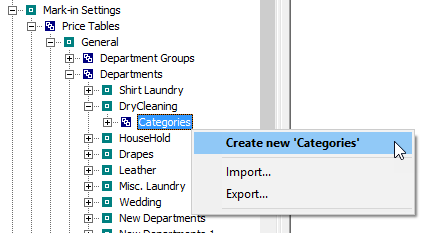
To create new categories, right-click ‘Categories’ next to the blue box and select ‘Create new 'Categories’.
Name: Name this something appropriate as customers will see this on invoices. (Example: ‘Shirts’.)
Describe & Price Available: This will enable a button at mark-in allowing custom item creation under this category.
Describe & Price Conveyor Context: Set this to hanging if you want Describe & Price items to go on your automated assembly and/or storage conveyor.
Repeat this process until you have all of the categories that you require.
Item
WARNING! Changing the name of an existing Item will render its current production invoices unusable. If this is a new copy that has not been in production, there will be no issue with renaming.
Items are the ultimate descriptor for your garments. Make sure you create all the items that you need, though keep in mind that the more items you have, the more complicated your mark-in sessions will be.
Setup > Program Configuration > Company > Mark-in Settings > Price Table > (Your Price Table) > Departments > (Your Department) > Categories > (Your Category) > Items
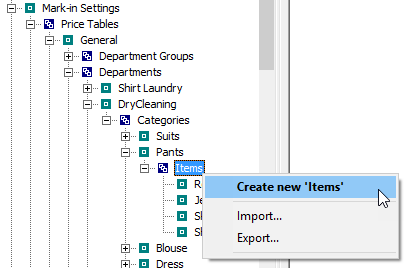
Right-click ‘Items’ next to the blue box and select ‘Create new Items’.
Name: Name this something appropriate as customers will see this on invoices. (Example: Dress Shirt.)
Price: This will be the cost given to the item when marked in.
Pieces: This will determine how many pieces show up on the invoice. The most common use for this is with Suits. If you only want to mark in 1 item but include an entire suit (e.g., jacket and pants), you would input ‘2’ here.
Upcharge Table: This will populate a upcharge table under the special charges section in the detail mark-in session. Find out more on these later in this training.
Alteration Table: This will give the list of alterations based on the table selected when using the Alterations button in the detail mark-in screen. Find out more on these later in this training.
Conveyor Context: This is only important if you have an automated conveyor. If you would like the item to be usable with the conveyor, set this to 'Hanging'.
Repeat this process until you have all of the Items that you require.
Promise Dates
WARNING! Changing the name of an existing promise date table will render its current production invoices unusable. If this is a new copy that has not been in production, there will be no issue with renaming.
This is to set up an automatic date due for garments based on the ‘Department’ level at the time of quick/detail.
Setup > Program Configuration > Company > Mark-in Settings > Price Table > (Your Price Table) > PromiseDates
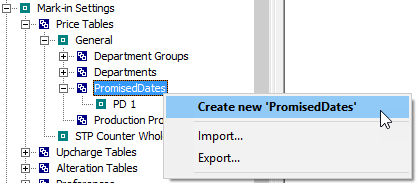
Right-click ‘PromiseDates’ next to the blue box and select ‘Create new PromiseDates’.
Name: Be sure to name this something appropriate. Keep in mind you may have multiple promise date tables to meet all your route and hotel needs.
Select 'Edit' to configure your table.
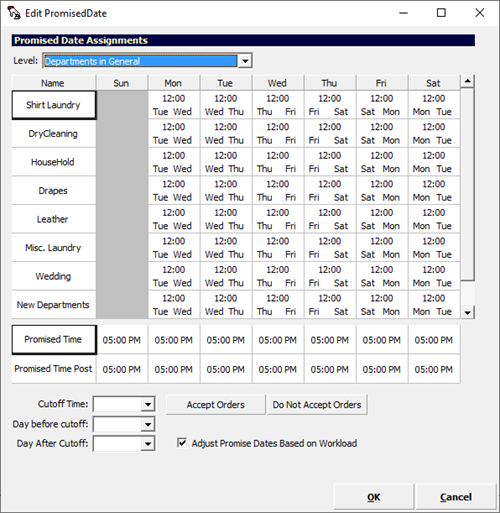
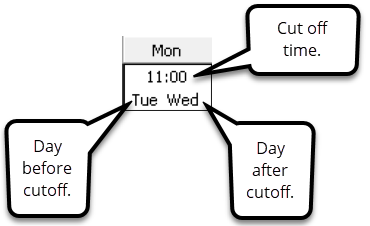
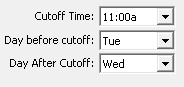
Cut off time: Anything before this time will be promised for the first day listed. Anything after will be for the second day listed. Make sure to re-select the Cutoff time for each new selection.
Tip: You must make all three selections each time you wish to change one of the settings. Automatic selections will not be applied.
To disable a day from production you will need to select the day and then select ‘Do not Accept Orders’. This will blank the day out, preventing orders from being promised for that day.

You can also set the promise date to be specific to your category levels instead of your departments. Select the drop down for Level and Choose Categories.
Price Table Default Setting Locations
To set the default price table for your store, navigate to:
Setup > Program Configuration > Store > Mark-in Settings > Price table
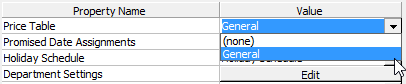
Use the drop down and select the desired table.
Setup > Program Configuration > Store > Mark-in Settings > Promise Date Assignment
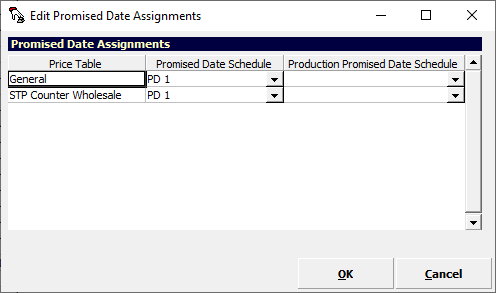
These settings will give you a default for the entire store. However, you can set overrides for routes and hotels at the store level.
WARINING! A price table will not be usable in mark-in if the default promise date schedule is not selected.
Hotel
The hotel settings function the same as the default store settings. You can find them at:
Setup > Program Configuration > Store > Mark-in Settings > Hotel > (Your hotel) > Price Table
Setup > Program Configuration > Store > Mark-in Settings > Hotel > (Your hotel) > Promise Date Assignment
Route
The route settings function the same as the default store settings. You can find them at:
Setup > Program Configuration > Store > Route Settings > Routes > (Your Route) > Price Table
Setup > Program Configuration > Store > Route Settings > Routes > (Your Route) > Promise Date Assignment
Customer
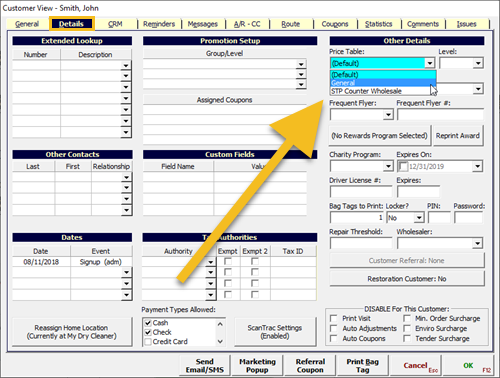
You can set a price table to override ALL settings per customer at:
Search > Customer > Customer View > Details > Price Table
Upcharge Tables
WARNING! Changing the name of an existing table will render its current production invoices unusable.
SPOT’s upcharges function through the use of an upcharge table that is associated one-by-one with each item in the price table. You can create the upcharges you wish to associate with that type of item. Some SPOT users set up their upcharges by clothing article type while others do it by department.
Setup > Program Configuration > Company>Mark-in Settings > Upcharge Tables

To add a new table, right-click ‘Upcharge Tables’ and select ‘Create new ‘Upcharge Tables’.

Default Multiple Select: This will allow multiple upcharges listed under this table to be selected at one time in the detail mark-in screen.
Referenced Upcharge Tables > Edit: This will let you link more than one table at a time. (Since you can only select one under an item/department.)
WARNING! Never select the current upcharge table in the reference selection, it will break the table.
Required Selection: With this setting on, the item cannot be marked in until at least one selection has been made from this table.
Setup > Program Configuration > Company > Mark-in Settings > Upcharge Tables > (Your Upcharge Table) > Upcharge Items
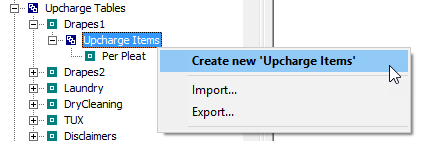
Right-click ‘Upcharge Items’ then select ‘Create new ‘Upcharge Items’.
Price: This price will be added to the item total.
Amount:
Actual: Flat dollar amount to add to the base price.
Percent: Percent of the item cost. Based on the amount listed in the price.
Apply Quantity to price: This will multiply the cost based on quantity.
Apply Quantity To Piece Count: If set to Yes, the order piece count will be incremented by the upcharge quantity.
Default Quantity: Default quantity of the upcharge.
Quantity Needed?: Determines whether the user is prompted to enter a quantity for the upcharge. If No, the DefaultQuantity value is used.
Unit Descriptor: The unit descriptor associated with the upcharge, if any(e.g., charge per pound). A selected unit descriptor may be defined to have more than one dimension; in this way, you may define area or volume upcharges.
Alteration Tables
WARNING! Changing the name of an existing table will render its current production invoices unusable.
Alterations are additional charges added to a specific item via the 'alterations' button on the order detail or the item details screens. These can be used by themselves, removing the item price (If it is not to be cleaned) or in addition to the cleaning cost.
Setup > Program Configuration > Company > Mark-in Settings > Alteration Tables
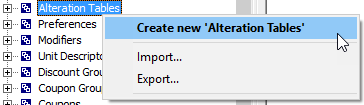
To add a new table, right-click ‘Alteration Tables’ and select ‘Create new ‘Alteration Tables’.

Name: As appropriate for the grouping, often times matching garment types. (Example: Shirts, blouse, pants, etc.)
Describe and Price Available: Indicates whether a [Describe] option will appear in the list of alterations at mark-in.
Taxable: Determines whether the alterations in this table are taxed.( If you are unsure, consult a tax professional.)
Setup > Program Configuration > Company > Mark-in Settings > Alteration Tables > (Your Alteration Table)
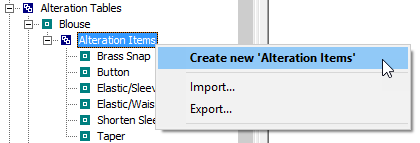
To add a new table, right-click ‘Alteration Items’ and select ‘Create new ‘Alteration Items’.

Name: Give the alteration a descriptive name. (Example: Add Button.)
EnviroCharge: Check if applicable. (Some states require a fee for dealing with the solvents used by dry cleaners.)
Price: This will be the cost used for the alteration. This will either be used with or instead of the item, depending on how the garment is marked-in.
PriceAt: Determines if and where the alteration may be priced.
(None): The price defined for the alteration will be used.
Mark-in: At mark-in, the user will be prompted to price the alteration.
Step: During a processing step (such as racking) that has been defined as a pricing step, the user will be prompted to price the alteration.
DEPENDENCIES:
Company Settings > Workflow Settings > Processing Steps > (Processing Step) >PricingStep
ProcessingDays: The number of processing days to be added to the order promise date if this alteration is selected.
PromptForQuantity: If set to Yes, the user will be prompted to enter the alteration quantity. The quantity will be multiplied by the alteration price to produce the final alteration price.