Lots are generally bins that hold a specific amount/type of garment. These lots are used to organize and streamline production. The Lot Manager will allow you to see what is happening in production in a single screen, with details available at the click of mouse. You can review open, closed, and even assemble lots. You may review history or current lot activity with reports for tracking incomplete lots in assembly and report on any garment details that are keeping the lot from being assembled, showing where they are in production.
Usage
To enable Lot Manager:
Setup > Program Configuration > Mark-in Settings > Lot Creation Mode
To reach the Lot Manager navigate to:
Navigate to:
SPOT Home Page > Menu – F3 > General 1 of 4 > Lot Management
You will select the Lot Management button to reveal the following example screen.
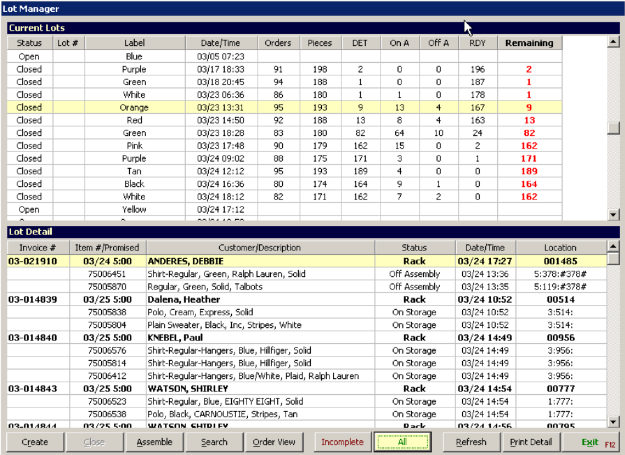
Current Lots
You will notice 3 distinct sections on this screen. "Current Lots" displays all current lots that are in production. All lots will be displayed in this section until they are set to "Assembled". At that time they will drop from this screen and be viewable with the search option. The columns in this section are used to view details at the lot level.
Status - Status of the lot described on the line item. You have two available status items for a lot listed in lot management. They are Open – Lots are accepting additional orders and garments. An example of an open lot is a lot defined to have a maximum of 100 pieces and only 50 pieces are currently in the lot. The lot will maintained as Open until it either has the configured 100 pieces or it is manually closed by a production manager.
Closed - The lot has hit its maximum pieces or the lot was closed manually by a production manager.
Assembled - Once a lot has reached its maximum pieces or is closed by production all orders are then assembled during the production process and then it is set to a status of "Assembled". After a lot has an "Assembled" status it is no longer displayed in the "Current Lots". To view these "Assembled" lots use the "Search" function discussed later in this chapter.
Lot # - Lot number created by SPOT either automatically using internal lot generation logic or created manually by the production staff.
Label - This is the physical "Name" of the lot. Normally you will see the lot sponsor/profile and the color of the lot. "Standard – White" as shown in the example means the lot is generated from the “Standard” lot profile and the lot tags are “White”.
Date / Time - The date and time the lot was created
Orders - Number of current orders in the lot
Pieces - Number of current pieces in the lot
DET - Number of pieces currently in the Detail or In-Process status. This would be all items that are currently on your production floor that have not been assigned to Quality Control step or placed on an assisted / auto assembly conveyor.
RDY - Number of orders that have either passed a QC step and are on an assisted / auto assembly conveyor
Remaining - Number of garments still on the production floor. If you have multiple in process steps defined this will reflect all items in these multiple steps.
Lot Detail
"Lot Detail"section of the screen gives you the details of the selected lot from the ‘Current Lots"screen. As per the example above lot 3 is selected showing the details of the lot in the "Lot Detail"screen. The following fields/columns are available and populated within the "Lot Detail"screen
Invoice # - Invoice number of the orders in the selected lot.
Item # / Promised - Promised date is on the first line of this column followed by the piece number of the items in the order. In the example above you have order 07-00002 that has 3 pieces. You can see the details of piece (1) 07-00002:1 etc.
Customer / Description - The first line for an invoice will be the customer’s name in bold, other lines in this column will be the descriptions of each garment on the order.
Status - The Status of the order is displayed if only invoice tracking is enabled. If Item Tracking is used you will see the status and location of each item associated with the order. An example with invoice tracking will be Detail, Ready or Sold. Examples at the item level will be Pressing, Spotting, On Conveyor, On assembly, On Rack.
Date / Time - The date and time the item was detailed and added to the lot.
Location - This is the current location for ready orders. You will see the rack location for the order if invoice tracking is used and you will see the location of the item if Item Tracking is used. Item tracking locations will be the location on the assembly or storage conveyor.
Operation
"Operation"selection section of the screen along with the selection of a lot in the "Current Lots"windows will allow you to review details of the selected lot in different ways and / or process the lot. The options available with each of these buttons are as follows.
Create - This is only used if you are using "Manually"created lots. Most installation will not use this option. This is used for those that have custom lot needs or are using a third party Itemtrac ID such as removable RFID chips, custom printed lot labels etc. If you use this feature you can customize thetype and color of lot being created with the "Create"selection.
Close - The "Close"selection allows you to manually close a lot. The example for this is you have production set for 100 piece lots and it is 3:00 pm and the end of the production day and you do not want to wait end the lot with 50 pieces and not the configured 100 pieces. Closing the lot with this selection will force a new lot to be generated for the detailers in your operation. Logic will be followed for generating the next lot just as if the 100 piece lot had been completed. Use caution.
Assemble / Unassembled - Once a lot has completed its life cycle in production and all orders are assembled in the lot and you have "0"displayed in the lots "Remaining"column you will use this selection to set the lots status to "Assembledâ€. Once a lot is set to "assembled" it will be removed from the "Current Lots"portion of the display. You may use the "Search"function to find these lots from previous days, weeks or months. "Unassembled"is only active when you select a lot that has a status of "Assembledâ€. This allows you to show the lot as closed and view it on the "Current Lots"screen for monitoring.
Search - The search gives you the ability to search for all lots in a given date range. Lots that have both
Order View - After selecting an order or a specific item in an order from the "Lot Detail"screen this will display the "Order View"screen for the selected order. This allows you to review and modify items. You may choose to "Split"or "Redo"an item in the order to remove it from the order and the current lot.
Incomplete - By Default this is selected whenever you select a lot from the "Current Lots"screen. This selection will show only the items in-process for the lot selected. This allows you to view only items in production and that need to be tracked to complete the lot. Production managers will find this an invaluable option for tracking down the "few items"that are holding up the lot from being completed / assembled.
All - This will show "All"items for the selected lot in the "Current Lots"screen and you will now see all in-process, ready and sold status orders / items.
Refresh - Refreshes the "Current Lots"and "Lot Detail"screen with current lot information. This will update totals and the status of items / orders on the screen. Use refresh if you have the lot manager screen displayed for more than a couple of minutes.
Print Detail - Prints the current "Lot Detail"screen to your defined report printer.
Exit - Selecting this will close the Lot Manager and return you to the Home Page.