In a perfect world, the customer would drop off their garments, the garments would be cleaned, then the customer would pick them up. Unfortunately it is not always that simple, a garment might get damaged or lost during the process, perhaps there was a delay, or maybe the customer is just not happy, this is when Issue Manager comes in handy.
Issue Manager is a tracking module for SPOT that allows you to construct step by step processes for any problems that might occur. This could include situations like customer claims, complaints, or lost garments. It can also be used for internal processes like maintenance needs and training. Issue manager is flexible, it has the ability to fit almost any need you may have for tracking a process utilized by your organization.
You may create issues, assign tasks, and report on progress for complete tracking and auditing control. With complimentary reporting, Issue Manager takes the stress out of tracking your issues.
Overview
Find your issues
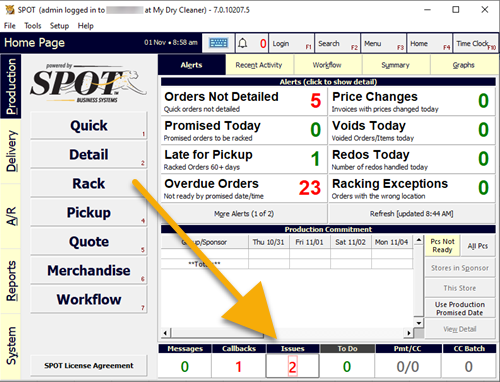
Once an issue has been assigned to your user or group you will see the number for issues increase on the SPOT home page. This number will only decrease as the issues are resolved.
Click on the Issues number to see a list of your current assigned issues.
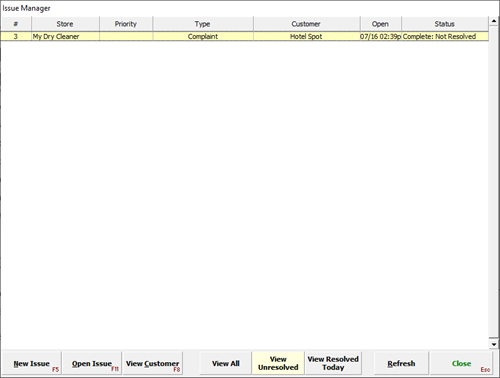
Once you click on the number you are able to see your list of assigned issues.
Issue Process
To begin the issue process you will need to select the Issue box on the SPOT home page or navigate to:
Menu > Store Management > Issue Manager - New
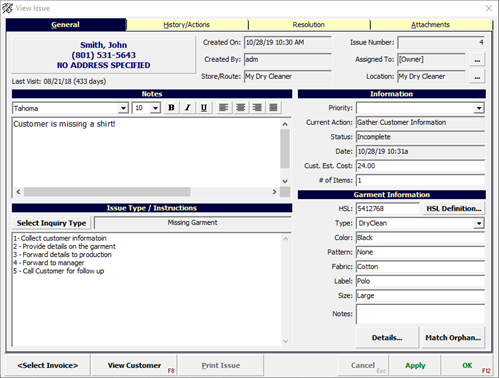
Once you have a new issue you will need to gather all the information for the problem.
Customer information, what the problem is, who at your organization is responsible for resolution, and any important details.
In the History/Actions tab you will be able to see what actions are required on the issue, marking each step status and adding notes as required.
To finish the issue, you will need to fill out the resolution tab. This lets you record what the outcome of the issue was in detail.
Requirements
Activity Rights
Before getting started, you will want to make sure that the chosen user groups have the correct activity rights enabled.
Navigate to:
Setup > Users, Groups, Rights... > Activity Rights
Select the desired user group on the left and then expand Issue Manager on the right.
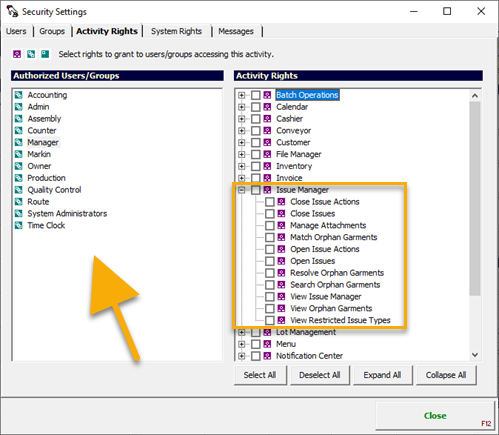
Close Issue Actions: This will allow the user to complete actions in Issue Manager > History/Actions
Close Issues: This will allow an issue resolution to be set.
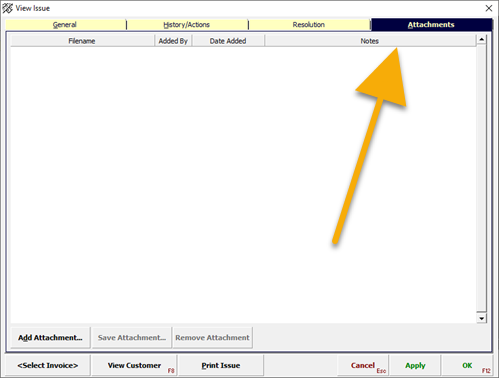
Manage Attachments: This allows the user to manage the attachment tab.
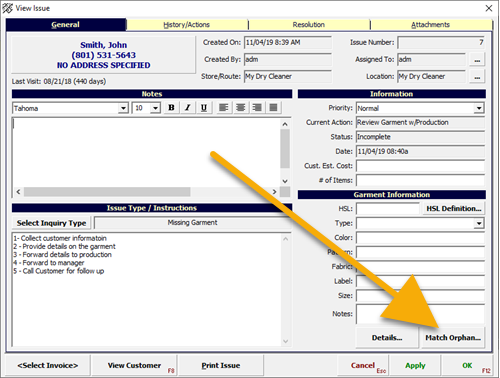
Match Orphan Garments: This will allow use of the Issue Manager > (Issue) > General > Match Orphan garment
Open Issue Actions: This will allow the user to use the open action button, essentially opening an action for notes and completion.
Resolve Orphan Garments: This allows saving of an Orphan Garments. Search > Garments > Orphan > Add/Edit Garment
Search Orphan Garments: This allows lookup of Orphan Garments. Search > Garments > Orphan
View Issue Manager: This allows access to Issue Manager.
View Orphan Garments: This allows access to view individual Orphan Garment descriptions.
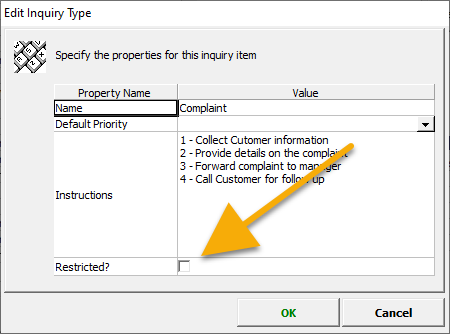
View Restricted Issue Types: This allows view of restricted issue types: These are set at Setup > Program Configuration > Company > Issue Manager > Edit > Type > View/Add
Setup
Import
Use this file to import default settings for your Issue Manager setup. It is suggested you Replace your current settings with these defaults. If you choose to replace your settings, current configuration settings will be lost.
Once you have the file saved. Navigate to:
Setup > Program Configuration > Company Settings > Issue Manager Settings > Edit > Import/Export
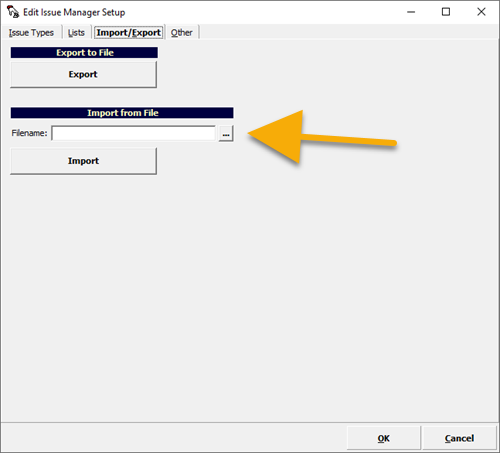
Select the three dots… and choose the file path where the defaults VTX file was downloaded. Then select Import.
.png "image(152).png")
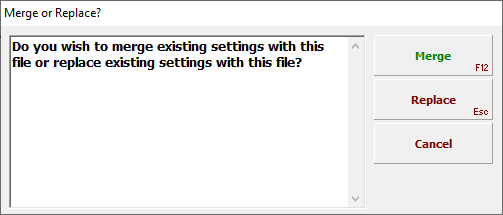
Select either Merge, to merge with current setup or select Replace, to overwrite what you already have.
WARNING! Importing can only be reversed by manually removing the entries.
.png "image(153).png")
You should now see the results of your import!
Settings
It is recommended to start with the defaults provided by the import, however, you can tweak what is provided by default or create your own set of settings.
Setup > Program Configuration > Company Settings > Issue Manager Settings > Edit > Issue Types
Issue Types / Inquiry Types
.png "image(104).png")
This section is devoted to the options you are able to select when generating a new issue, more specifically, the Issue Type/ Instructions section of a new issue.

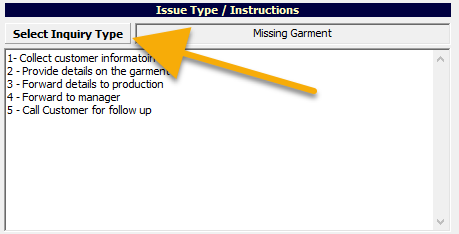
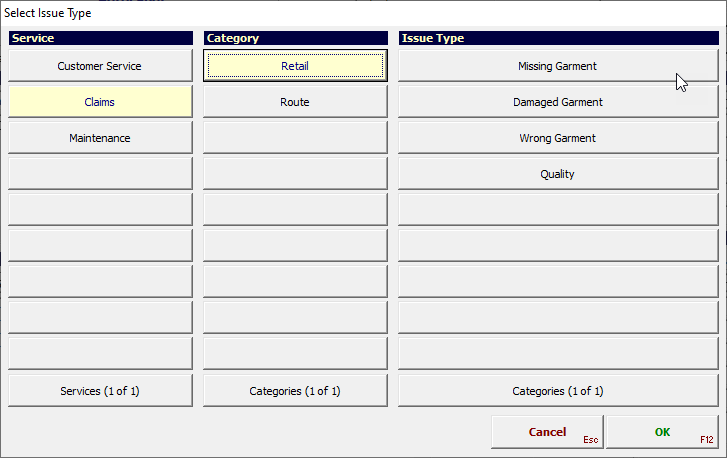
During issue creation, when using the Select Inquiry Type button you are presented with a tree structure.
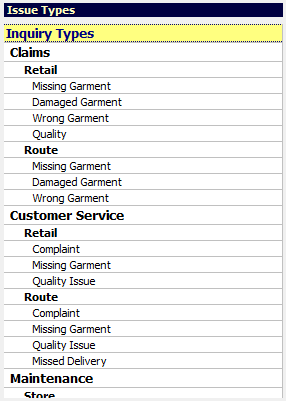
This is a direct reflection of Issue Types section of the Issue Manager Setup.
There are three levels available to organize your process.
Service: This is the top level and the first choice in the tree.
Category: This is the second level in the hierarchy.
Type: This is the final selector of the hierarchy.
Tip: Changing the order of the list in the issue manager configuration WILL impact placement in the tree during selection.
Issue Actions
This is a collection of actions that may be performed on any issue. This is a general list and will be used at the Type level via the Action Sequence to customize the required steps to complete an issue.
.png "image(105).png")
Each action has properties that you can change, you can view this by either choosing Add Action or View Action.
Initial Status: This will allow you to choose from a dynamic lists that you can modify. This is reflected in the action history.
Notify Customer: This setting is not currently used.
Notify Manager: This will be reflected in the action details once applied to an issue.
Days to Complete: This is the amount of time given to complete the action.
Instructions: Use this field to describe in detail what should be done to satisfy this action.
Action Sequence
Action sequences are based on a Type selected. Each Type will have its own unique action sequence associated that will give directions to the CSR, manager, or owner to the proper resolution and tracking of the issue.
.png "image(106).png")
To populate the action sequence, you will need to click and drag Issue Actions from the box above.
Lists
List are used in many places with issue manager. To access these lists you will need to navigate to:
Setup > Program Configuration > Company > Issue Manager > Edit > Lists
There are many lists that you are able to edit in this location, however we will only be looking at those that commonly interact with Issue Manager itself.
.png "image(107).png")
Action Status Types
.png "image(108).png")
The items in this list will be presented in your Action Status Type drop down when you add or edit an Action Status.
Customer Satisfaction
This list will be represented in:
Issue Manager > (Issue) > Resolution > Customer Satisfaction
Inquiry Priorities
.png "image(109).png")
This list is represented in:
Issue Manager > (Issue) > General > Information >Priority
Resolution Types
This list is represented in:
Issue Manager > (Issue) > Resolution > Resolution
Responsibility Types
.png "image(110).png")
This list is represented in:
Issue Manager > (Issue) > Resolution > Party Responsible
Usage
Create Issues (General)
To first generate an issue, navigate to:
Menu > Store Management > Issue Manager - New
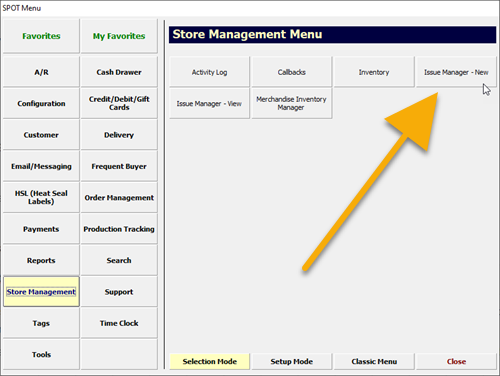
- OR -
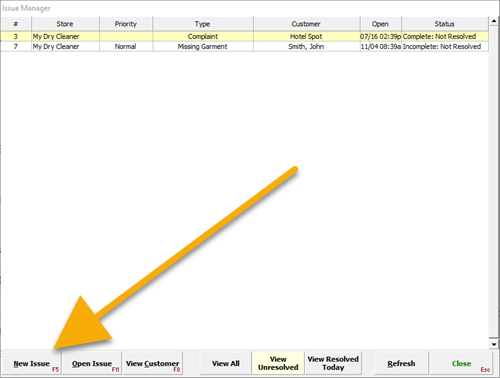
Use the Issue Manager button on the home page, then select New Issue.
Next, select your customer from the Customer Search screen.
Once you have a customer selected, you will be taken to the General tab of the issue.
It is recommended to first select your Inquiry Type as this will populate with preset defaults. After selecting your Type, fill in the remaining information as it pertains to the issue.
Select Apply.
This issue will now be visible to the user or user group it is assigned to.
History/Actions
Once an issue has been created, the assigned user(s) will be able to access it.
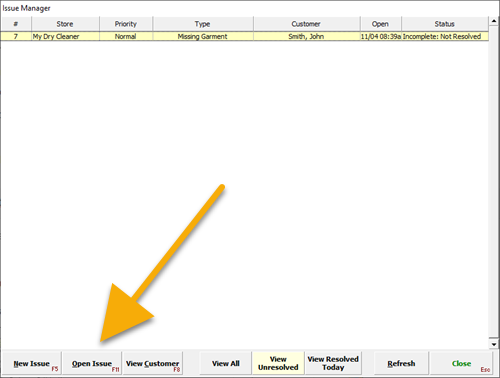
From the Issue Manager screen select your issue, then select Open Issue.
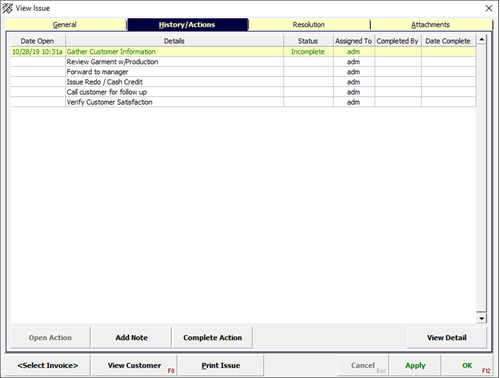
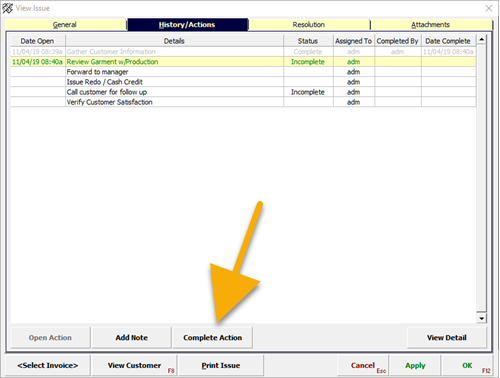
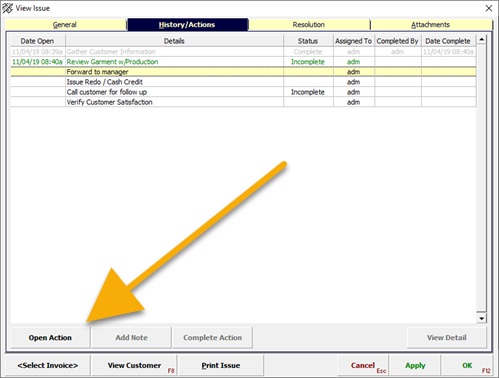
Select the History / Actions tab, this will display all defined actions required to complete the issue.

Each action has three simple interaction:
Open Action: This will set the status of an action to incomplete.
Add notes: This is a simple note popup that will display under the action.
Complete action: This will set the status to complete, once this is selected, you are not able to change anything about that action.
Once an issue has been open, you will be able to select View Detail.
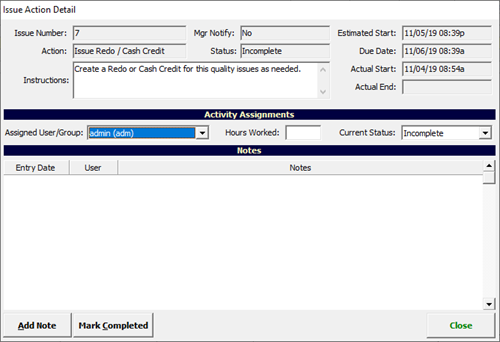
This window will allow you to change particular information about the action. You can change:
Assigned user
Hours Worked
Current Status
You will also be able to add a note, this functions the same as the History/Actions Add Notes button.
And finally, you are able to mark an action complete from this window.
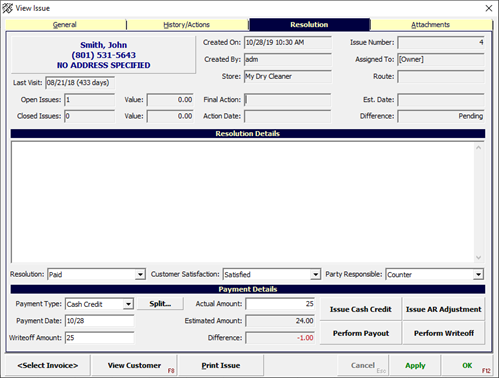
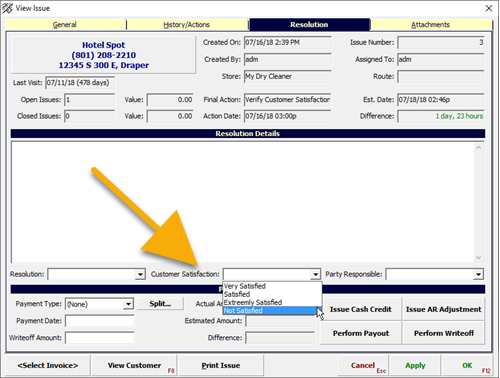
Resolution
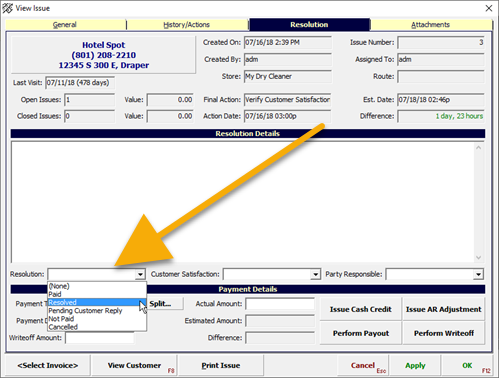
Once you have completed all of the actions in the issue and taken notes as required, navigate to the Resolution tab.
Set a resolution, apply any payments, and/or notes. Then press the OK to complete the issue.
Options
Resolution Details: Free form text to enable any final notes and comments about the issue.
Resolution: None, Resolved or Waiting on Customer Reply are your options by default. Using the Resolved option you will close the entire issue.
Customer Satisfaction: Use this field to record the customer’s feelings toward the final resolution of the issue. This is a good reporting tool to see how you are resolving issues in the customer’s eyes. This is not a required field to complete the process.
Party Responsible: This will allow you to place responsibility to a group or department in your company. This field is used in reporting and analysis of who is responsible for issues.
Issue Cash Credit: Short cut to issue customer cash credits from this screen. If used from this screen the payment type, date and amount will be automatically updated.
Issue A/R Adjustment: Short cut to issue customer A/R adjustment from this screen. If used from this screen the payment type, date and amount will be automatically updated.
Perform Payout: Short cut to issue a customer Payout from this screen. If used from this screen the payment type, date and amount will be automatically updated.
Perform Write-off: Short cut to write off the invoice amount from this screen. You must have attached an order to this issue in order for this option to be used. If used from this screen the payment type, date and amount will be automatically updated.