SPOT has unique and powerful tools designed specifically to help you manage your hotel accounts with ease.
Setup
Create a Hotel
Setup > Program Configuration > Store > Hotel Settings
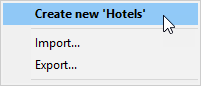
Right-click on 'Hotels' then select 'Create new 'Hotel' '.

Fill in the properties for this hotel including price table, the billing group, etc. Tip: Each hotel can have it own invoice template, which is defined here.
Create a Division
Divisions make up subcategories in hotels to manage and organize customers and employees. Each hotel must have at least one division created in order to function properly. It is recommended to have at least two divisions: ‘Employee’ and ‘Guest’, for instance. Many dry cleaners also create divisions such as ‘Managers’ and ‘Comp’.
Setup > Program Configuration > Store > Hotel Settings
Click on the (+) sign to expand the hotel.
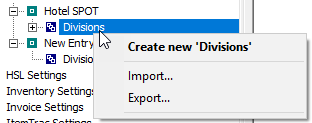
Right click on Divisions then select 'Create new 'Division' '.
Fill in the properties for each division with name, abbreviation, primary discount percentage, and secondary discount percentage, if applicable.
Create A/R Billing Groups
It is important to set up a billing group specifically for your hotels to manage your A/R properly.
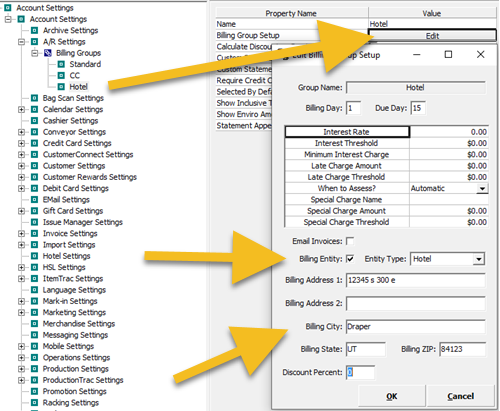
Setup > Program Configuration > Company > A/R Settings > Billing Groups
Right click on Billing Groups and create a new billing group.
Call it 'Hotel' (for example).
Click on Hotel and choose Edit.
Fill in the Billing Day, Due Day, Interest, etc.
Put check mark in Billing Entity > then select Hotel as Entity Type.
Fill in your billing address for the hotel. This will be used for statement purposes.
Click OK.
Create a Hotel Customer
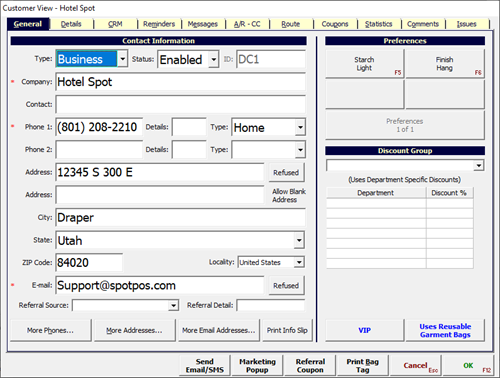
Create a Master Account
A hotel master account must be created first in order for a hotel to function. The master account should contain the proper address and contact information for the hotel account.
Tip: Invoices will NOT be marked in under this account. It is maintained for organizational and management purposes.
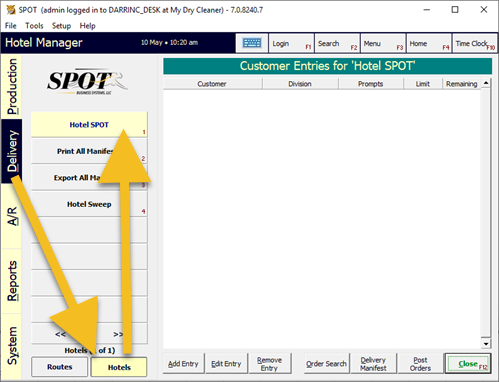
From the home page choose the Delivery tab on the left side, then select the Hotel button at the bottom, then select the appropriate hotel from the list.
Choose Add Entry at bottom. This will bring you to the customer lookup screen.
Select Add a new customer. Tip: It is recommended to start with a brand new customer. However, if you intend to use an existing customer, be sure to close out any A/R account items before completing this step.
Type: Business. ('Hotel' type does exist - however, it was intended for a legacy setup method.)
Phone, Address, etc.
Click OK to save customer.
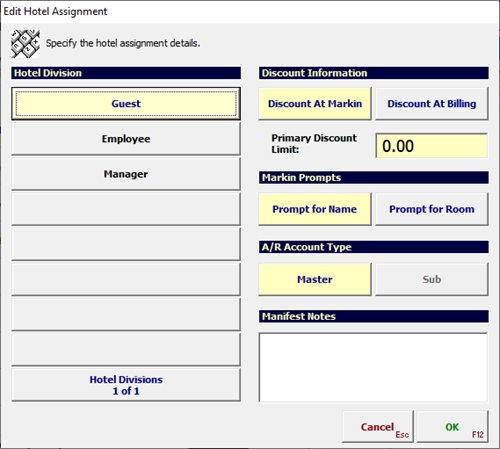
Hotel Division: Select any division.
Discount Information: Discount at Mark-in OR Billing, depending on how you are running your operation.
Discount At Mark-in will apply the discount as you mark the order in, resulting in an invoice showing the discount applied.
Discount At Billing will not show the discount on the invoice - instead, the discount will be applied during the billing process.
Mark-in Prompts: Both disabled.
A/R Account Type: Master.
Once you have made all your selections, select 'OK'.
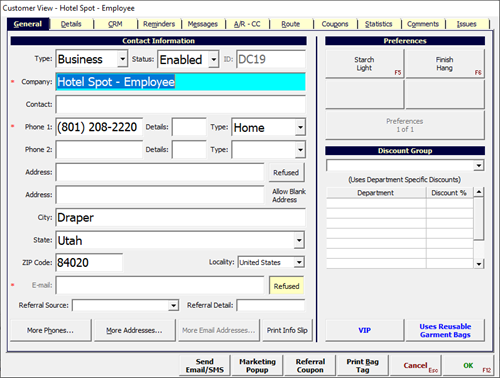
Create a Sub Account
A sub account will be associated with invoices for its parent hotel. These accounts can range from customers to employees.
From the home page choose the Delivery tab on the left side, then select the Hotel button at the bottom, then select the appropriate hotel from the list.
Choose Add Entry at bottom. This will bring you to the customer lookup screen.
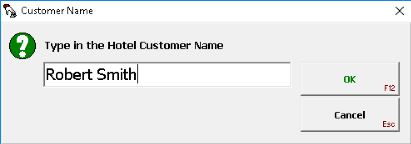
Select add a new customer. Tip: It is recommended that you create a single 'SPOT' customer for all hotel customers and/or all hotel employees, assigning the actual name during mark-in. See the image below.
Type: Business
Phone, Address, etc.
Click OK to save customer.
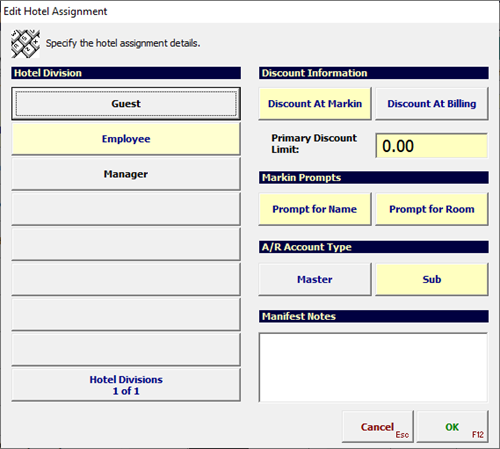
Hotel Division: Select the appropriate division.
Discount Information: Discount at Mark-in OR Billing depending on how you are running your operation.
Discount At Mark-in will apply the discount as you mark the order in, resulting in an invoice showing the discount applied.
This would be used in cases when the hotel is providing the direct service cost to its customer.
Discount At Billing will not show the discount on the invoice - instead, the discount will appear on the Hotel Statement.
This effectively allows the Hotel to charge its own fee for providing the service to its customers.
Mark-in Prompts: Select if you would like the system to prompt for a room and/or customer name at mark-in.
A/R Account Type: Sub.
Once you have made all your selections, select 'OK'.
Usage
Hotel Overview
Once you have created your hotel, it is time to utilize it.
Create Hotel Invoice
Select 'Detail' or press 2 on the keyboard. Search for the account name that you intend to use. As a reminder, you are not able to use the hotel master account to mark-in as it is intended to only manage the entirety of the hotel.
Mark the order in as normal.
When you select finish, you will receive a prompt asking for the Guest’s name and/or room number if selected at the division.
Run Hotel Manifest
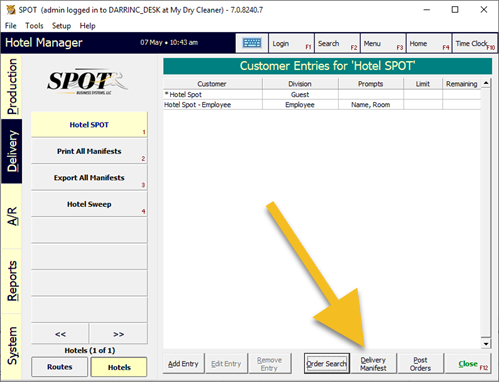
From the Home Page choose the Delivery tab on the left side. Select the hotel button at the bottom, then select the appropriate hotel from the list.
Select the Delivery Manifest button at the bottom.
Select the appropriate date for delivery.
You have now created the delivery manifest with all orders grouped by Hotel Division.
Post Hotel Orders
Once an Invoice has appeared on a hotel manifest, you can post it using the Post Orders button in the hotel delivery screen.
From the Home Page choose the Delivery tab on the left side. Select the hotel button at the bottom, then select the appropriate hotel from the list.
Select Post Orders button.
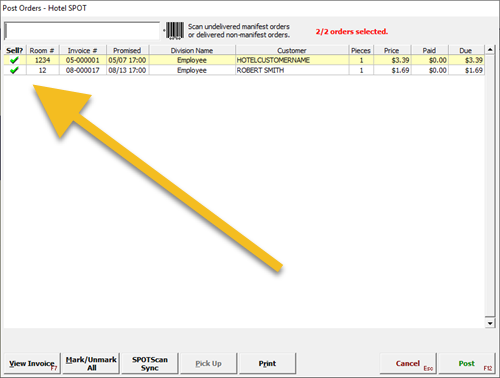
All orders will have a green check mark next to them. (This will post all orders at once. For any order you do not wish to post at this time, simply remove the check mark.)
Select the 'Post' button. You will receive a confirmation with information on how many invoices will post. If everything looks correct, select yes.
Tip: The Hotel Sweep button is a tool for making sure that no orders are accidentally left as uncharged to the hotel account. We recommend that you run the Hotel Sweep function before running your statements.
Common Settings
Store
Setup > Program Configuration > Store > Hotel Settings
Statement Appearance: This allows you to change the statement to have the “Invoice” layout. This will put the word “Invoice” at the top and serialize the statements in the top right.
Show Item info: This will put individual item info on the statement.
Show Only Ready Orders on Manifest: When running the hotel manifest, this will only include ready orders.