This article describes how to set up cash drawers. Select your cash drawer to continue:
Epson Driver Cash Drawer
Go to Program Configuration > Workstation > Hardware Settings > Printers > Epson > Windows Printer Path
Right-click on the text box next to the 'Windows Printer Path' and select the CashDrawer driver.
Once the cash drawer path has been selected, copy the full path displayed. Change the path back to the Epson printer path after performing this step, or the invoice printing will be negatively impacted.
Go to Program Configuration > Workstation > Hardware Settings > Cash Drawers
Add a new cash drawer or use the existing one.
Configure the cash drawer with the settings below:
Name: Choose the desired name. Examples: "CD1" or "CashDrawer1"
Cash Drawer Type: Epson Driver
Port: Paste the Windows Printer path copied on Step 2
ASCII Codes to Open: A Single blank space
Times to Send Code: 1
Save, then test by performing a check-in or a check-out via the System menu on the homepage of SPOT.
Parallel Cash Drawer
Go to Program Configuration > Workstation > Hardware Settings > Cash Drawers
Add a new cash drawer or use the existing one.
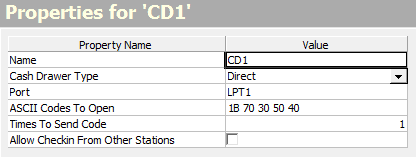
Configure the cash drawer with the below:
Name: Choose the desired name. Examples: "CD1" or "CashDrawer1"
Cash Drawer Type: Direct
Port: LPT port that the cash drawer is connected with
ASCII Codes to Open: 1B 70 30 50 40
Times to Send Code: 1
Save, then test by performing a check-in or a check-out via the System menu on the homepage of SPOT.
Serial Cash Drawer
Determine whether you want the cash drawer to open automatically or manually with a key. If you want the drawer to automatically open, a separate power cable is required.
Determine the cash drawer's port by completing the steps below:
Open Device Manager on the workstation
Expand the COM devices. If there are multiple ports, you can remove the drawer and plug it back in to see which port disappears the reappears.
Test the cash drawer's hardware by completing the steps below:
Press the Windows key and "R" at the same time to open the Run box.
Type in "cmd" and press enter to open the Command Prompt
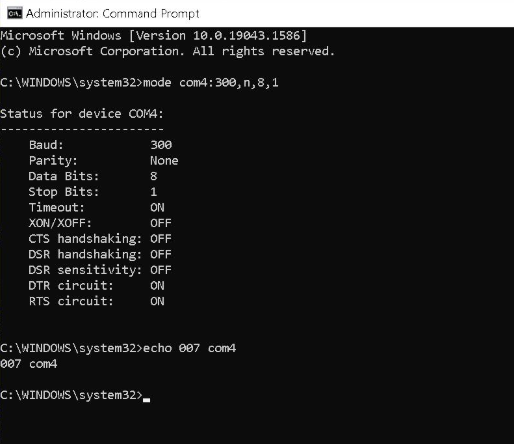
Type "mode com#:300,n,8,1" without the quotation marks and replace "#" with the port number found in step 2, then press Enter
Type "echo 007 com#" without the quotation marks and replace "#" with the port number found in step 2, then press Enter . The cash drawer should open. If not, the cash drawer's hardware is non-functional.
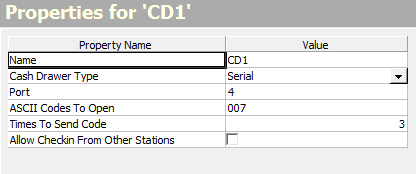
Configure the Cash Drawer with the settings below:
Name: Choose the desired name. Examples: "CD1" or "CashDrawer1"
Cash Drawer Type: Serial
Port: The port that we determined for the cash drawer in Step 2
ASCII Codes To Open: 007 or G
Times To Send Code: 3. If the COM port is at a 9600 baud, the times to send should be between 10 and 25
USB Cash Drawer
Device Manager
Open Device Manager on their Windows device
Expand "Human Interface Devices"
Right-click "HID-complaint vendor-defined device"
Go to Properties > Details > Property > Hardware lds
The last number in the PID is the port to use
.png "image(102).png")
Device and Printerns
Go to Program Configuration > Workstation > Hardware Settings > Cash Drawers
Add a new Cash Drawer or use the existing one.
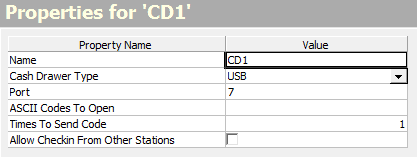
Configure the Cash Drawer with the settings below:
Name: Choose the desired name. Examples: "CD1" or "CashDrawer1"
Cash Drawer Type: USB
Port: The port that we determined for the Cash Drawer in Step 1
ASCII Codes To Open: Leave blank
Times To Send Code: 1
Setup the Cash Drawer to communicate with Citrix by completing the steps below:
Open SPOT
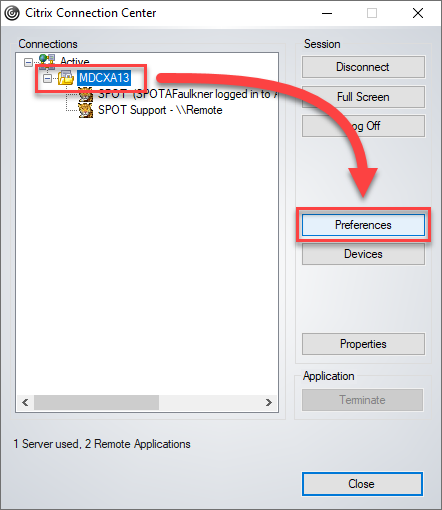
Right-click the Citrix icon in the system tray and click 'Connection Center'
Click the connected server and then select 'Preferences'
Click the Connections tab and check the two options listed under 'Generic USB Devices'
Save, then test by performing a check-in or a check-out via the System menu on the homepage of SPOT. If the drawer doesn't open or you receive an error, proceed based on the issue:
Incorrect Port: Determine the correct port.
Cash Drawer doesn't open: Confirm the cash drawer is properly