A/R (Accounts Receivable) is a function used in Spot for recurring customer billing.
Requirements
A/R is available to all Spot customers.
Overview
Key Terms
By default, the only thing required to activate A/R is to enable it at the customer level. However, please note that there are many settings that need to be reviewed in order for A/R to serve your specific needs. Along with understanding your settings options, it is important to understand a few key terms:
Master Account: This can mean an individual customer responsible for their account balance only OR a customer responsible for both their own account and also all of the Sub Accounts under it.
Sub Account: A customer linked to a master account. Any balance accrued on a Sub Account is included in its Master Account's balance.
Statement: The bill that contains all valid charges accrued since the last statement date.
Usage
Running Statements
From the Spot home page, select the A/R tab.
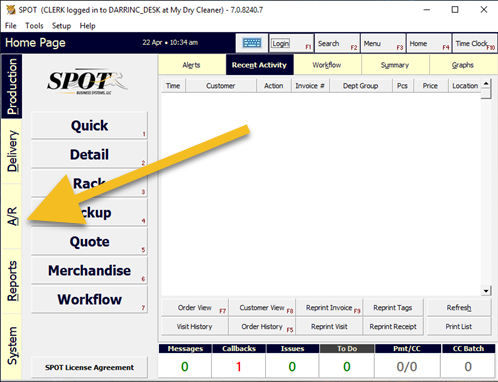
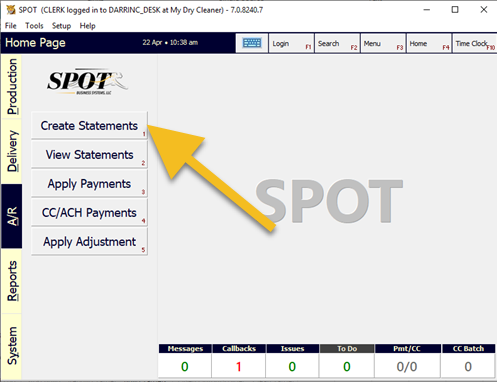
Select 'Create Statements' or press 1 on your keyboard.
Tip
Make sure you have the statement wizard enabled.
Setup > Program Configuration > Company > A/R Settings > Use Statement Wizard
.png)
Select 'Next'.
.png)
Select 'Standard' (unless you are running statements for your Hotel customers, in which case you should select 'Hotel').
.png)
Select the closing date that you want to use.
It is strongly recommended NOT picking a closing date in the future. This can cause a significant discrepancy in your statements.
The discrepancy comes from the gap of time not covered. Since a statement uses the last closing date as the starting date, any invoices marked in after the previous statement was actually created, but before the closing date, will not make it on to either statement. The future date option is only available for certain non-standard scenarios that wouldn't apply in most situations.
.png)
First, make sure to select the billing groups you want to create statements for by ensuring they have a green check mark.
Next, select either the default due dates set by the billing group or choose a manual date.
.png)
Select the customers that you wish to use for this statement run.
.png)
While you are able to process credit cards on file when generating statements, it is recommended that you wait until you are comfortable with generating statements to avoid billing errors.
Tip
It’s possible to process payments after the statements have been generated.
.png)
It is possible to run trial statements before actually generating them. This step is optional and does not affect the outcome of statement generation.
.png)
Select 'Create Statements', then 'Proceed' when you get the prompt.
.png)
Congratulations! You have now created your statements. Select 'Close' or press Escape on your keyboard.
A/R Payments
There are several ways to make A/R payments. In this guide we will be looking at the most common single and multiple customer payment methods.
.png)
From the Spot home page, select the A/R tab.
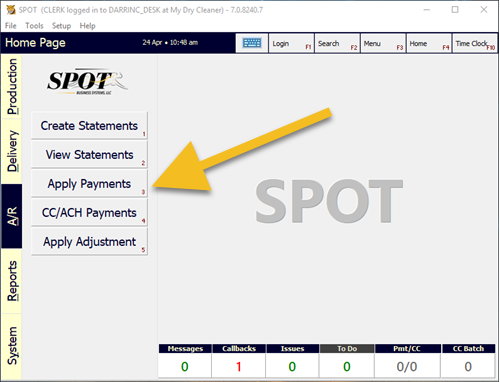
Select ‘Apply Payments’ or press 3 on your keyboard.
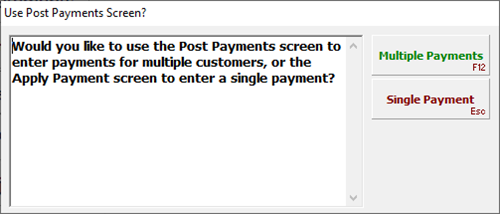
Select the corresponding drop-down.
Multiple Payments
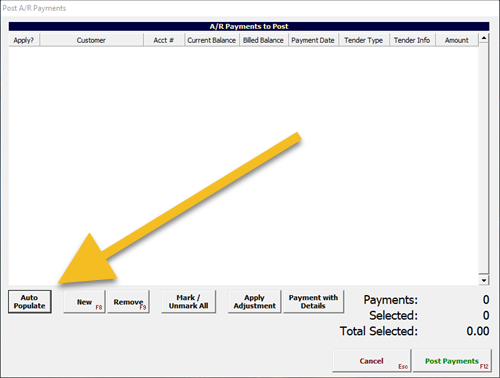
Select 'Auto Populate'.
Highlight the stores you want to include, then choose the payment date.
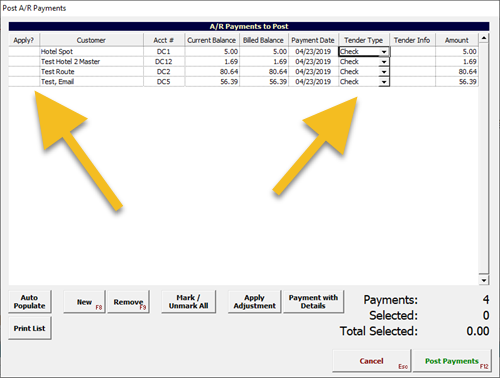
Once you have populated the list, you are able to select the customer accounts for applying payments.
Make sure that you have the correct tender type selected for each customer.

Use the New and Remove buttons to add or remove a single customer from the list.

With the Apply Adjustments button, you are able to add adjustments to an individual customer.

Payment with Details button will allow you to enter the single payment screen for the selected customer.

Once you have completed all of the changes, select the Post Payments button.
After a confirmation, you will have completed all your payments!
Single Payment
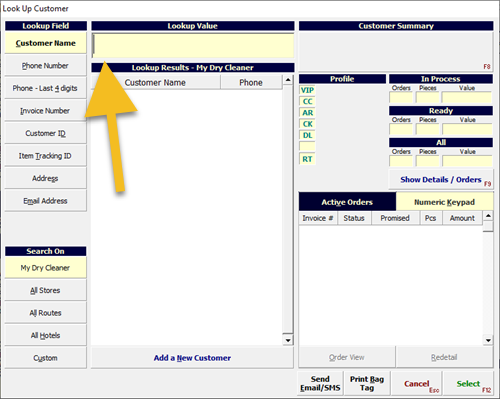
Under the 'Lookup Value', begin typing the last name of your customer or choose from one of the other 'Lookup Field' options on the left.
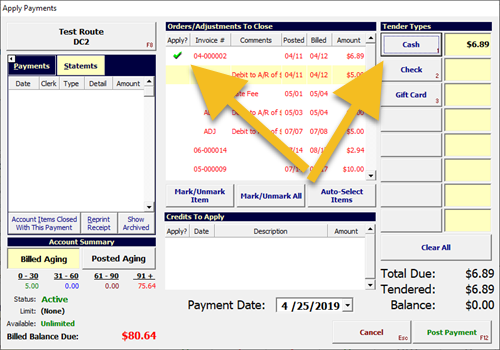
Select what invoices or adjustments you would like to be a part of the transaction. Once you are satisfied, select the tender type that you wish to use. Then use the 'Post Payment' button to apply the payment.
Tip
You’re not able to post a payment if the orders/adjustments exceed the tendered amount.
Congratulations! You have completed your A/R payment!
General A/R Settings
Company Settings
The following settings are most commonly used. It is highly recommended that you review these settings in order to streamline your A/R operations.
In the Spot application go to:
Setup > Program Configuration > Company > A/R Settings
PaymentTypesDisallowed: Identify which payment types (such as 'Cash', 'Check', or 'Credit Card') are NOT allowed for A/R Payments. This setting is enforced at all locations.
Print CC Receipt for A/R Payment: Select this to print a Credit Card Receipt when an A/R payment is made by credit card.
Statement Display mode: If set to "Detail", all activity (i.e., invoices and adjustments) for the master and/or sub accounts will be displayed on the statement. If set to "Summary", only one summary line will be displayed under the master/sub account name.
Use Statement Wizard:
Yes: The Statement Wizard will be invoked automatically when the Statements screen is entered. (Default)
No: The Statement Wizard will not be invoked automatically.
Company Settings (Billing Groups)
Billing groups give you the ability to assign a customer to a group for ease of statement generation, controlling cash flow, and categorizing Credit Card on File customers.
You may create as many billing groups as needed. If you run Routes and/or hotels through A/R, it is recommended that you make at least one group for both (using billing group name: ‘Hotel’, ‘Route’, etc.) These billing groups allow you to control individual settings for each group.
Billing groups are found at Setup > Program Configuration > Company > A/R Settings > Billing Groups
Name – This is important for the clerks to easily identify customers who belong to a specific billing group.
Be aware that renaming a group will break its association with any customer that is currently using it. It is recommended to create a new group.
Require Credit card on file -
Yes: A customer must have a credit card on file to be assigned to this billing group.
No: No credit card on file is required for a customer to be assigned to this billing group. (Default)
Statement Appearance -
Statement: Uses terms "Billing" and "Closing Date". Shows previous balance and payments taken since last statement.
Invoice: Uses terms "Invoice" and "Invoice Date". Has sequential serial number (this number is not for reference in Spot); has no previous balance or payment information.
Store Settings
Setup > Program Configuration > Store > A/R Settings
Default A/R-CC precedence: Determines the default "Payment Precedence" setting that will be used when new customers are added. The setting determines how the A/R account and the credit card on file (CCOF) settings interact if both are present in the customer record.
Default Billing Group: Sets the default group for this store when creating a new customer.
Default Print Statement: Set this to ‘Yes’.
Default Statement Destination: Set this to Email (.PDF).
Store Settings (Template)
Setup > Program Configuration > Store > Report/Printing Settings
Custom Statement File: Spot has a few basic statement files.
The most common three are as follows:
Statement.rpt: This will be used if nothing is populated in the field. This template is only used with the pre-printed statement paper (contains a barcode). Contact our Sales department at 801.208.2212 for purchasing this paper.
Statement3.rpt: This is the most popular layout.
Statement5.rpt: This is a good alternative to Statement3.
Custom Statement File (E-mail): This settings allows you to use a different template when sending the customer a statement in the PDF format via email.
When emailing in PDF, there cannot be a barcode on the statement template as it will corrupt the file, making it unreadable.
Customer View Settings
.png)
A/R Settings
Account type:
Master: This account type can create statements and is responsible for all invoices created for it and any of its ‘Sub-Accounts’.
Sub-Account: This account may not create statements. A Master account must be selected.
Account Number: ’Copy_From ID’ should be used by default unless an external number is needed.
Billing Group: Assign the appropriate group.
Payment Precedence: Make sure this is correct. You can set the default at:
Setup > Program Configuration > Store > A/R > Default A/R-CC Precedence
Credit Card: Orders are normally charged to the Credit Card on File (CCOF). The account is only used for route customers if the CCOF is declined.
A/R (CC pays monthly balance): Orders are normally charged on account. The CCOF can be used to make payments on account, including using the "CCOF Payments" option. When using "CCOF Payments", the card will be charged for the total account balance.
A/R (CC pays overdue balance): Orders are normally charged on account. The CCOF can be used to make payments on account, including using the "CCOF Payments" option. When using "CCOF Payments", the card will be charged only for the portion of the account balance that is overdue.
Print/Send Statements: This should be checked.
Send Statement Method: This should be ‘E-mail (.PDF)’
Account Enabled: This should be checked.
If you want to disable a particular customer, you only have to uncheck this box to stop invoices from being posted to A/R.
Account Summary
Billed Aging: Represents the value of charges that have been billed to the customer via statement creation, minus what has been paid.
Posted Aging: Represents all invoices posted to A/R (Billed or not), minus what has been paid.
Understanding A/R Statement activity
To understand why an entry IS or IS NOT on your statement, there are a few things you should know.
The STARTING DATE of the statement will always be the closing date of the last statement. This means that if a statement has yet to be created, the first statement will include ALL activity that has taken place up to the closing date set.
The CLOSING DATE set during the statement creation will include all activity up to but NOT including the closing date. For instance, if the 1st of the month is always chosen as a closing date, all activity for the entire PRIOR month will appear on the statement.
Conditions for an invoice to show on a statement:
The invoice was SOLD to A/R BEFORE the closing date.
The invoice is not on any other statement.
The invoice must belong to the Master or a Sub Account.